How to: Create a Toolbar UI at Design Time
- 9 minutes to read
This topic shows how to create a Toolbar UI consisting of a main menu, toolbar and status bar with sample bar items from scratch.
The following tasks are demonstrated:
- Use the MainMenuControl, ToolBarControl and StatusBarControl to create three main toolbar types.
- Add regular buttons, an in-place editor and static item.
- Create a check button group (radio group).
- Customize the Quick bar with smart tags.
- Specify images for bar items with the DX Image Picker.
No business logic is implemented for bar items in this tutorial. Refer to the following example for information on how to implement business logic: How to: create a Bars UI using the MVVM design pattern.
Create a Project
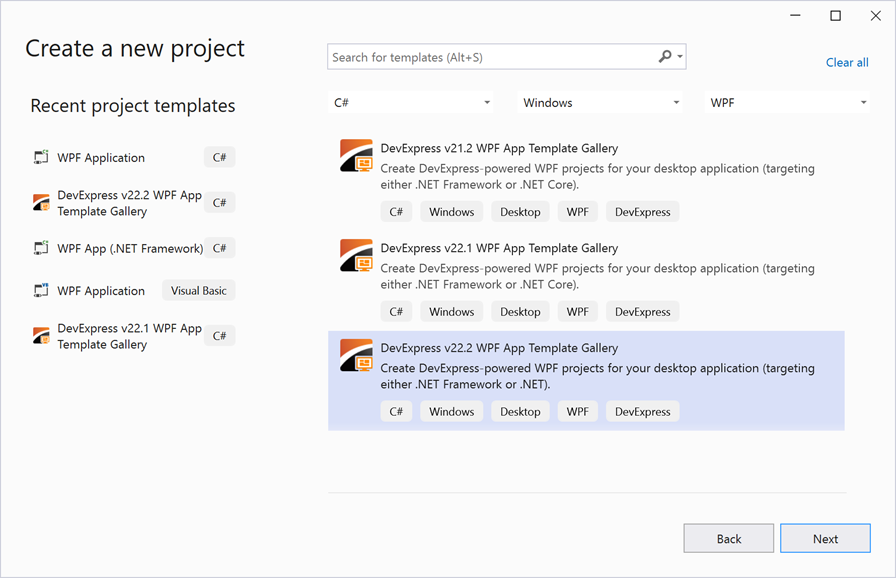
Create a new project. Choose the DevExpress v23.2 WPF App Template Gallery template.
Select the Blank Application template.
Use a NuGet Feed
If you add the DevExpress products via a NuGet feed instead of the Unified Component Installer, the DevExpress v23.2 WPF App Template Gallery template is not available to you. Use the WPF Application template to create a new project.

When the wizard prompts you for the target framework, select .NET 5.0.
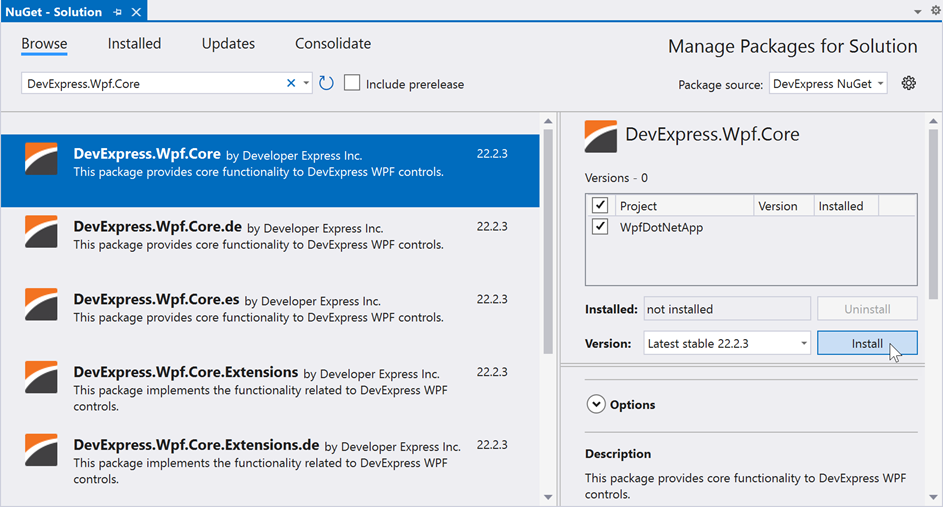
Go to Tools | NuGet Package Manager | Manage NuGet Packages for Solution.
In the “Browse” tab, search for the ‘DevExpress.Wpf.Core’ keyword and install the DevExpress.Wpf.Core package for the current project. Accept the license agreement.
Set Up the Theme and Layout of Controls
Reference the “Office 2013” theme assembly or the theme NuGet package in your project.

Open the MainWindow.xaml file in the Designer.
Select the Window in the Designer or in the Document Outline Window and invoke its Quick Actions. Select the “Office 2013” paint theme using the Application Theme setting.

The Window contains an empty Grid. Add three rows to the Grid.RowDefinitions collection, as follows. The top and bottom rows will accommodate toolbar controls created in this example.
<dx:ThemedWindow
    x:Class="CreateToolbarLayout.MainWindow"
    xmlns="http://schemas.microsoft.com/winfx/2006/xaml/presentation"
    xmlns:x="http://schemas.microsoft.com/winfx/2006/xaml"
    xmlns:dx="http://schemas.devexpress.com/winfx/2008/xaml/core"
    Title="MainWindow" Height="350" Width="525">
    <Grid>
        <Grid.RowDefinitions>
            <RowDefinition Height="Auto" />
            <RowDefinition Height="*"/>
            <RowDefinition Height="Auto"/>
        </Grid.RowDefinitions>
    </Grid>
</dx:ThemedWindow>
Add a Main Menu and a Toolbar
Drop the MainMenuControl to the Window. Alignment and size constraints may be set for the created main menu. In this case, remove these settings from XAML. You should have the following code, as a result:
<Grid>
    <Grid.RowDefinitions>
        <RowDefinition Height="Auto" />
        <RowDefinition Height="*"/>
        <RowDefinition Height="Auto"/>
    </Grid.RowDefinitions>
    <dxb:MainMenuControl/>
</Grid>
Tip
If you add the DevExpress products via a NuGet feed instead of the Unified Component Installer, the toolbox doesn’t contain DevExpress controls until you add the corresponding NuGet package.
The DevExpress.Wpf.Core NuGet package includes the DevExpress Bars suite.
Drop the ToolBarControl to the Window. Remove the alignment settings that are set for it, if any.
<dxb:MainMenuControl/>
<dxb:ToolBarControl/>
Currently, the created toolbar may visually overlap the main menu. This can be fixed as follows.
In XAML, wrap the created main menu and toolbar in a BarContainerControl. Set the Grid.Row property to 0 for this Bar Container.
<Grid>
    <Grid.RowDefinitions>
        <RowDefinition Height="Auto" />
        <RowDefinition Height="*"/>
        <RowDefinition Height="Auto"/>
    </Grid.RowDefinitions>
    <dxb:BarContainerControl Grid.Row="0">
        <dxb:MainMenuControl/>
        <dxb:ToolBarControl/>
    </dxb:BarContainerControl>
</Grid>
The Bar Container arranges its child bars next to each other, without an overlap. A ToolBarControl placed inside a Bar Container can be dragged and float at runtime.

Tip
You can add a BarContainerControl from the Toolbox first, and then add toolbars to it.
Add a Sub Menu to the Main Menu
Select the main menu bar and invoke its Quick Actions. Select BarSubItem in the dropdown list next to the Add BarItem item and click the item.
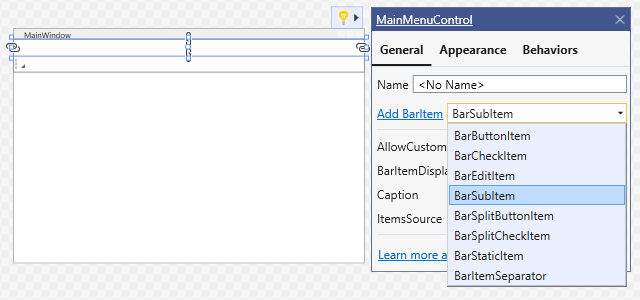
This adds a BarSubItem object to the main menu.

<dxb:MainMenuControl>
    <dxb:BarSubItem Content="BarSubItem"/>
</dxb:MainMenuControl>
Customize the Sub Menu
Select the BarSubItem and invoke its Quick Actions.

In the invoked popup pane, set the Content property to “File”. Then, add two buttons to this sub menu by clicking the Add BarItem item twice. This generates the following XAML.
<dxb:MainMenuControl>
    <dxb:BarSubItem Content="File">
        <dxb:BarButtonItem Content="BarButtonItem"/>
        <dxb:BarButtonItem Content="BarButtonItem"/>
    </dxb:BarSubItem>
</dxb:MainMenuControl>
A sub menu’s child buttons are not visible at design time, and thus they cannot be selected on the design surface. However, these buttons still provide Quick Actions, which are displayed on the design surface when you select a corresponding object in XAML or in the Document Outline Window.
Invoke the Quick Actions for the first BarButtonItem object. Set Content to “Open” and click the ellipses button (…) for the Glyph property.

This opens the DX Image Picker, where you can locate an appropriate image for the button from among predefined images. If prompted, add the DevExpress.Images.v23.2 assembly reference.

Select an image for the button and click OK.
In the same manner, specify the new content (“Close”) and glyph for the second button. You will have the following XAML as a result.
<dxb:MainMenuControl>
    <dxb:BarSubItem Content="File">
        <dxb:BarButtonItem Content="Open" Glyph="{dx:DXImage SvgImages/Outlook Inspired/Open.svg}"/>
        <dxb:BarButtonItem Content="Close" Glyph="{dx:DXImage SvgImages/Outlook Inspired/Close.svg}"/>
    </dxb:BarSubItem>
</dxb:MainMenuControl>
If you run the application now, you will be able to see the created Open and Close buttons residing in the File sub menu.

Note
To provide actions for buttons, you can handle the BarItem.ItemClick event or specify a command with the BarItem.Command property.
If buttons need to be identified, specify the x:Name properties for the objects.
Add a Check Button Group to the Toolbar
The check buttons (BarCheckItem) created in this section will be used to specify the text alignment (left-aligned, centered and right-aligned). When a single button is checked, the other two buttons should be unchecked. To accomplish this, the buttons need to be combined into the same group, using the BarCheckItem.GroupIndex property.
Invoke the Quick Actions for the ToolBarControl. Select the BarCheckItem in the dropdown menu next to the Add BarItem item. Add three bar check items.

<dxb:ToolBarControl>
    <dxb:BarCheckItem Content="BarCheckItem"/>
    <dxb:BarCheckItem Content="BarCheckItem"/>
    <dxb:BarCheckItem Content="BarCheckItem"/>
</dxb:ToolBarControl>

Invoke the Quick Actions for the first check button. Set the BarCheckItem.GroupIndex property to 1, and use the DevExpress Image Picker to set the button’s glyph.

In the same manner, set the BarCheckItem.GroupIndex property for the other two check buttons to 1. Specify images for them with the Glyph property. You will have the following XAML as a result.
<dxb:ToolBarControl>
    <dxb:BarCheckItem Content="BarCheckItem" GroupIndex="1" Glyph="{dx:DXImage SvgImages/Outlook Inspired/AlignLeft.svg}"/>
    <dxb:BarCheckItem Content="BarCheckItem" GroupIndex="1" Glyph="{dx:DXImage SvgImages/Outlook Inspired/AlignCenter.svg}"/>
    <dxb:BarCheckItem Content="BarCheckItem" GroupIndex="1" Glyph="{dx:DXImage SvgImages/Outlook Inspired/AlignRight.svg}"/>
</dxb:ToolBarControl>

Note
To provide actions for buttons, you can handle the BarCheckItem.CheckedChanged event or specify a command with the BarItem.Command property.
If buttons need to be identified, specify the x:Name properties for the objects.
Add an In-place Combobox Editor to the Toolbar
If you use Smart Tags instead of Quick Actions, follow the instructions below instead.
Select the toolbar in the designer and click its smart tag. In the popup pane, click the  button and select BarEditItem -> BarComboBoxEditItem.

Click the the Add BarComboBoxEditItem link to add a combobox in-place editor to the toolbar.

Invoke the smart tag for the created BarEditItem object. Set the Content property to “Font Size:” and the EditWidth property to 100.

In XAML, set the x:Name property for the BarEditItem object to “beiFontSize”. You may also want to provide lookup values for the combobox editor. This can be done as follows:
<dxb:BarEditItem x:Name="beiFontSize" Content="Font Size" EditWidth="100">
  <dxb:BarEditItem.EditSettings>
      <dxe:ComboBoxEditSettings>
          <dxe:ComboBoxEditSettings.Items>
              <dxe:ComboBoxEditItem Content="10"/>
              <dxe:ComboBoxEditItem Content="11"/>
              <dxe:ComboBoxEditItem Content="12"/>
          </dxe:ComboBoxEditSettings.Items>
      </dxe:ComboBoxEditSettings>
  </dxb:BarEditItem.EditSettings>
</dxb:BarEditItem>
Invoke the Quick Actions for the ToolBarControl and add a BarEditItem.

Select the BarEditItem and invoke its Quick Actions. Set the EditSettings property to ComboBoxEditSettings.

This creates a BarEditItem object in XAML.
<dxb:ToolBarControl>
    <dxb:BarCheckItem Content="BarCheckItem" GroupIndex="1" Glyph="{dx:DXImage SvgImages/Outlook Inspired/AlignLeft.svg}"/>
    <dxb:BarCheckItem Content="BarCheckItem" GroupIndex="1" Glyph="{dx:DXImage SvgImages/Outlook Inspired/AlignCenter.svg}"/>
    <dxb:BarCheckItem Content="BarCheckItem" GroupIndex="1" Glyph="{dx:DXImage SvgImages/Outlook Inspired/AlignRight.svg}"/>
    <dxb:BarEditItem Content="BarEditItem">
        <dxb:BarEditItem.EditSettings>
            <dxe:ComboBoxEditSettings/>
        </dxb:BarEditItem.EditSettings>
    </dxb:BarEditItem>
</dxb:ToolBarControl>
Invoke the Quick Actions for the created BarEditItem object. Set the Content property to “Font Size:” and the EditWidth property to 100.

In XAML, set the x:Name property for the BarEditItem object to “beiFontSize”. You may also want to provide lookup values for the combobox editor. This can be done as follows:
<dxb:BarEditItem x:Name="beiFontSize" Content="Font Size" EditWidth="100">
    <dxb:BarEditItem.EditSettings>
        <dxe:ComboBoxEditSettings>
            <dxe:ComboBoxEditSettings.Items>
                <dxe:ComboBoxEditItem Content="10"/>
                <dxe:ComboBoxEditItem Content="11"/>
                <dxe:ComboBoxEditItem Content="12"/>
            </dxe:ComboBoxEditSettings.Items>
        </dxe:ComboBoxEditSettings>
    </dxb:BarEditItem.EditSettings>
</dxb:BarEditItem>
Note
Lookup values for an in-place combobox editor can also be provided with the LookUpEditSettingsBase.ItemsSource inherited property.
To get the currently selected value in an in-place editor, or to set the in-place editor’s value, use the BarEditItem.EditValue property.
If you run the application now, you will be able to see the radio group in action and select values in the combo-box in-place editor.

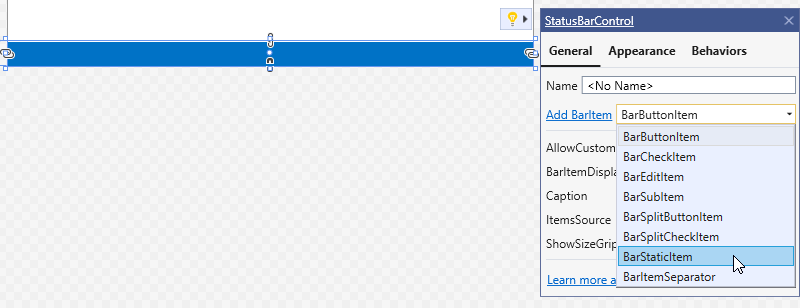
Add a Status Bar with a Static Item
Drop the StatusBarControl to the Window. Remove its size and alignment settings from XAML, if any. Set its Grid.Row property to 2. The status bar will be displayed at the bottom of the Window.

<dxb:BarContainerControl Grid.Row="0">
    <dxb:MainMenuControl .../>
    <dxb:ToolBarControl .../>
</dxb:BarContainerControl>

<dxb:StatusBarControl Grid.Row="2"/>
Select the status bar and use the Quick Actions to add a BarStaticItem.
<dxb:StatusBarControl Grid.Row="2">
    <dxb:BarStaticItem Content="BarStaticItem"/>
</dxb:StatusBarControl>
The created BarStaticItem object is intended to display the font size selected in the beiFontSize editor.
Invoke the Quick Actions for the BarStaticItem object. Click the rectangle button to the right of the Content property and select Create Data Binding.

In the invoked window, bind to the EditValue property of the beiFontSize object.

The following XAML code will be generated.
<dxb:StatusBarControl Grid.Row="2">
    <dxb:BarStaticItem Content="{Binding EditValue, ElementName=beiFontSize}"/>
</dxb:StatusBarControl>
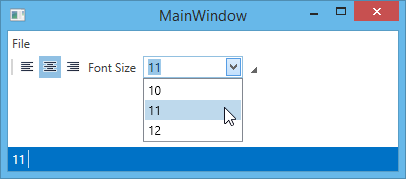
Run the application. Once you select a value in the combobox, it is reflected by a static item in the status bar.
Add a Theme Selector
Add another BarSubItem to the main menu bar. Select the BarSubItem and invoke its Quick Actions. Set the Content property to “Theme”. Switch to the Behaviors tab. Add the BarSubItemThemeSelectorBehavior. Set the ShowMode property to GroupedList.

The BarSubItemThemeSelectorBehavior automatically populates the associated BarSubItem with all available themes and allows you to choose a theme applied to your application in runtime.
Complete Code
<dx:ThemedWindow
    xmlns="http://schemas.microsoft.com/winfx/2006/xaml/presentation"
    xmlns:x="http://schemas.microsoft.com/winfx/2006/xaml"
    xmlns:dx="http://schemas.devexpress.com/winfx/2008/xaml/core" xmlns:dxb="http://schemas.devexpress.com/winfx/2008/xaml/bars"
    xmlns:dxe="http://schemas.devexpress.com/winfx/2008/xaml/editors"
    x:Class="CreateToolbarLayout.MainWindow"
    Title="MainWindow" Height="350" Width="525">
    <Grid>
        <Grid.RowDefinitions>
            <RowDefinition Height="Auto" />
            <RowDefinition Height="*"/>
            <RowDefinition Height="Auto"/>
        </Grid.RowDefinitions>

        <dxb:BarContainerControl Grid.Row="0">
            <dxb:MainMenuControl>
                <dxb:BarSubItem Content="File">
                    <dxb:BarButtonItem Content="Open" Glyph="{dx:DXImage SvgImages/Outlook Inspired/Open.svg}"/>
                    <dxb:BarButtonItem Content="Close" Glyph="{dx:DXImage SvgImages/Outlook Inspired/Close.svg}"/>
                </dxb:BarSubItem>
                <dxb:BarSubItem Content="Theme">
                    <dxmvvm:Interaction.Behaviors>
                        <dxb:BarSubItemThemeSelectorBehavior ShowMode="GroupedList"/>
                    </dxmvvm:Interaction.Behaviors>
                </dxb:BarSubItem>
            </dxb:MainMenuControl>
            <dxb:ToolBarControl>
                <dxb:BarCheckItem Content="BarCheckItem" GroupIndex="1" Glyph="{dx:DXImage SvgImages/Outlook Inspired/AlignLeft.svg}"/>
                <dxb:BarCheckItem Content="BarCheckItem" GroupIndex="1" Glyph="{dx:DXImage SvgImages/Outlook Inspired/AlignCenter.svg}"/>
                <dxb:BarCheckItem Content="BarCheckItem" GroupIndex="1" Glyph="{dx:DXImage SvgImages/Outlook Inspired/AlignRight.svg}"/>
                <dxb:BarEditItem x:Name="beiFontSize" Content="Font Size" EditWidth="100">
                    <dxb:BarEditItem.EditSettings>
                        <dxe:ComboBoxEditSettings>
                            <dxe:ComboBoxEditSettings.Items>
                                <dxe:ComboBoxEditItem Content="10"/>
                                <dxe:ComboBoxEditItem Content="11"/>
                                <dxe:ComboBoxEditItem Content="12"/>
                            </dxe:ComboBoxEditSettings.Items>
                        </dxe:ComboBoxEditSettings>
                    </dxb:BarEditItem.EditSettings>
                </dxb:BarEditItem>
            </dxb:ToolBarControl>
        </dxb:BarContainerControl>
        <dxb:StatusBarControl Grid.Row="2">
            <dxb:BarStaticItem Content="{Binding EditValue, ElementName=beiFontSize}"/>
        </dxb:StatusBarControl>
    </Grid>
</dx:ThemedWindow>