Starting Point
- 2 minutes to read
Let’s create an application that gathers user information and credentials using a custom registration form. This tutorial demonstrates how to create a registration form using DevExpress WPF Data Editors.
Concept
The registration form you are going to create is similar to the one Google provides for its mail service (see Google registration form).
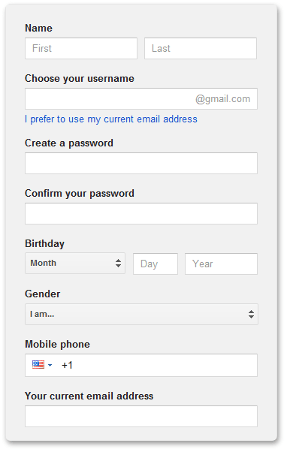
The resulting registration form will contain the following input boxes and visual elements:
- First Name
- Last Name
Email.
This editor formats its input in the following manner:
<sometext>@<sometext>.<sometext>.- Password
- Confirm password
- Birthday
- Gender. This editor accepts one of two values: Male, Female.
- “Register” button. This button invokes registration logic (it is disabled when a field is blank or input data is invalid).
Each input box requires user input. When a user clicks the Register button, the data is being validated and, if validation succeeds, a record is added to the database.
Starting Point
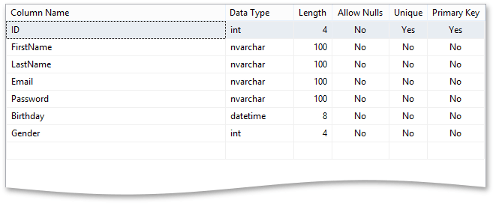
First you need to download the base project. The complete solution with source code is available in the DXEditorsTutorial example. This solution contains several projects - each one is the result of a lesson in the tutorial. The RegistrationForm.BaseProject project is the base solution you will be working on. This project contains three views: MainView, RegistrationView, and RecordsView. This tutorial will show you how to create the RegistrationView. The two other views are already prepared, so you can learn how they are designed. The base project also contains a database and a data model. The database has only one Employee table. Its table scheme is as follows.
Result
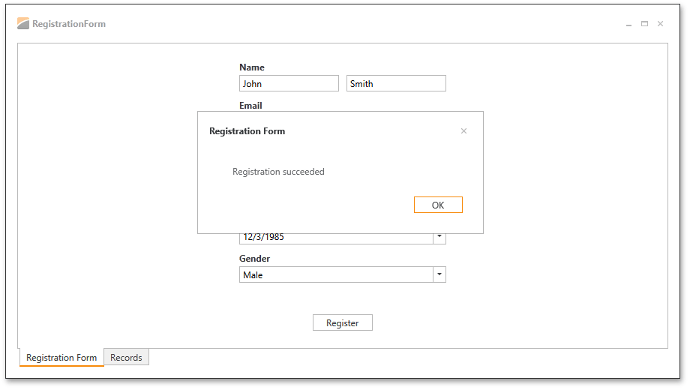
At the end of this tutorial, you will create a complete application which supports masked input and validation. The resulting application is shown in the screenshot below.