Lesson 4 - Use the DateNavigator Control (legacy)
- 3 minutes to read
Note
You are viewing documentation for the legacy WPF Scheduler control. If you’re starting a new project, we strongly recommend that you use a new control declared in the DevExpress.Xpf.Scheduling namespace. If you decide to upgrade an existing project in order to switch to the updated scheduler control, see the Migration Guidelines document.
This document describes how to add a DateNavigator control to an existing project. You can customize the behavior and appearance settings of the DateNavigator using its API.
Add the DateNavigator Control to an Existing Project
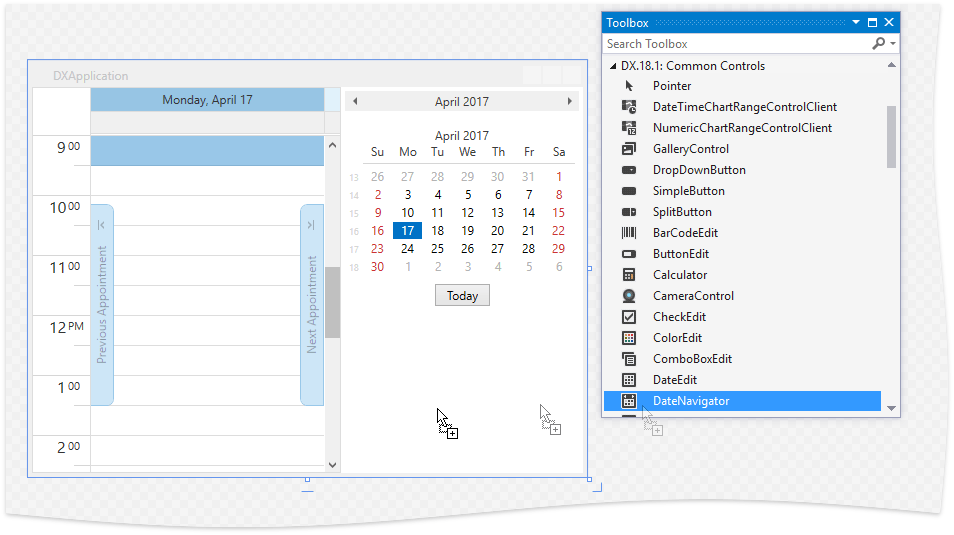
If the project already contains the SchedulerControl, drag the DateNavigator item from the DX.19.1.WPF: Common Controls toolbox tab.
Your XAML markup may look like the following snippet.
<Window x:Class="WpfApplication1.MainWindow"
        xmlns="http://schemas.microsoft.com/winfx/2006/xaml/presentation"
        xmlns:x="http://schemas.microsoft.com/winfx/2006/xaml"
        xmlns:dxe="http://schemas.devexpress.com/winfx/2008/xaml/editors"
        Title="MainWindow" Height="409" Width="676" >
    <Grid>
        <dxe:DateNavigator Name="dateNavigator1" VerticalAlignment="Stretch" />
    </Grid>
</Window>
You can also add a date navigator by adding this XAML to your code without dragging the DateNavigator control to the window. However, in this case, you need to manually add references to the DevExpress.Data.v19.1 and DevExpress.Xpf.Core.v19.1 libraries.
Bind the Date Navigator to a Scheduler Control
Use the SchedulerDateNavigatorStyleSettings.SchedulerControl property to specify the SchedulerControl object to which the DateNavigator control is bound.
<Window x:Class="WpfApplication1.MainWindow"
        xmlns="http://schemas.microsoft.com/winfx/2006/xaml/presentation"
        xmlns:x="http://schemas.microsoft.com/winfx/2006/xaml"
        xmlns:dxsch="http://schemas.devexpress.com/winfx/2008/xaml/scheduler"
        xmlns:dxe="http://schemas.devexpress.com/winfx/2008/xaml/editors"
        Title="MainWindow" Height="409" Width="676" >
    <Grid>
        <Grid.ColumnDefinitions>
            <ColumnDefinition Width="Auto"/>
            <ColumnDefinition Width="*" />
        </Grid.ColumnDefinitions>

        <dxe:DateNavigator Name="dateNavigator1"
                           VerticalAlignment="Stretch">
            <dxe:DateNavigator.StyleSettings>
                <dxsch:SchedulerDateNavigatorStyleSettings
                    SchedulerControl="{Binding ElementName=schedulerControl1}"/>
            </dxe:DateNavigator.StyleSettings>
        </dxe:DateNavigator>

        <dxsch:SchedulerControl Name="schedulerControl1"
                                HorizontalAlignment="Stretch" VerticalAlignment="Stretch"
                                Grid.Column="1" >
        </dxsch:SchedulerControl>
    </Grid>
</Window>
As a result, end-users can select a specific date, several non-adjacent dates (by holding the Ctrl key), a continuous range of dates, a single week, or multiple weeks within a scheduler by clicking and dragging within the date navigator. If the selected range is less than a week, or composed of non-adjacent dates, the scheduler displays it in the Day View. If the selected continuous range comprises a week or more, the scheduler switches to the Month (Multi-Week) View.
Specify Date Navigator Settings
The DateNavigator class provides a number of members allowing you to specify the behavior and appearance of the date navigator.
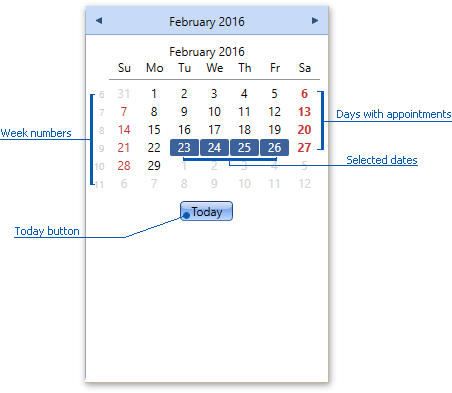
- Set the DateNavigator.HighlightSpecialDates property to true to highlight dates with appointments in bold font.
- Set the DateNavigator.ShowTodayButton property to true to show the Today button.
- Set the DateNavigator.ShowWeekNumbers property to true to display week numbers.
- Set the DateNavigator.FirstDayOfWeek property to Sunday to specify that the week starts on Sunday.
- Set the DateNavigator.IsMultiSelect property to true to allow end-users to select multiple dates.
<dxe:DateNavigator Name="dateNavigator1"
                   VerticalAlignment="Stretch"
                   HighlightSpecialDates="True"
                   ShowTodayButton="True"
                   ShowWeekNumbers="True"
                   FirstDayOfWeek="Sunday"
                   IsMultiSelect="True">
    <!--...-->
</dxe:DateNavigator>