Lesson 7 - Create a Custom Edit Appointment Form Using the MVVM Pattern (legacy)
- 8 minutes to read
Note
You are viewing documentation for the legacy WPF Scheduler control. If you’re starting a new project, we strongly recommend that you use a new control declared in the DevExpress.Xpf.Scheduling namespace. If you decide to upgrade an existing project in order to switch to the updated scheduler control, see the Migration Guidelines document.
The following tutorial will guide you through the process of creating a custom appointment editing form for the SchedulerControl by using the Model-View-ViewModel (MVVM) design pattern, which allows you to provide a clean separation between the UI portion and logic portion of your application. The new MVVM-based mechanism for form display will help you customize different SchedulerControl dialogs in the most efficient manner. In particular, this example demonstrates how to substitute the standard Edit Appointment form with a custom one.
To simplify this example, the Appointment Recurrence feature is disabled in the application, so that end-users cannot create recurring appointments via the Appointment Recurrence dialog. However, you can extend the example by implementing the recurrence functionality, as described in the Create a Custom Appointment Recurrence Dialog Using the MVVM Pattern lesson of the current tutorial.
This tutorial includes the following sections.
- Create a New Project and Add a Scheduler Control
- Create a ViewModel with a Data Source
- Specify Mappings for Appointment and Resource Properties
- Create a Custom Edit Appointment Form
- Use a Data Template to Show the Custom Form
- Result
Create a New Project and Add a Scheduler Control
- Create a new WPF Application project, specify its name as MVVMShedulerApplication, and open the MainWindow.xaml file in the Designer.
- Drag the SchedulerControl item from the DX.19.1: Scheduling toolbox tab to the canvas. The SchedulerControl will be added to the design surface.
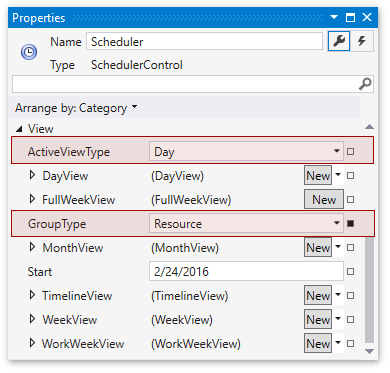
In the Properties tool window, change the name of the control to Scheduler, specify Day as the active view type and group the appointments by Resource.
Next, you will need to bind a scheduler to a data source and specify mappings for appointment and resource properties.
Create a ViewModel with a Data Source
- Add a new folder to your project. Right-click the project’s name (MVVMSchedulerApplication) in the Solution Explorer, and then select Add | New Folder. Change the folder name to ViewModel.
- Add a MainViewModel class. In the Solution Explorer, right-click the ViewModel folder, and then select Add | Class…. In the invoked Add New Item window, assign the MainViewModel name to the class.
Provide a data source for the Scheduler Control. In the MainViewModel class, create the Doctor and HospitalAppointment classes, whose instances will be used to represent the resource and appointment objects, respectively. Also, specify the generic Doctors and Appointments collections to which the Scheduler Storage will be bound.
Note
A complete sample project is available at https://github.com/DevExpress-Examples/how-to-create-a-custom-edit-appointment-form-using-the-mvvm-pattern-t103885.
Imports System Imports System.Collections.Generic Imports System.ComponentModel Partial Friend Class MainViewModel Public Property Doctors() As BindingList(Of Doctor) Public Property Appointments() As BindingList(Of HospitalAppointment) Public Sub New() Doctors = New BindingList(Of Doctor)() Appointments = New BindingList(Of HospitalAppointment)() FillEmployees() FillTasks() End Sub Public Class Doctor Public Property Id() As Object Public Property Name() As String End Class Public Class HospitalAppointment Public Property PatientName() As String Public Property Location() As String Public Property StartTime() As Date Public Property EndTime() As Date Public Property InsuranceNumber() As String Public Property FirstVisit() As Boolean Public Property DoctorId() As Object Public Property Notes() As String End Class End ClassSpecify the MainViewModel instance as the data context for data binding by assigning it to the FrameworkElement.DataContext property. As a result, your XAML may look like the following. (If it does not, you can overwrite your code with the code below.)
Tip
A complete sample project is available in the DevExpress Code Examples database at http://www.devexpress.com/example=T103885.
<Window x:Class="MVVMSchedulerApplication.MainWindow"
        xmlns="http://schemas.microsoft.com/winfx/2006/xaml/presentation"
        xmlns:x="http://schemas.microsoft.com/winfx/2006/xaml"
        xmlns:dxsch="http://schemas.devexpress.com/winfx/2008/xaml/scheduler"
        xmlns:dxe="http://schemas.devexpress.com/winfx/2008/xaml/editors"
        xmlns:viewmodel="clr-namespace:MVVMSchedulerApplication.ViewModel"
        xmlns:dx="http://schemas.devexpress.com/winfx/2008/xaml/core"
        xmlns:local="clr-namespace:MVVMSchedulerApplication"
        Title="MainWindow" Height="600" Width="850">
    <Window.DataContext>
        <viewmodel:MainViewModel/>
    </Window.DataContext>
    <Grid>
        <dxsch:SchedulerControl x:Name="Scheduler" ActiveViewType="Day" GroupType="Resource"/>
    </Grid>
</Window>
Specify Mappings for Appointment and Resource Properties
Specify standard mappings for appointment properties by setting the AppointmentStorage.Mappings property values. Also, add custom field mappings for the non-standard appointment fields such as InsuranceNumber, FirstVisit and Notes. To do this, configure the CustomFieldMappings property of the AppointmentStorage object. As a result, your XAML may look like the following.
Tip
A complete sample project is available in the DevExpress Code Examples database at http://www.devexpress.com/example=T103885.
<dxsch:SchedulerControl.Storage>
        <dxsch:SchedulerStorage>
            <dxsch:SchedulerStorage.AppointmentStorage>
                <dxsch:AppointmentStorage DataSource="{Binding Appointments}">
                    <dxsch:AppointmentStorage.Mappings>
                        <dxsch:AppointmentMapping
                        Subject="PatientName"
                        Location="Location"
                        Start="StartTime"
                        End="EndTime"
                        ResourceId="DoctorId"/>
                    </dxsch:AppointmentStorage.Mappings>
                    <dxsch:AppointmentStorage.CustomFieldMappings>
                        <dxsch:SchedulerCustomFieldMapping Member="InsuranceNumber" Name="InsuranceNumber"/>
                        <dxsch:SchedulerCustomFieldMapping Member="FirstVisit" Name="FirstVisit"/>
                        <dxsch:SchedulerCustomFieldMapping Member="Notes" Name="Notes"/>
                    </dxsch:AppointmentStorage.CustomFieldMappings>
                </dxsch:AppointmentStorage>
            </dxsch:SchedulerStorage.AppointmentStorage>
        </dxsch:SchedulerStorage>
</dxsch:SchedulerControl.Storage>
Specify mappings for resource properties by setting the ResourceStorage.Mappings property values, as shown in the XAML code below.
Tip
A complete sample project is available in the DevExpress Code Examples database at http://www.devexpress.com/example=T103885.
<dxsch:SchedulerStorage.ResourceStorage>
           <dxsch:ResourceStorage DataSource="{Binding Doctors}">
               <dxsch:ResourceStorage.Mappings>
                   <dxsch:ResourceMapping Id="Id" Caption="Name"/>
               </dxsch:ResourceStorage.Mappings>
           </dxsch:ResourceStorage>
</dxsch:SchedulerStorage.ResourceStorage>
Next, you will need to create a custom Edit Appointment form that allows editing of custom fields.
Create a Custom Edit Appointment Form
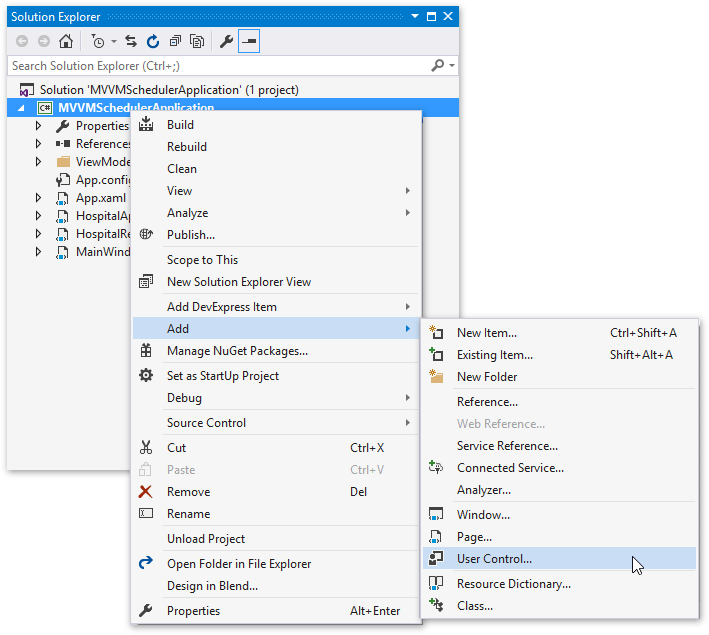
In the Solution Explorer, right-click the project’s name (MVVMSchedulerApplication) and select Add | User Control…
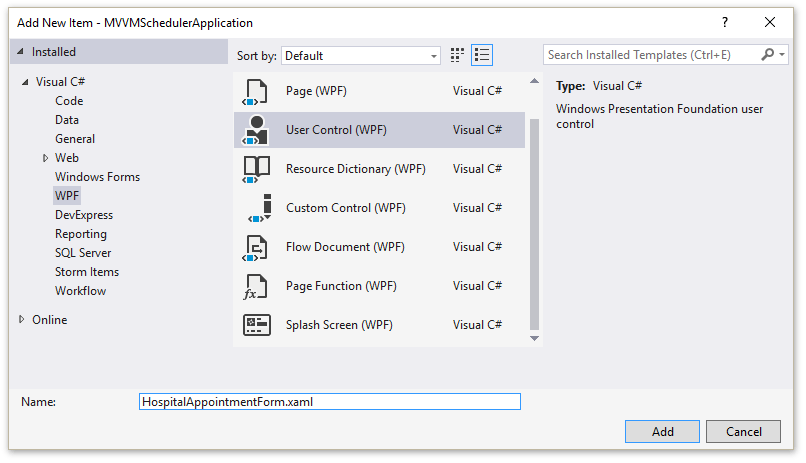
In the Add New Item dialog, select the WPF group of templates, click the User Control (WPF) item, change its name to HospitalAppointmentForm.xaml, and then click Add.
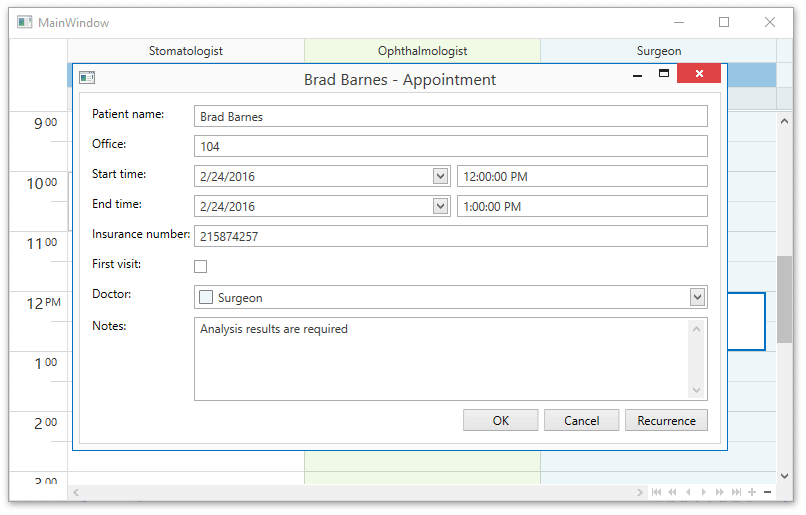
Add the corresponding controls to edit the following appointment properties.
- Subject - the TextEdit control
- Location - the TextEdit control
- Start, End - DateEdit controls for date values and TextEdit controls for time values
- InsuranceNumber (custom field) - the TextEdit control
- FirstVisit (custom field) - the CheckEdit control
- ResourceId - the AppointmentResourceEdit control
- Notes (custom field) - the TextEdit control
To enable appointment management in the appointment editing form, bind the created controls to the corresponding property values of the DevExpress.Xpf.Scheduler.UI.AppointmentFormViewModel object. The DevExpress.Xpf.Scheduler.UI.AppointmentFormViewModel class inherits from the AppointmentFormControllerBase class and serves as a data context for any bindings within the form. Overwrite the HospitalAppointmentForm.xaml file as follows.
Tip
A complete sample project is available in the DevExpress Code Examples database at http://www.devexpress.com/example=T103885.
<UserControl x:Class="MVVMSchedulerApplication.HospitalAppointmentForm"
             xmlns="http://schemas.microsoft.com/winfx/2006/xaml/presentation"
             xmlns:x="http://schemas.microsoft.com/winfx/2006/xaml"
             xmlns:mc="http://schemas.openxmlformats.org/markup-compatibility/2006"
             xmlns:d="http://schemas.microsoft.com/expression/blend/2008"
             xmlns:dxe="http://schemas.devexpress.com/winfx/2008/xaml/editors"
             xmlns:dxsch="http://schemas.devexpress.com/winfx/2008/xaml/scheduler"
             xmlns:dxschi="http://schemas.devexpress.com/winfx/2008/xaml/scheduler/internal"
             mc:Ignorable="d"
             x:Name="AptForm"
             MinWidth="640" MinHeight="350">

    <UserControl.Resources>
        <dxschi:TimeSpanToDateTimeConverter x:Key="timeSpanToDateTimeConverter"/>
        <dxschi:InvertedBoolConverter x:Key="invertedBoolConverter"/>
    </UserControl.Resources>

    <Grid Margin="12" ShowGridLines="False">
        <Grid.RowDefinitions>
            <RowDefinition Height="Auto"/>
            <RowDefinition Height="Auto"/>
            <RowDefinition Height="Auto"/>
            <RowDefinition Height="Auto"/>
            <RowDefinition Height="Auto"/>
            <RowDefinition Height="Auto"/>
            <RowDefinition Height="Auto"/>
            <RowDefinition x:Name="stretchingLine" Height="*"/>
            <RowDefinition Height="Auto"/>
        </Grid.RowDefinitions>

        <Grid.ColumnDefinitions>
            <ColumnDefinition Width="Auto" MinWidth="90"/>
            <ColumnDefinition Width="*"/>
        </Grid.ColumnDefinitions>

        <!--Subject-->
        <TextBlock Text="Patient name:" Margin="0,0,4,8"/>
        <dxe:TextEdit x:Name="subjectEdit" Margin="0,0,0,8" Grid.Column="1" EditValue="{Binding Subject, UpdateSourceTrigger=PropertyChanged, Mode=TwoWay}"/>

        <!--Location-->
        <TextBlock Grid.Row="1" Grid.Column="0" Margin="0,0,4,8" Text="Office:"/>
        <dxe:TextEdit Grid.Row="1" Grid.Column="1" Margin="0,0,0,8" EditValue="{Binding Location, Mode=TwoWay}"/>

        <!--Start-->
        <TextBlock Grid.Row="2" Grid.Column="0" Text="Start time:" Margin="0,0,4,8"/>
        <Grid Grid.Row="2" Grid.Column="1" Margin="0,0,0,8">
            <Grid.RowDefinitions>
                <RowDefinition Height="Auto" />
            </Grid.RowDefinitions>

            <Grid.ColumnDefinitions>
                <ColumnDefinition Width="*"/>
                <ColumnDefinition Width="*"/>
            </Grid.ColumnDefinitions>

            <dxe:DateEdit x:Name="edtStartDate" MinWidth="150" Grid.Row="0" Grid.Column="0"
                          EditValue ="{Binding DisplayStartDate, UpdateSourceTrigger=PropertyChanged, Mode=TwoWay}"/>
            <dxe:TextEdit x:Name="edtStartTime" MinWidth="150" MaskType="DateTime" DisplayFormatString="{Binding TimeEditMask}"
                          Mask="{Binding TimeEditMask}" Grid.Row="0" Grid.Column="1" Margin="6,0,0,0"
                          EditValue ="{Binding DisplayStartTime, Converter={StaticResource timeSpanToDateTimeConverter}, UpdateSourceTrigger=PropertyChanged, Mode=TwoWay}">
            </dxe:TextEdit>
        </Grid>

        <!--End-->
        <TextBlock Grid.Row="3" Grid.Column="0" Text="End time:" Margin="0,0,4,8"/>
        <Grid Grid.Row="3" Grid.Column="1" Margin="0,0,0,8">
            <Grid.RowDefinitions>
                <RowDefinition Height="Auto" />
            </Grid.RowDefinitions>

            <Grid.ColumnDefinitions>
                <ColumnDefinition Width="*"/>
                <ColumnDefinition Width="*"/>
            </Grid.ColumnDefinitions>

            <dxe:DateEdit x:Name="edtEndDate" MinWidth="150" Grid.Row="0" Grid.Column="0" EditValue="{Binding DisplayEndDate, Mode=TwoWay}"/>

            <dxe:TextEdit x:Name="edtEndTime" MinWidth="150" MaskType="DateTime" DisplayFormatString="{Binding TimeEditMask}" Mask="{Binding TimeEditMask}"
                          Grid.Row="0" Grid.Column="1" Margin="6,0,0,0" EditValue ="{Binding DisplayEndTime, Converter={StaticResource timeSpanToDateTimeConverter}, Mode=TwoWay}">
            </dxe:TextEdit>
        </Grid>

        <!--Insurance number (custom field)-->
        <TextBlock Grid.Row="4" Grid.Column="0" Text="Insurance number:" Margin="0,0,4,8"/>
        <dxe:TextEdit Grid.Row="4" Grid.Column="1" Margin="0,0,0,8" EditValue="{Binding CustomFields[InsuranceNumber], Mode=TwoWay}"/>

        <!--First visit (custom field)-->
        <TextBlock Grid.Row="5" Grid.Column="0" Text="First visit:" Margin="0,0,4,8"/>
        <dxe:CheckEdit Grid.Row="5" Grid.Column="1" Margin="0,0,0,8" EditValue="{Binding CustomFields[FirstVisit], Mode=TwoWay}"/>

        <!--Resource ID-->
        <TextBlock Grid.Row="6" Grid.Column="0" Text="Doctor:" Margin="0,0,4,8"/>
        <dxsch:AppointmentResourceEdit Grid.Row="6" Margin="0,0,0,8" Grid.Column="1" SchedulerControl="{Binding Control}"
                                       EditValue="{Binding ResourceId, UpdateSourceTrigger=PropertyChanged, Mode=TwoWay}" MinHeight="22"/>

        <!--Notes (custom field)-->
        <TextBlock Grid.Row="7" Grid.Column="0" Text="Notes:" Margin="0,0,4,8"/>
        <dxe:TextEdit Grid.Row="7" Grid.Column="1" MinHeight="50" Margin="0,0,0,8" EditValue ="{Binding CustomFields[Notes], Mode=TwoWay}" AcceptsReturn="True" TextWrapping="Wrap"
                      VerticalScrollBarVisibility="Visible" HorizontalContentAlignment="Left" VerticalContentAlignment="Top"/>
        <!--Buttons-->
        <StackPanel Grid.Row="8" Grid.Column="1" Grid.ColumnSpan="2"
                    Orientation="Horizontal" HorizontalAlignment="Right">
            <Button x:Name="btnOk"
                Content="OK"
                Command="{Binding SaveAppointmentCommand}" MinWidth="75" Margin="6,0,0,0"/>
            <Button x:Name="btnCancel"
                Content="Cancel"
                Command="{Binding CancelEditingCommand}" MinWidth="75" Margin="6,0,0,0"/>
        </StackPanel>
    </Grid>
</UserControl>
Use a Data Template to Show the Custom Form
- Switch to the MainWindow.xaml file. To display the custom Edit Appointment form, activate the new MVVM-based mechanism by setting the SchedulerControl.FormCustomizationUsingMVVMLocal property to true.
To invoke the appointment editing form, you need to specify a data template that contains a service used to display the form’s View in a separate window. By default, the WindowedDocumentUIService is used as a service to show the Edit Appointment form. You can also create your own service. If you create your own, your service must inherit from the base ServiceBase class and implement the IDocumentManagerService interface. To specify the data template, use the SchedulerControl.AppointmentFormServiceTemplate property. To display your custom form instead of the standard one, set the ViewServiceBase.ViewTemplate property to HospitalAppointmentForm. To specify the style and size of your form, use the WindowedDocumentUIService.WindowStyle property. The XAML code implementing this approach is shown below.
Tip
A complete sample project is available in the DevExpress Code Examples database at http://www.devexpress.com/example=T103885.
<dxsch:SchedulerControl.AppointmentFormServiceTemplate>
     <DataTemplate>
          <ContentControl>
                <dx:WindowedDocumentUIService>
                   <dx:WindowedDocumentUIService.WindowStyle>
                       <Style TargetType="dx:DXWindow">
                           <Setter Property="SizeToContent" Value="WidthAndHeight"/>
                       </Style>
                    </dx:WindowedDocumentUIService.WindowStyle>
                    <dx:WindowedDocumentUIService.ViewTemplate>
                       <DataTemplate>
                           <local:HospitalAppointmentForm/>
                       </DataTemplate>
                    </dx:WindowedDocumentUIService.ViewTemplate>
                </dx:WindowedDocumentUIService>
          </ContentControl>
     </DataTemplate>
</dxsch:SchedulerControl.AppointmentFormServiceTemplate>
Result
Run the project. The image below shows the scheduler with a custom Edit Appointment form invoked.