How To: Create a SlideView and Populate It with Data
- 3 minutes to read
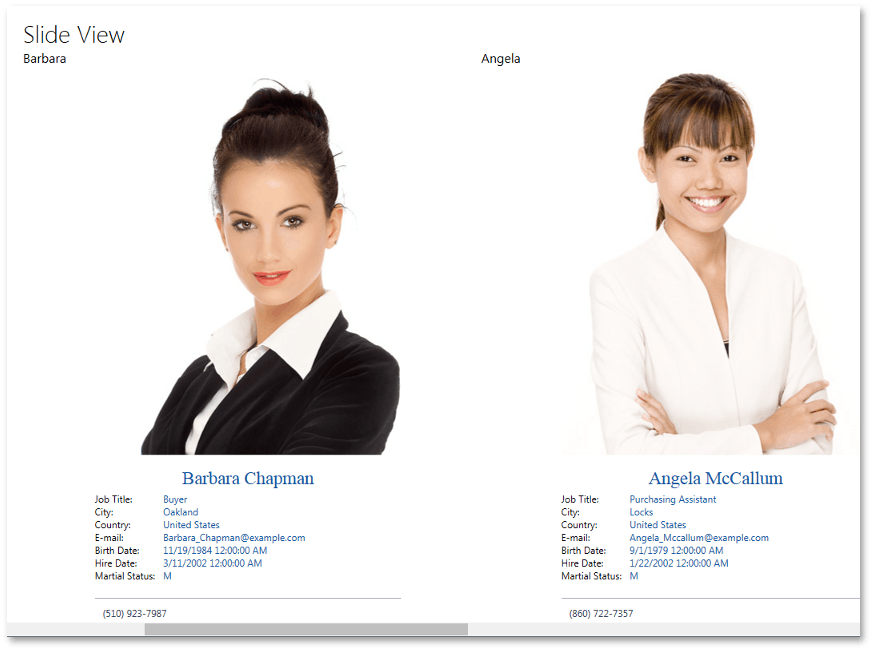
This example describes how to create a Slide View, bind it to data, and use templates to visualize its items. The last section of this article contains the complete example code.
Steps
- Start Visual Studio and create a new WPF project by selecting FILE | New | Project… in the main menu. In the New Project window that is invoked, select WPF Application and change the name to SlideViewSample.
Change the main window’s theme to Office 2013. To do so, reference the DevExpress Core namespace and use the ThemeManager.
using DevExpress.Xpf.Core;

// ...

public partial class App : Application
{
    protected override void OnStartup(StartupEventArgs e)
    {
        ThemeManager.ApplicationThemeName = Theme.Office2013Name;
        base.OnStartup(e);
    }
}
Find the SlideView control in the Toolbox and drop it onto the form. Once added, the SlideView automatically generates two SlideViewItem objects. These items are not necessary, so remove them from the XAML mark-up.
<Grid>
    <dxwui:SlideView>

    </dxwui:SlideView>
</Grid>
Define the data source in XAML.
<Window xmlns:dxwui="http://schemas.devexpress.com/winfx/2008/xaml/windowsui"  x:Class="SlideViewSample.MainWindow"
        xmlns="http://schemas.microsoft.com/winfx/2006/xaml/presentation"
        xmlns:x="http://schemas.microsoft.com/winfx/2006/xaml"
        xmlns:dxc="http://schemas.devexpress.com/winfx/2008/xaml/core"
        xmlns:local="clr-namespace:SlideViewSample"
        Title="MainWindow" Height="841.85" Width="1423.369">
    <Window.DataContext>
        <local:EmployeesData/>
    </Window.DataContext>

</Window>
The EmployeesData class, which is used as a data source, is defined in the C# code. The code for this and other data source classes is listed later in this example.
Now create two DataTemplate objects in the Resources section. These data templates will specify how items and their headers within our SlideView should appear.
<Window.Resources>
        <DataTemplate x:Key="ItemHeaderTemplate">
            <Grid>
                <TextBlock Text="{Binding FirstName}"/>
            </Grid>
        </DataTemplate>
        <DataTemplate x:Key="ItemContentTemplate">
            <Grid x:Name="Grid_Content" Margin="100, 0, 100, 0">
                <Grid>
                    <Grid.RowDefinitions>
                        <RowDefinition Height="auto" />
                        <RowDefinition Height="auto" />
                        <RowDefinition Height="auto" />
                        <RowDefinition Height="auto" />
                    </Grid.RowDefinitions>
                    <Border HorizontalAlignment="Center" VerticalAlignment="Center" Background="White" BorderBrush="Black" BorderThickness="0" Margin="0">
                        <Image Margin="1" Source="{Binding Photo}" Stretch="None" />
                    </Border>

                    <TextBlock HorizontalAlignment="Center" VerticalAlignment="Center" Text="{Binding FullName}" TextWrapping="Wrap" Grid.Row="1" FontFamily="Times New Roman" FontSize="22.667" Foreground="#FF1059A3" Margin="0,15,0,5" />
                    <Grid Grid.Row="2">
                        <Grid.RowDefinitions>
                            <RowDefinition Height="auto"/>
                            <RowDefinition Height="auto"/>
                            <RowDefinition Height="auto"/>
                            <RowDefinition Height="auto"/>
                            <RowDefinition Height="auto"/>
                            <RowDefinition Height="auto"/>
                            <RowDefinition Height="auto"/>
                        </Grid.RowDefinitions>
                        <Grid.ColumnDefinitions>
                            <ColumnDefinition Width="auto"/>
                            <ColumnDefinition Width="auto"/>
                        </Grid.ColumnDefinitions>
                        <TextBlock Text="Job Title:" Grid.Column="0" Grid.Row="0"/>
                        <TextBlock Text="City:" Grid.Column="0" Grid.Row="1"/>
                        <TextBlock Text="Country:" Grid.Column="0" Grid.Row="2"/>
                        <TextBlock Text="E-mail:" Grid.Column="0" Grid.Row="3"/>
                        <TextBlock Text="Birth Date:" Grid.Column="0" Grid.Row="4"/>
                        <TextBlock Text="Hire Date:" Grid.Column="0" Grid.Row="5"/>
                        <TextBlock Text="Martial Status:" Grid.Column="0" Grid.Row="6"/>
                        <TextBlock Text="{Binding JobTitle}" TextWrapping="Wrap"  Foreground="#FF1059A3" Margin="10,0" Grid.Column="1" Grid.Row="0"/>
                        <TextBlock Text="{Binding City}" TextWrapping="Wrap" Foreground="#FF1059A3" Margin="10,0" Grid.Column="1" Grid.Row="1"/>
                        <TextBlock Text="{Binding CountryRegionName}" TextWrapping="Wrap" Foreground="#FF1059A3" Margin="10,0" Grid.Column="1" Grid.Row="2"/>
                        <TextBlock Text="{Binding EmailAddress}" TextWrapping="Wrap" Foreground="#FF1059A3" Margin="10,0" Grid.Column="1" Grid.Row="3"/>
                        <TextBlock Text="{Binding BirthDate}" TextWrapping="Wrap" Foreground="#FF1059A3" Margin="10,0" Grid.Column="1" Grid.Row="4"/>
                        <TextBlock Text="{Binding HireDate}" TextWrapping="Wrap" Foreground="#FF1059A3" Margin="10,0" Grid.Column="1" Grid.Row="5"/>
                        <TextBlock Text="{Binding MaritalStatus}" TextWrapping="Wrap" Foreground="#FF1059A3" Margin="10,0" Grid.Column="1" Grid.Row="6"/>
                    </Grid>
                    <Grid Grid.Row="3" Margin="0,20,0,0">
                        <Grid.RowDefinitions>
                            <RowDefinition Height="auto" />
                            <RowDefinition Height="auto" />
                        </Grid.RowDefinitions>
                        <Rectangle Fill="#FFA4A7BD" StrokeThickness="0" Height="1" Margin="0" VerticalAlignment="Top" />
                        <TextBlock Margin="10" Grid.Row="1" TextWrapping="Wrap" Foreground="#FF3B3D60" Text="{Binding Phone}" />
                    </Grid>
                </Grid>
            </Grid>
        </DataTemplate>
    </Window.Resources>
Finally, assign the data templates to the SlideView’s ItemTemplate and ItemHeaderTemplate properties. Also set the data source for the SlideView via the ItemsSource property.
<Grid Background="White"> <dxwui:SlideView ItemsSource="{Binding DataSource}" Header="Slide View" ItemTemplate="{StaticResource ItemContentTemplate}" ItemHeaderTemplate="{StaticResource ItemHeaderTemplate}"> </dxwui:SlideView> </Grid>- You can now launch the application to see the results. Remember to include the code for classes encapsulating the data source, which can be found below. The .XML file that stores employee data is also listed later in this example. Include this file in your project and set its BuildAction property to EmbeddedResource.
Complete Code
This example demonstrates how to create a SlideView, bind it to data and use templates to visualize its items.