Lesson 2 - Create a Grouped Report with a Document Map
- 4 minutes to read
This tutorial will guide you through the process of creating a grouped report using the DXPrinting library for WPF. It will begin with the report created in the previous lesson: Lesson 1 - Create Your First Report.
In this tutorial, you will learn how to group document data using a printing link type for processing collection data sources. You will also learn how to define distinct data templates for document groups in XAML.
To create groups in a report, do the following.
Modify Data Templates
- In your reporting application, open the MainForm.xaml file, and declare a GroupInfo data template. This template will display category names using the TextEdit control, and arrange detail table headers in table rows.
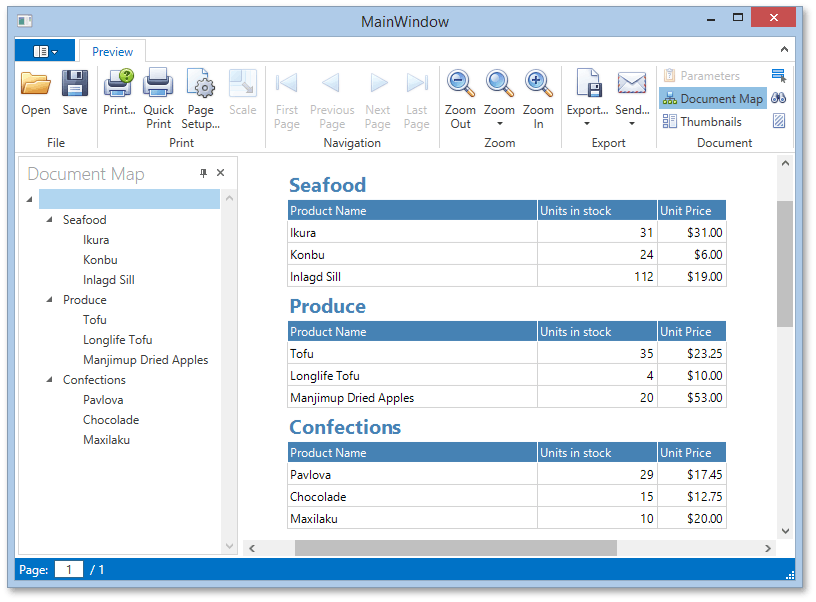
- For complex reports, it makes sense to provide a document map that makes the document easier to navigate in print preview. To make the document map reflect the hierarchical structure of the report, specify a bookmark for the category name, and make it a parent of the product name bookmark.
The following code demonstrates the XAML data templates of a grouped report with a document map.
<Window.Resources>
    <DataTemplate x:Key="CategoryTemplate">
        <StackPanel Orientation="Vertical">
            <StackPanel.Resources>
                <Style TargetType="dxe:TextEdit">
                    <Setter Property="Padding" Value="3,0,3,0" />
                </Style>
            </StackPanel.Resources>
            <dxe:TextEdit x:Name="CategoryEdit" Text="{Binding Path=Content.Name, Mode=OneWay}"
                          FontWeight="Bold" FontSize="20" Foreground="SteelBlue"
                          dxp:ExportSettings.Bookmark="{Binding Content.Name}" />
            <Grid>
                <Grid.ColumnDefinitions>
                    <ColumnDefinition MinWidth="250"/>
                    <ColumnDefinition MinWidth="120"/>
                    <ColumnDefinition MinWidth="70"/>
                </Grid.ColumnDefinitions>
                <dxe:TextEdit Foreground="White" Background="SteelBlue" BorderBrush="White"
                              BorderThickness="1,1,0,1" Grid.Column="0" Text="Product Name"/>
                <dxe:TextEdit Foreground="White" Background="SteelBlue" BorderBrush="White"
                              BorderThickness="1,1,0,1" Grid.Column="1" Text="Units in stock"/>
                <dxe:TextEdit Foreground="White" Background="SteelBlue" BorderBrush="White"
                              BorderThickness="1,1,1,1" Grid.Column="2" Text="Unit Price"/>
            </Grid>
        </StackPanel>
        </DataTemplate>


    <DataTemplate x:Key="ProductTemplate">
        <StackPanel>
            <StackPanel.Resources>
                <Style TargetType="dxe:TextEdit">
                    <Setter Property="Padding" Value="3,0,3,0" />
                </Style>
            </StackPanel.Resources>

            <Grid>
                <Grid.ColumnDefinitions>
                    <ColumnDefinition MinWidth="250"/>
                    <ColumnDefinition MinWidth="120"/>
                    <ColumnDefinition MinWidth="70"/>
                </Grid.ColumnDefinitions>
                <dxe:TextEdit dxp:ExportSettings.BookmarkParentName="CategoryEdit"
                              dxp:ExportSettings.Bookmark="{Binding Content.Name}"
                              BorderBrush="LightGray" BorderThickness="1,0,0,1"
                              Grid.Column="0" Text="{Binding Path=Content.Name}"/>
                <dxe:TextEdit BorderBrush="LightGray" BorderThickness="1,0,0,1" Grid.Column="1"
                              Text="{Binding Path=Content.InStock}" HorizontalContentAlignment ="Right"/>
                <dxe:TextEdit BorderBrush="LightGray" BorderThickness="1,0,1,1" Grid.Column="2"
                              Text="{Binding Path=Content.UnitPrice}"
                              HorizontalContentAlignment ="Right" MaskUseAsDisplayFormat="True"
                              MaskType="Numeric" Mask="c2"/>
            </Grid>
        </StackPanel>
    </DataTemplate>
 </Window.Resources>
Define the Data Source
Define a method that will implement the ICollectionView interface for the data source created in the previous lesson. This method should apply grouping to the view source before returning the view.
using System.Collections.Generic;
using System.ComponentModel;
using System.Windows;
using System.Windows.Data;
using System.Windows.Documents;
// ...

private ICollectionView CreateProductsView() {
    CollectionViewSource Source = new CollectionViewSource();
    Source.Source = CreateProducts();
    Source.GroupDescriptions.Add(new PropertyGroupDescription("Category"));
    return Source.View;
}
Create a Printing Link
DXPrinting provides a special link type to create grouped reports from ICollectionView data sources: CollectionViewLink.
The following code illustrates the implementation of this link.
using DevExpress.Xpf.Printing;
// ...

private void Window_Loaded_1(object sender, RoutedEventArgs e) {
    // Create a link and assign a data source to it.
    // Assign your data templates to different report areas.
    CollectionViewLink link = new CollectionViewLink();

    link.CollectionView = CreateProductsView();
    link.GroupInfos.Add(new GroupInfo((DataTemplate)Resources["CategoryTemplate"]));
    link.DetailTemplate = (DataTemplate)Resources["ProductTemplate"];

    // Associate the link with the Document Preview control.
    preview.DocumentSource = link;

    // Generate the report document
    // and show pages as soon as they are created.
    link.CreateDocument(true);
}
View the Result
Your report is now ready to be generated. It reflects the hierarchy of your data via grouping and the document map. Run the application and view the results.