Lesson 1 - Create Your First Report
- 8 minutes to read
This tutorial will guide you through the process of creating a non-hierarchical report using the DXPrinting library for WPF. You will learn how to create a simple report based on a basic “products by categories” data source.
In this tutorial, you will also learn about the main concepts of report creation, such as creating documents by declaring data templates for different document areas, and creating printing links to lay out the data in the document. You will also learn how to embed a document preview in your WPF application to preview, print and/or export the created document, as well as simplify navigation through your document using a document map and bookmarks.
To create your first report with DXPrinting, do the following.
- Create a New Project
- Define the Data Source
- Declare Data Templates
- Create a Printing Link
- View the Result
Create a New Project
- Start Microsoft Visual Studio 2012, 2013, 2015, 2017 or 2019.
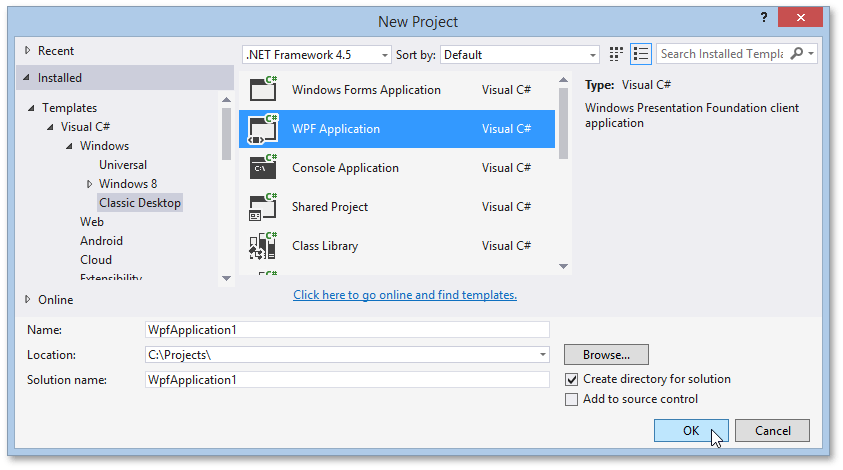
Create a new project by pressing CTRL+SHIFT+N. In the invoked New Project dialog, select WPF Application, enter the name of the application and click OK.
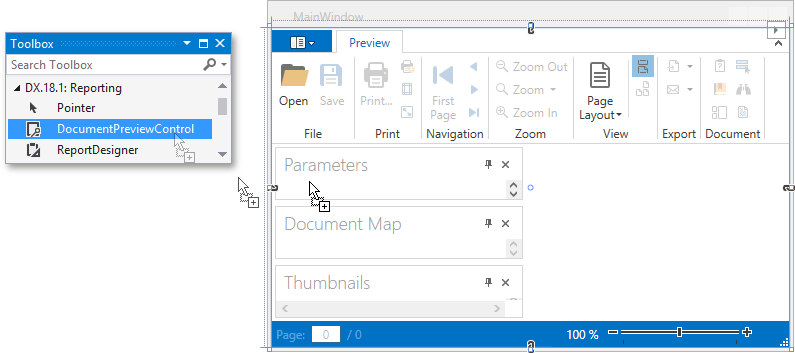
Open the Toolbox panel (by pressing CTRL+ALT+X), select the DocumentPreviewControl control in the DX.21.2.Reporting tab and drop it onto the form.
In XAML, set the Name property to preview for the created control.
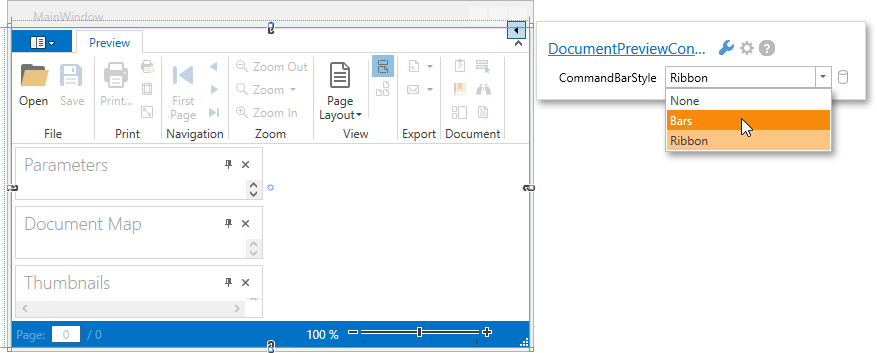
<dxp:DocumentPreviewControl Name="preview" />By default, the Document Preview has a Ribbon toolbar. To switch to the Bars toolbar layout or remove the toolbar, click the Document Preview’s smart tag, and in the invoked actions list expand the CommandBarStyle drop-down list and select the required option.
Define the Data Source
First, define the data source that will be used to generate the document. You will then select the appropriate printing link based on the data source type.
The following code illustrates the implementation of a basic data source that can be printed with a SimpleLink. To learn about printing hierarchical data sources, see the following tutorial: Lesson 2 - Create a Grouped Report with a Document Map.
using System.Collections.Generic;
using System.Windows;
using System.Windows.Documents;
// ...

// Define a class that represents a single record in your data source.
private class Product {
    public string Category { get; set; }
    public string Name { get; set; }
    public int InStock { get; set; }
    public double UnitPrice { get; set; }

    public Product(string category, string name, int instock, double unitprice) {
       Category = category;
       Name = name;
       InStock = instock;
       UnitPrice = unitprice;
    }
}

// Define a method that will populate your data source with data.
private List<Product> CreateProducts() {
    List<Product> Data = new List<Product>();
    Data.Add(new Product("Seafood", "Ikura", 31, 31.00));
    Data.Add(new Product("Seafood", "Konbu", 24, 6.00));
    Data.Add(new Product("Seafood", "Inlagd Sill", 112, 19.00));
    Data.Add(new Product("Produce", "Tofu", 35, 23.25));
    Data.Add(new Product("Produce", "Longlife Tofu", 4, 10.00));
    Data.Add(new Product("Produce", "Manjimup Dried Apples", 20, 53.00));
    Data.Add(new Product("Confections", "Pavlova", 29, 17.45));
    Data.Add(new Product("Confections", "Chocolade", 15, 12.75));
    Data.Add(new Product("Confections", "Maxilaku", 10, 20.00));

    return Data;
}
Declare Data Templates
The next step is to declare a data template in your reporting application. A data template is a XAML class that allows you to define the appearance of printed data. In DXPrinting, data templates specify which elements to use to display data in your report, as well as to evaluate the styling and alignment of these elements. For more information, see the following topic in MSDN: Data Templating Overview.
To declare data templates for various sections of your report, do the following.
- Declare a data template for your report header area. This template will not use data bindings, and will only contain static text.
- Declare a data template for the body of your report (“detail area”). To do this, use a grid with the TextEdit controls bound to the corresponding data source fields.
- You can add a document map to your report by specifying bookmarks for the controls bound to the Name data field.
The following code implements the functionality described above.
<Window
        xmlns="http://schemas.microsoft.com/winfx/2006/xaml/presentation"
        xmlns:x="http://schemas.microsoft.com/winfx/2006/xaml"
        xmlns:dxe="http://schemas.devexpress.com/winfx/2008/xaml/editors"
        xmlns:dxp="http://schemas.devexpress.com/winfx/2008/xaml/printing" x:Class="WpfApplication9.MainWindow"
        Title="MainWindow" Height="350" Width="525" Loaded="Window_Loaded_1">

    <Grid>
        <dxp:DocumentPreviewControl Name="preview" />
    </Grid>

    <Window.Resources>
        <DataTemplate x:Key="HeaderTemplate">
            <StackPanel>
                <StackPanel.Resources>
                    <Style TargetType="dxe:TextEdit">
                        <Setter Property="Padding" Value="3,0,3,0" />
                    </Style>
                </StackPanel.Resources>

                <Grid>
                    <Grid.ColumnDefinitions>
                        <ColumnDefinition MinWidth="200"/>
                        <ColumnDefinition MinWidth="120"/>
                        <ColumnDefinition MinWidth="120"/>
                        <ColumnDefinition MinWidth="70"/>
                    </Grid.ColumnDefinitions>
                    <dxe:TextEdit Foreground="White" Background="SteelBlue" BorderBrush="White"
                              BorderThickness="1,1,0,1" Grid.Column="0" Text="Product Name"/>
                    <dxe:TextEdit Foreground="White" Background="SteelBlue" BorderBrush="White"
                              BorderThickness="1,1,0,1" Grid.Column="1" Text="Product Category"/>
                    <dxe:TextEdit Foreground="White" Background="SteelBlue" BorderBrush="White"
                              BorderThickness="1,1,0,1" Grid.Column="2" Text="Units in stock"/>
                    <dxe:TextEdit Foreground="White" Background="SteelBlue" BorderBrush="White"
                              BorderThickness="1,1,0,1" Grid.Column="3" Text="Unit Price"/>
                </Grid>
            </StackPanel>
        </DataTemplate>

        <DataTemplate x:Key="ProductsTemplate">
            <StackPanel Orientation="Vertical">
                <StackPanel.Resources>
                    <Style TargetType="dxe:TextEdit">
                        <Setter Property="Padding" Value="3,0,3,0" />
                    </Style>
                </StackPanel.Resources>

                <Grid>
                    <Grid.ColumnDefinitions>
                        <ColumnDefinition MinWidth="200"/>
                        <ColumnDefinition MinWidth="120"/>
                        <ColumnDefinition MinWidth="120"/>
                        <ColumnDefinition MinWidth="70"/>
                    </Grid.ColumnDefinitions>
                    <dxe:TextEdit BorderBrush="LightGray" BorderThickness="1,0,0,1"
                              Grid.Column="0" Text="{Binding Path=Content.Name}"
                              dxp:ExportSettings.Bookmark="{Binding Content.Name}"/>
                    <dxe:TextEdit BorderBrush="LightGray" BorderThickness="1,0,0,1"
                              Grid.Column="1" Text="{Binding Path=Content.Category}"/>
                    <dxe:TextEdit BorderBrush="LightGray" BorderThickness="1,0,0,1"
                              Grid.Column="2" Text="{Binding Path=Content.InStock}"
                              HorizontalContentAlignment ="Right"/>
                    <dxe:TextEdit BorderBrush="LightGray" BorderThickness="1,0,1,1"
                              Grid.Column="3" Text="{Binding Path=Content.UnitPrice}"
                              HorizontalContentAlignment ="Right" MaskUseAsDisplayFormat="True"
                              MaskType="Numeric" Mask="c2"/>
                </Grid>
            </StackPanel>
        </DataTemplate>
    </Window.Resources>
</Window>
Create a Printing Link
To generate a report document for print preview, use a printing link, and assign the declared data templates to the corresponding properties of the link. To create a report document in this tutorial, we will employ a SimpleLink, which is used to print non-hierarchical data in the most simple linear fashion.
To create a printing link in your application, do the following.
- Handle the Loaded event of the main window.
- Define a SimpleLink instance and assign the previously declared data templates to the corresponding properties.
- Handle the SimpleLink.CreateDetail event, which occurs every time a new data record is printed. In this event handler, assign the data from your data source to the currently printed record.
- Call the LinkBase.CreateDocument method to generate the report document.
The last step is to assign the link’s view model to the Document Preview control declared in XAML.
The following code implements the functionality described in this section.
using DevExpress.Xpf.Printing;
// ...

private List<Product> Data;

private void Window_Loaded_1(object sender, RoutedEventArgs e) {
    // Create a dataset.
    Data = CreateProducts();

    // Create a link and specify templates for various document sections.
    SimpleLink CategoryLink = new SimpleLink();
    CategoryLink.ReportHeaderTemplate = (DataTemplate)Resources["HeaderTemplate"];
    CategoryLink.DetailTemplate = (DataTemplate)Resources["ProductsTemplate"];

    // Specify the link's DetailCount property, which defines the number of records to display.
    // The following code will print all data available in the data source for the detail section.
    CategoryLink.DetailCount = Data.Count;

    // Assign the created link to the DocumentSource property of the Document Preview control.
    preview.DocumentSource = CategoryLink;

    // Create a detail section for every entry in your data source and generate the document.
    CategoryLink.CreateDetail += link_CreateDetail;
    CategoryLink.CreateDocument(true);
}

void link_CreateDetail(object sender, CreateAreaEventArgs e) {
    e.Data = Data[e.DetailIndex];
}
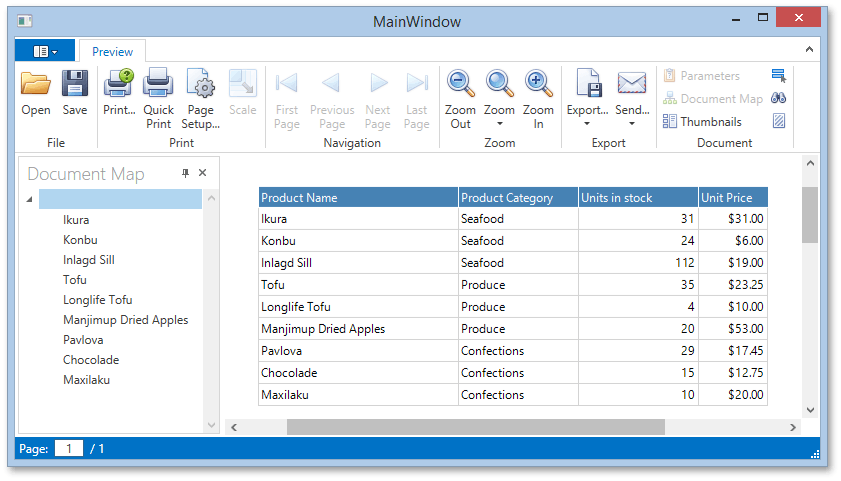
View the Result
Your first report is now ready. Run the application and view the results.