Formatting Values Using Custom Conditions
- 3 minutes to read
The Custom Condition allows you to use a custom expression for a conditional formatting rule. Refer to Expressions Overview and Criteria Language Syntax topics to learn more.
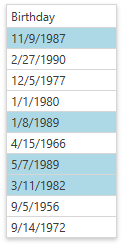
The image below displays the grid column whose Birthday cells are blue if their values are greater than 1/1/1980 and less than 1/1/1990.
This topic consists of the following sections:
- Adding Rules in Code
- Adding Rules Using Conditional Formatting Menu
- Adding Rules Using Conditional Formatting Rules Manager
Adding Rules in Code
Create the FormatCondition class instance and specify the following settings to create a conditional format in code:
- Specify the expression that defines the comparison logic by setting the FormatConditionBase.Expression property.
- Use the FormatConditionBase.FieldName property to specify the column’s field name to which to apply the conditional format.
Specify the target cells’ formatting:
- Use the FormatConditionBase.PredefinedFormatName property to specify the predefined format, or
- Set the custom format using the ExpressionConditionBase.Format property.
- Add the resulting FormatCondition instance to the TableView.FormatConditions (or TreeListView.FormatConditions) collection.
The following code sample illustrates how to define a conditional format in markup:
<dxg:TableView.FormatConditions>
<dxg:FormatCondition Expression="[Birthday] > #1980-01-01# And [Birthday] < #1990-01-01#" FieldName="Birthday" PredefinedFormatName="LightRedFillWithDarkRedText" />
</dxg:TableView.FormatConditions>
The code sample below illustrates how to define the same conditional format in code-behind:
var birthdayFormatCondition = new FormatCondition() {
   Expression = "[Birthday] > #1980-01-01# And [Birthday] < #1990-01-01#",
   FieldName = "Birthday",
   PredefinedFormatName = "LightRedFillWithDarkRedText"
};
view.FormatConditions.Add(birthdayFormatCondition);
Adding Rules Using Conditional Formatting Menu
- Select the Highlight Cells Rules item in the Conditional Formatting Menu, and choose the Custom Condition in the invoked sub menu.
- In the invoked dialog, click the ellipsis button to open the Custom Condition Editor and specify the required expression.
- Choose a format to define the applied rule’s visual appearance. The conditional formatting menu allows you to use only predefined formats stored within the TableView.PredefinedFormats (or TreeListView.PredefinedFormats) collection.
- Enable the apply format to the entire row option to apply a conditional format to the entire row, if necessary.

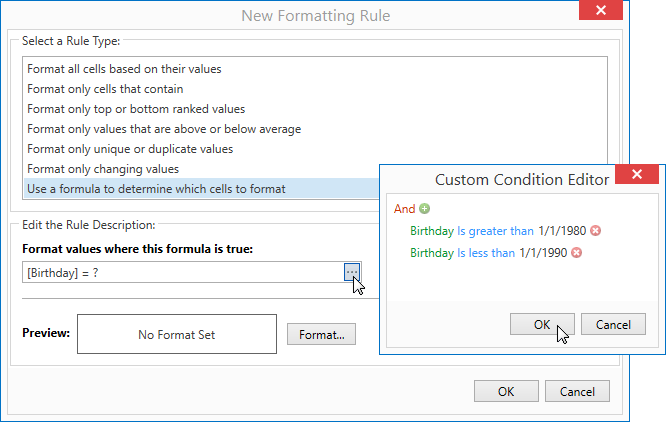
Adding Rules Using Conditional Formatting Rules Manager
- Click the New Rule… in the Conditional Formatting Rules Manager.
- Select the Use a formula to determine which cells to format rule in the invoked New Formatting Rule dialog.
- Click the ellipsis button to open the Custom Condition Editor, that allows you to specify the required expression.
- To define the visual appearance of the applied rule, click the Format button, and specify the required settings in the invoked Format Cells dialog. See the Format Cells Dialog Window section of the Conditional Formatting Rules Manager topic to learn more.
See Also