How to: Display the Integrated Ribbon for the Scheduler
- 3 minutes to read
This example demonstrates how to display the integrated ribbon for the WPF Scheduler and use the ribbon customization actions to add, modify, or remove ribbon elements.
Add the Ribbon to the Scheduler
Set the SchedulerControl.CommandBarStyle property to CommandBarStyle.Ribbon to display the integrated ribbon with all the available scheduler commands.
<dxsch:SchedulerControl x:Name="scheduler" CommandBarStyle="Ribbon"/>
The following image shows the resulting application:

Customize the Ribbon UI
Add the following namespace declarations to the MainWindow.xaml file:
xmlns:dxr="http://schemas.devexpress.com/winfx/2008/xaml/ribbon"
xmlns:dxb="http://schemas.devexpress.com/winfx/2008/xaml/bars"
xmlns:dx="http://schemas.devexpress.com/winfx/2008/xaml/core"
To modify the Scheduler’s ribbon UI, add the necessary customization actions to the SchedulerControl.RibbonActions collection. The action’s ElementName property specifies the name of the existing ribbon element you wish to change or remove. This can be a ribbon category, page, page group, or item. Element names are the DefaultBarItemNames class fields.
Note
You can find complete lists of element names for the Home and Appointment ribbon pages by these links:
The Default and Appointment ribbon page categories have the DefaultBarItemNames.Categories_Default and DefaultBarItemNames.Categories_Appointment element names respectively.
- Remove a Ribbon Element
To remove an element from the ribbon, add a RemoveAction with the required element’s name to the SchedulerControl.RibbonActions collection.
The following code demonstrates how to remove a specific ribbon group and item:
<dxsch:SchedulerControl.RibbonActions> <!--Remove the Window group from the Home tab.--> <dxb:RemoveAction ElementName="{x:Static Member=dxsch:DefaultBarItemNames.Groups_Home_Window }"/> <!--Remove the Go to Today item on the Home tab, in the Navigate group.--> <dxb:RemoveAction ElementName="{x:Static Member=dxsch:DefaultBarItemNames.Items_Home_Navigate_GotoToday }"/> </dxsch:SchedulerControl.RibbonActions>- Modify a Ribbon Element
Use an UpdateAction to change an existing ribbon element. Specify the element’s name, the property you wish to modify and the new value that should be assigned to this property.
The example below demonstrates how to disable the Appointment group on the ribbon and hide the Group by Date button.
<!--Disable the Appointment group on the Home tab.--> <dxb:UpdateAction ElementName="{x:Static dxsch:DefaultBarItemNames.Groups_Home_Appointment }" PropertyName="IsEnabled" Value="False"/> <!--Hide the Group by Date item on the Home tab, in the Group By group.--> <dxb:UpdateAction ElementName="{x:Static dxsch:DefaultBarItemNames.Items_Home_GroupBy_GroupByDate }" PropertyName="IsVisible" Value="False"/>- Add a New Ribbon Element
To add a new element to the ribbon, add an InsertAction to the SchedulerControl.RibbonActions collection.
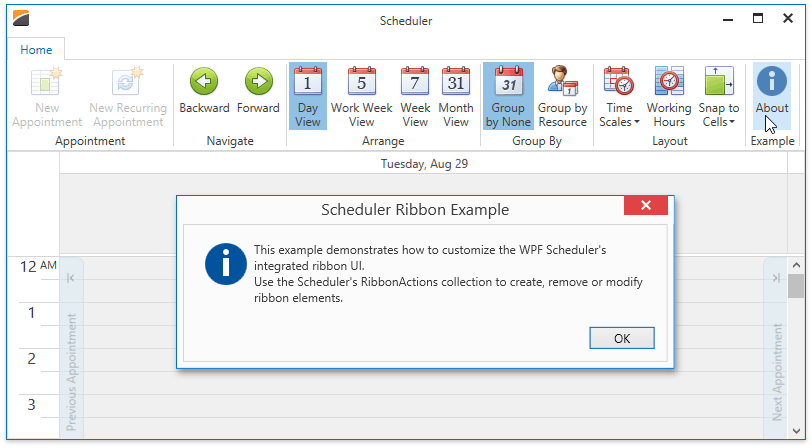
The code below demonstrates how to create a new ribbon button. The About button is located in a separate Example group and uses the BarItem.ItemClick event to display a custom message containing information about the current example.
<!--Add a new group to the Home tab.-->
<!--The group contains a single button displaying information about this example.-->
<dxb:InsertAction ContainerName="{x:Static dxsch:DefaultBarItemNames.Pages_Home}" Index="6">
    <dxr:RibbonPageGroup Caption="Example">
        <dxb:BarButtonItem  Content="About"
                            ItemClick="About_ItemClick"
                            LargeGlyph="{dx:DXImageOffice2013 Image=Info_32x32.png}"/>
    </dxr:RibbonPageGroup>
</dxb:InsertAction>
Handle the About button’s BarItem.ItemClick event as shown below.
void About_ItemClick(object sender, DevExpress.Xpf.Bars.ItemClickEventArgs e) {
    DXMessageBox.Show(@"This example demonstrates how to customize the WPF Scheduler's integrated ribbon UI. Use the Scheduler's RibbonActions collection to create, remove or modify ribbon elements.",
        "Scheduler Ribbon Example", MessageBoxButton.OK, MessageBoxImage.Information);
}
Result
Run the application. The following image illustrates the result: