Lesson 2 - Create a Tree Map Bound to Flat Data
- 5 minutes to read
This lesson goes over the steps required to build a simple unbound TreeMap diagram.
To crate a simple unbound chart, do the following.
- Step 1.Add a TreeMap Control
- Step 2. Bind the TreeMap to a Data Source
- Step 3. Customize the Appearance of the TreeMap
- Result
Step 1. Add a TreeMap Control
- Run Microsoft Visual Studio 2012, 2013, 2015, 2017 or 2019.
- Create a new WPF project and add the TreeMapControl component to it. (See the first step in Lesson 1 to learn how to do this).
Step 2. Bind the TreeMap to a Data Source
To provide data to the TreeMap control, to the following.
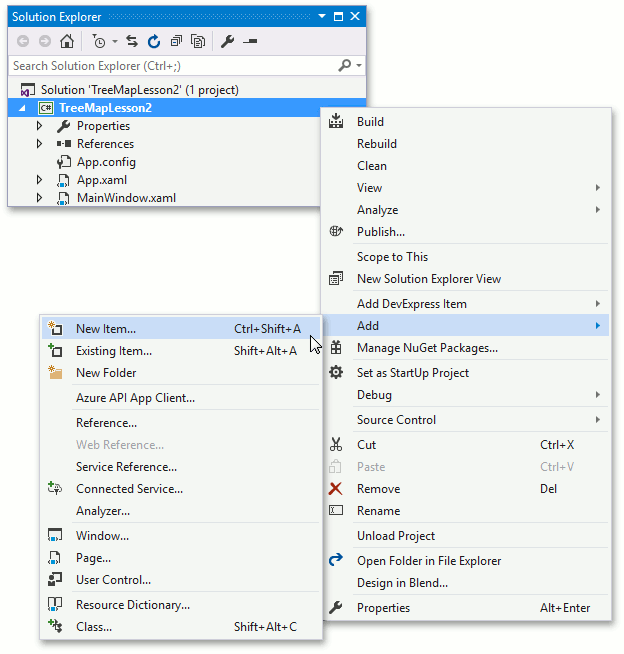
Create a sample data file. To do this right-click the project in the Solution Explorer. In the invoked menu, select the Add | New Item… element.
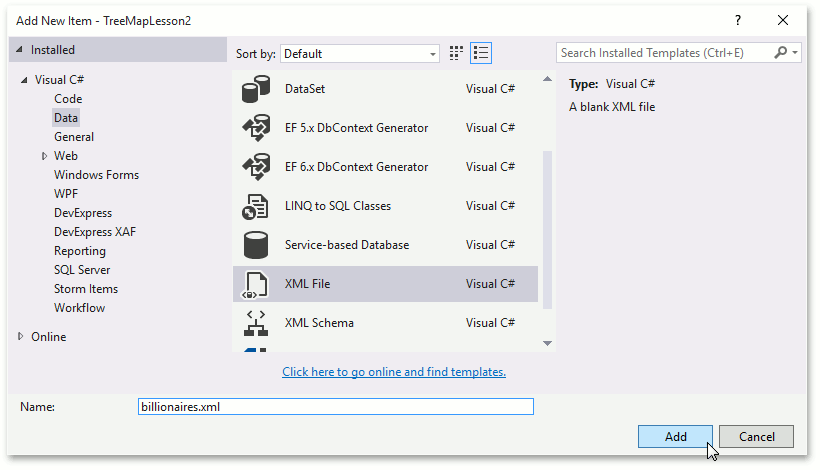
In the invoked Add New Item dialog, select the Data | XML File item. Set the name to billionaires.xml, then click Add to add the file to the project.
Insert the following content to the XML file.
<Billionaires>
    <Billionaire>
        <Name>Bill Gates</Name>
        <NetWorth>79.2</NetWorth>
        <Age>60</Age>
        <Country>United States</Country>
        <Source>Microsoft</Source>
    </Billionaire>
    <Billionaire>
        <Name>Carlos Slim Helu</Name>
        <NetWorth>77.1</NetWorth>
        <Age>75</Age>
        <Country>Mexico</Country>
        <Source>telecom</Source>
    </Billionaire>
    <Billionaire>
        <Name>Warren Buffett</Name>
        <NetWorth>72.7</NetWorth>
        <Age>85</Age>
        <Country>United States</Country>
        <Source>Berkshire Hathaway</Source>
    </Billionaire>
    <Billionaire>
        <Name>Amancio Ortega</Name>
        <NetWorth>64.5</NetWorth>
        <Age>79</Age>
        <Country>Spain</Country>
        <Source>Zara</Source>
    </Billionaire>
    <Billionaire>
        <Name>Larry Ellison</Name>
        <NetWorth>54.3</NetWorth>
        <Age>71</Age>
        <Country>United States</Country>
        <Source>Oracle</Source>
    </Billionaire>
    <Billionaire>
        <Name>Charles Koch</Name>
        <NetWorth>42.9</NetWorth>
        <Age>79</Age>
        <Country>United States</Country>
        <Source>diversified</Source>
    </Billionaire>
    <Billionaire>
        <Name>David Koch</Name>
        <NetWorth>42.9</NetWorth>
        <Age>75</Age>
        <Country>United States</Country>
        <Source>diversified</Source>
    </Billionaire>
    <Billionaire>
        <Name>Christy Walton</Name>
        <NetWorth>41.7</NetWorth>
        <Age>60</Age>
        <Country>United States</Country>
        <Source>Wal-Mart</Source>
    </Billionaire>
    <Billionaire>
        <Name>Jim Walton</Name>
        <NetWorth>40.6</NetWorth>
        <Age>67</Age>
        <Country>United States</Country>
        <Source>Wal-Mart</Source>
    </Billionaire>
<Billionaire>
        <Name>Liliane Bettencourt</Name>
        <NetWorth>40.1</NetWorth>
        <Age>93</Age>
        <Country>France</Country>
        <Source>L'Oreal</Source>
  </Billionaire>
</Billionaires>
Add an XML provider with the file as a source to a window’s resources. To do this, add the following code to the Window.xaml.
<Window.Resources>
    <XmlDataProvider x:Key="dataSource"
                     Source="Data/billionaires.xml"/>
</Window.Resources>
Now, all the preparatory work is done. The next step is providing data to the Tree Map.
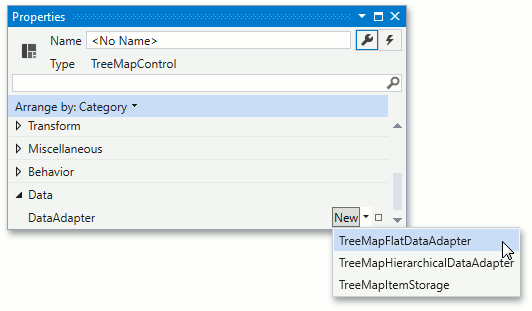
Assign the TreeMapFlatDataAdapter to the TreeMapControl.DataAdapter property.
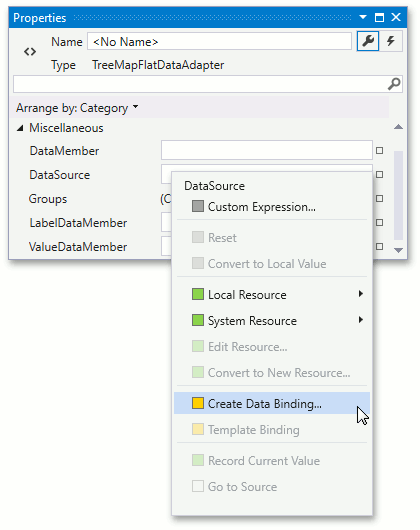
Specify the data source of the data adapter. To do this, create a new data binding to the XML provider added to the window previously. Locate the TreeMapFlatDataAdapter.DataSource property and click its property marker. In the invoked menu, select Create Data Binding….
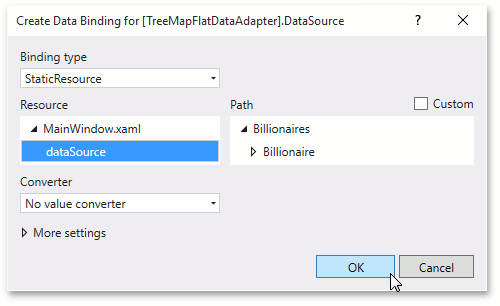
In the invoked dialog, set Binding type to StaticResource, and then select the dataSource item in the Resource list. Finally, click the OK button to create a data binding.
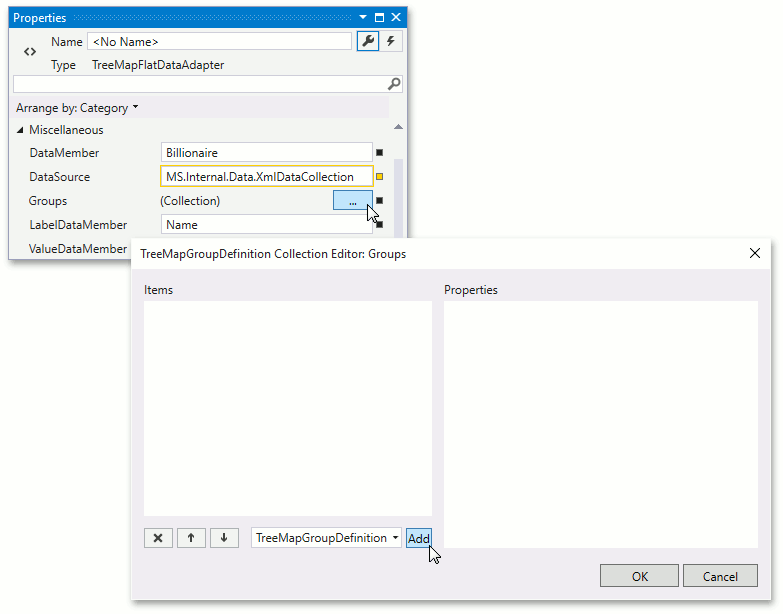
Specify the data source member that will be used to generate tree map items. Set the TreeMapFlatDataAdapter.DataMember to Billionaire. Then, specify which members of the data member will be provided as labels and values to tree map items. Set the TreeMapFlatDataAdapter.LabelDataMember to Name and TreeMapFlatDataAdapter.ValueDataMember to NetWorth.

Using Tree Map control, it is possible to group automatically generated items and specify how the group header will look for each generated group. Add the following tempate to the Window’s resources to use it as a group header content template later.
<Window.Resources>
    <!-- ... -->
    <DataTemplate x:Key="countryGroupTemplate">
            <TextBlock Background="Gray"
                       Foreground="White"
                       FontSize="16"
                       Text="{Binding Label}"
                       Margin="4,4,4,0"
                       Padding="6,4,4,4"
                       FontWeight="SemiBold"/>
        </DataTemplate>
</Window.Resources>
To group generated tree map items, add a new group definition to the TreeMapFlatDataAdapter.Groups collection. To do this, locate the collection and click the ellipsis button. In the invoked window, click the Add button.
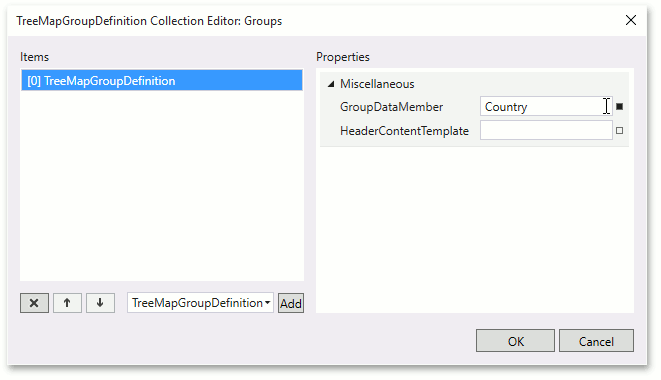
For the newly added group definition, set the TreeMapGroupDefinition.GroupDataMember property to Country
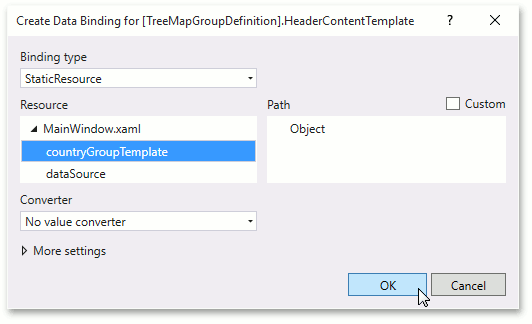
Bind the TreeMapGroupDefinition.HeaderContentTemplate property to the previously added data template. To do this, click the property marker located opposite the property, and then click the Create Data Binding….
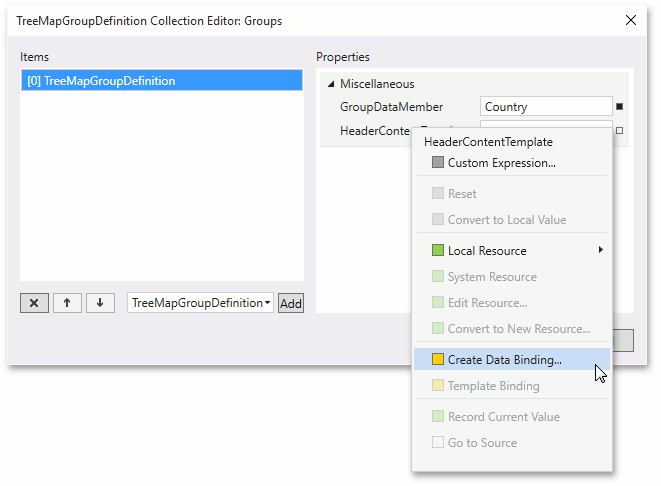
In the invoked dialog, set the Binding type to StaticResource and select the countryGroupTemplate item in the Resources list. Then, click OK to create a data binding.
Click OK to perform changes and close the Groups editor.
Currently, the Window’s XAML should look like this:
<Window.Resources>
    <XmlDataProvider x:Key="dataSource"
                     Source="Data/billionaires.xml"/>
    <DataTemplate x:Key="countryGroupTemplate">
        <TextBlock Background="Gray"
                   Foreground="White"
                   FontSize="16"
                   Text="{Binding Label}"
                   Margin="4,4,4,0"
                   Padding="6,4,4,4"
                   FontWeight="SemiBold"/>
    </DataTemplate>
</Window.Resources>
<Grid>
    <dxtm:TreeMapControl>
        <dxtm:TreeMapFlatDataAdapter DataSource="{Binding Source={StaticResource dataSource}}"
                                     DataMember="Billionaire"
                                     LabelDataMember="Name"
                                     ValueDataMember="NetWorth">
            <dxtm:TreeMapFlatDataAdapter.Groups>
                <dxtm:GroupDefinitionCollection>
                    <dxtm:TreeMapGroupDefinition GroupDataMember="Country"
                                                 HeaderContentTemplate="{Binding Source={StaticResource countryGroupTemplate}}"/>
                </dxtm:GroupDefinitionCollection>
            </dxtm:TreeMapFlatDataAdapter.Groups>
        </dxtm:TreeMapFlatDataAdapter>
    </dxtm:TreeMapControl>
</Grid>
Step 3. Customize the Appearance of the TreeMap
In this step, the appearance of TreeMap’s toolpip will be configured as well as the Colorizer used to provide colors to tree map items.
Add the following data template to the Window’s resources.
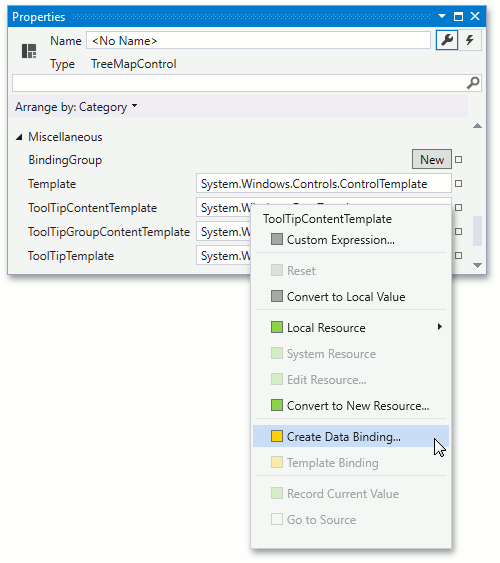
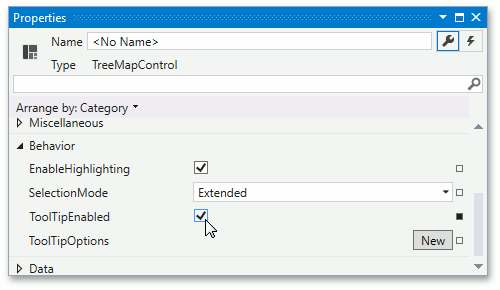
<Window.Resources>
    <!-- ... -->
    <DataTemplate x:Key="tooltipTemplate">
        <StackPanel Margin="8">
            <TextBlock Text="{Binding Item.Name}"
                       Foreground="White"
                       FontSize="24"/>
            <TextBlock Text="{Binding Item.Age, StringFormat=Age: {0}}"
                       Foreground="LightGray"/>
            <TextBlock Text="{Binding Item.NetWorth, StringFormat=Net Worth: ${0:c}B}"
                       Foreground="LightGray"/>
            <TextBlock Text="{Binding Item.Source, StringFormat=Source: {0}}"
                       Foreground="LightGray"/>
            <TextBlock Text="{Binding Item.Country, StringFormat=Country of Citizenship: {0}}"
                       Foreground="LightGray"/>
        </StackPanel>
    </DataTemplate>
</Window.Resources>
Create the TreeMapControl.ToolTipContentTemplate data binding to the previously added template. To do this, click the property marker opposite the property. In the invoked menu, select Create Data Binding….
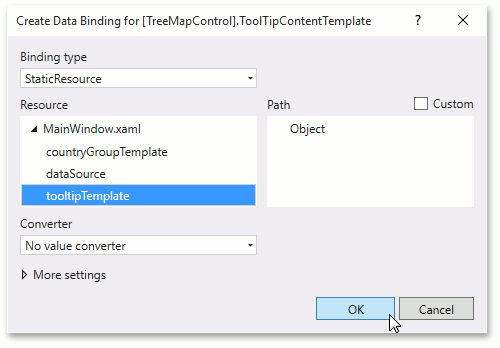
In the invoked window, set the Binding type to StaticResource and select the tooltipTemplateitem in the Resources list. Then, click OK to create a data binding.
Finally, set the TreeMapControl.ToolTipEnabled to true.
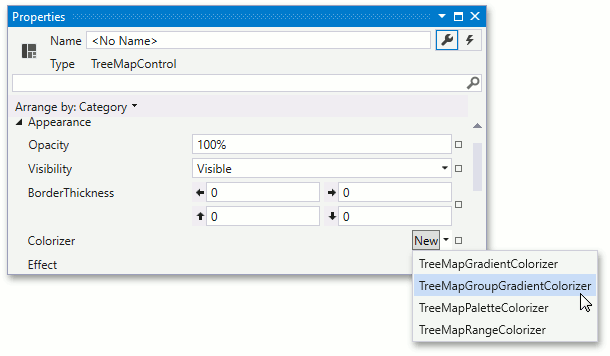
Assign a TreeMapGroupGradientColorizer to the TreeMapControl.Colorizer property.
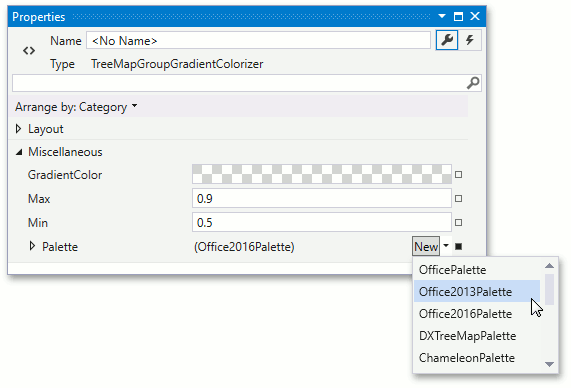
Set the TreeMapPaletteColorizerBase.Palette property to Office2013Palette.
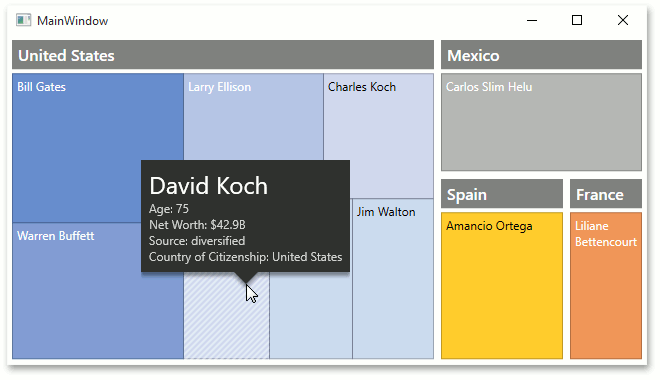
Result
The application is done. The following code snippet demonstrates the resulting XAML.
<Window x:Class="TreeMapLesson2.MainWindow"
        xmlns="http://schemas.microsoft.com/winfx/2006/xaml/presentation"
        xmlns:x="http://schemas.microsoft.com/winfx/2006/xaml"
        xmlns:dxtm="http://schemas.devexpress.com/winfx/2008/xaml/treemap"
        Title="MainWindow" Height="360" Width="640">
    <Window.Resources>
        <XmlDataProvider x:Key="dataSource" Source="Data/billionaires.xml"/>
        <DataTemplate x:Key="countryGroupTemplate">
            <TextBlock Background="Gray"
                       Foreground="White"
                       FontSize="16"
                       Text="{Binding Label}"
                       Margin="4,4,4,0"
                       Padding="6,4,4,4"
                       FontWeight="SemiBold"/>
        </DataTemplate>
        <DataTemplate x:Key="tooltipTemplate">
            <StackPanel Margin="8">
                <TextBlock Text="{Binding Item.Name}"
                           Foreground="White"
                           FontSize="24"/>
                <TextBlock Text="{Binding Item.Age, StringFormat=Age: {0}}"
                           Foreground="LightGray"/>
                <TextBlock Text="{Binding Item.NetWorth, StringFormat=Net Worth: ${0:c}B}"
                           Foreground="LightGray"/>
                <TextBlock Text="{Binding Item.Source, StringFormat=Source: {0}}"
                           Foreground="LightGray"/>
                <TextBlock Text="{Binding Item.Country, StringFormat=Country of Citizenship: {0}}"
                           Foreground="LightGray"/>
            </StackPanel>
        </DataTemplate>
    </Window.Resources>
    <Grid>
        <dxtm:TreeMapControl ToolTipContentTemplate="{Binding Source={StaticResource tooltipTemplate}}"
                             ToolTipEnabled="True">
            <dxtm:TreeMapControl.LayoutAlgorithm>
                <dxtm:SquarifiedLayoutAlgorithm/>
            </dxtm:TreeMapControl.LayoutAlgorithm>
            <dxtm:TreeMapControl.Colorizer>
                <dxtm:TreeMapGroupGradientColorizer>
                    <dxtm:Office2013Palette/>
                </dxtm:TreeMapGroupGradientColorizer>
            </dxtm:TreeMapControl.Colorizer>
            <dxtm:TreeMapFlatDataAdapter DataSource="{Binding Source={StaticResource dataSource}}"
                                         DataMember="Billionaire"
                                         LabelDataMember="Name"
                                         ValueDataMember="NetWorth">
                <dxtm:TreeMapFlatDataAdapter.Groups>
                    <dxtm:GroupDefinitionCollection>
                        <dxtm:TreeMapGroupDefinition GroupDataMember="Country"
                                                     HeaderContentTemplate="{Binding Source={StaticResource countryGroupTemplate}}"/>
                    </dxtm:GroupDefinitionCollection>
                </dxtm:TreeMapFlatDataAdapter.Groups>
            </dxtm:TreeMapFlatDataAdapter>
        </dxtm:TreeMapControl>
    </Grid>
</Window>
Run the application and click any tree map item. The application should look like this.