Lesson 2 - Load a Vector Cartesian Map
- 5 minutes to read
This is the second tutorial in the Getting Started series for the Map control. It will guide you through the process of creating a simple map application that draws vector data using Cartesian coordinates.
The DevExpress WPF MapControl supports displaying both Geographical and Cartesian maps. The Geographical maps usually show geospatial data using geographical coordinates (latitude and longitude), while Cartesian maps use X and Y coordinates to draw building plans or any other Cartesian data.
This tutorial consists of the following steps.
- Step 1. Add a Map Control
- Step 2. Customize the Map Control
- Step 3. Load Vector Data
- Step 4. Customize a Colorizer
- Step 5. Customize a Legend
- Result
Step 1. Add a Map Control
- Run Microsoft Visual Studio 2012, 2013, 2015, 2017 or 2019.
- Create a new WPF Application project and add the MapControl component to it. (See the first step in Lesson 1 to learn how to do this).
After these steps, the XAML should look as follows. If it does not, you can override your code with the following.
<Window x:Class="MapControl_Lesson2.MainWindow"
        xmlns="http://schemas.microsoft.com/winfx/2006/xaml/presentation"
        xmlns:x="http://schemas.microsoft.com/winfx/2006/xaml"
        xmlns:sys="clr-namespace:System;assembly=mscorlib"
        xmlns:dxm="http://schemas.devexpress.com/winfx/2008/xaml/map"
        Title="MainWindow" Height="360" Width="640" >
    <Grid>
        <dxm:MapControl Background="White"/>
    </Grid>
</Window>
Step 2. Customize the Map Control
Follow these steps below to prepare the Map control to draw a Cartesian map and customize control settings.
Set the MapControl.CoordinateSystem property value to CartesianMapCoordinateSystem.
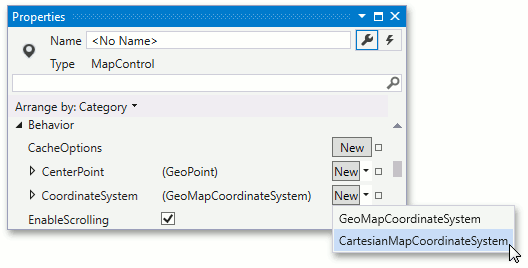
Specify the MapControl.CenterPoint property value to the CartesianPoint object with values of coordinates equaling -100, -47. The following XAML demonstrates this.
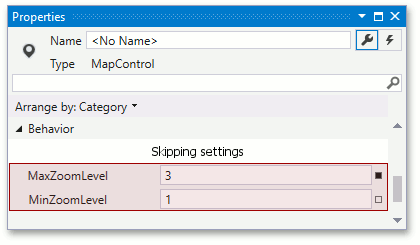
<!--...-->
<dxm:MapControl>
    <dxm:MapControl.CenterPoint>
        <dxm:CartesianPoint X="-100" Y="-47"/>
    </dxm:MapControl.CenterPoint>
<!--...-->
Set the MapControl.MaxZoomLevel property value to 3 and the MapControl.MinZoomLevel property value to 1.
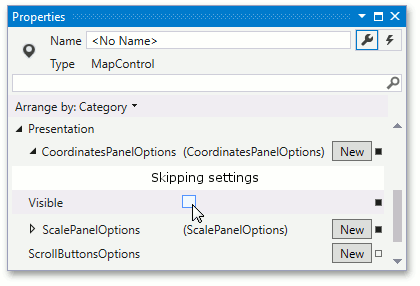
Assign an ScalePanelOptions object to the MapControl.ScalePanelOptions property and set the object’s MapElementOptions.Visible property to false.
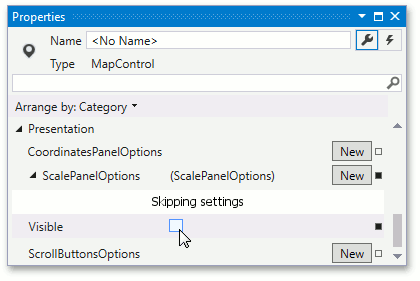
Assign an CoordinatesPanelOptions object to the MapControl.CoordinatesPanelOptions property and set the object’s MapElementOptions.Visible property to false.
After this, the XAML should look as follows.
<!--...-->
<dxm:MapControl>
    <dxm:MapControl.CoordinatesPanelOptions>
        <dxm:CoordinatesPanelOptions Visible="False"/>
    </dxm:MapControl.CoordinatesPanelOptions>
    <dxm:MapControl.ScalePanelOptions>
        <dxm:ScalePanelOptions Visible="False"/>
    </dxm:MapControl.ScalePanelOptions>
    <dxm:MapControl.CenterPoint>
        <dxm:CartesianPoint X="-82" Y="-47"/>
    </dxm:MapControl.CenterPoint>
    <dxm:MapControl.CoordinateSystem>
        <dxm:CartesianMapCoordinateSystem/>
    </dxm:MapControl.CoordinateSystem>
</dxm:MapControl>
<!--...-->
Step 3. Load Vector Data
Shape data can be stored in numerous existing data formats. The Map control supports loading data from Shapefile and KML file formats. To load data from a Shapefile, do the following.
For this lesson, we can use one of the Shapefiles shipped with the WPF Map Control demo. By default, these files are installed in the following folder.
C:\Users\Public\Documents\DevExpress Demos 20.2\Components\Components\Data\Hotels\
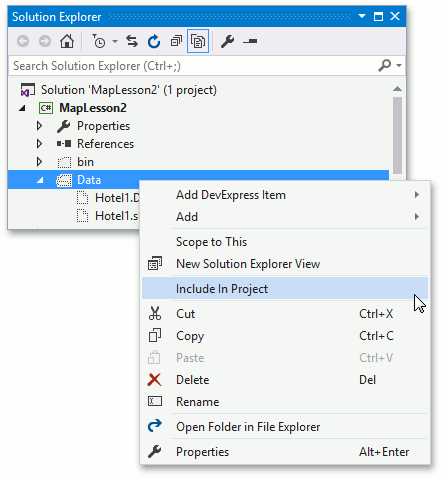
Copy the Hotel1.shp and Hotel1.dbf files to the Data subdirectory of your project and include these files into your solution.
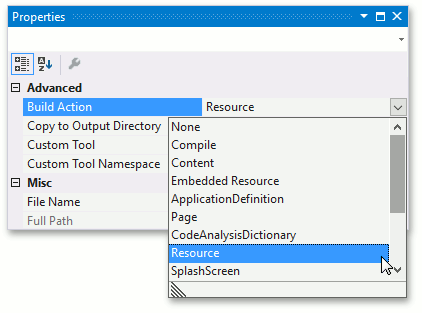
For both files, set the Build Action property to Resource.
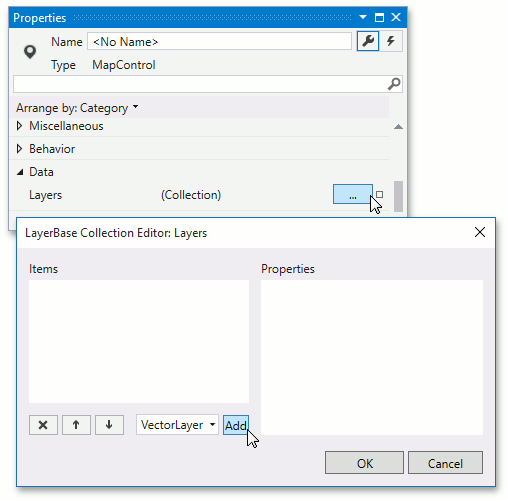
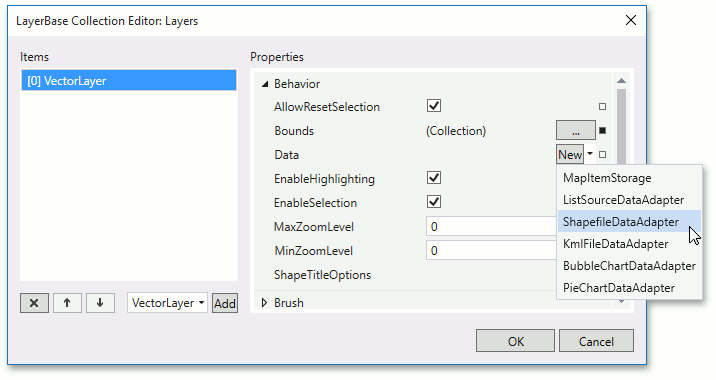
Add a new VectorLayer to the MapControl.Layers collection (refer to the Step 2 of the Lesson 1 to learn how to do this).
Assign the ShapefileDataAdapter object as the VectorLayer.Data property.
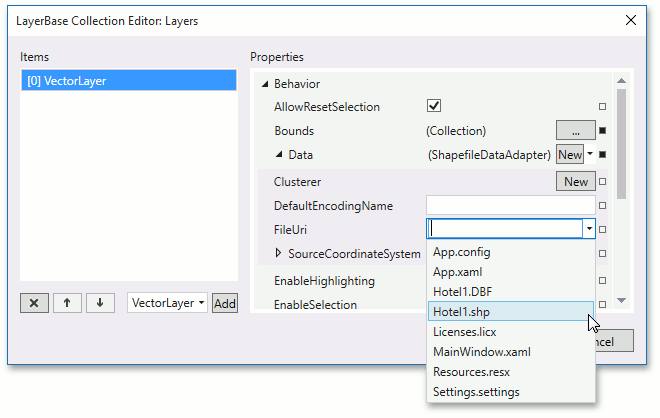
Specify the ShapefileDataAdapter.FileUri property. For this, select the Hotel1.shp item from the drop-down list.
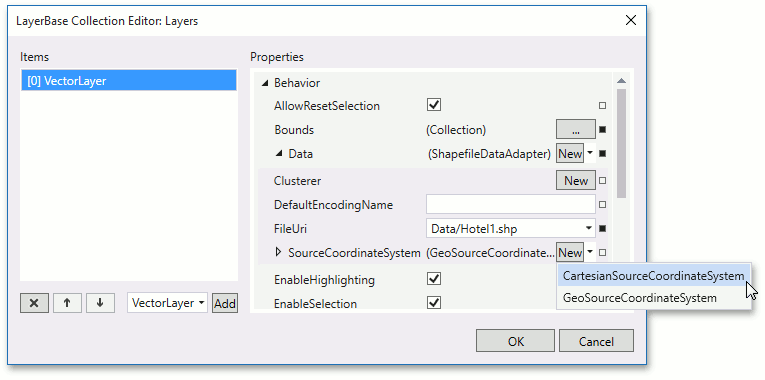
Set the CoordinateSystemDataAdapterBase.SourceCoordinateSystem property value to CartesianSourceCoordinateSystem.
After you perform these steps, your XAML should look like following.
<!--...-->
<dxm:VectorLayer>
    <dxm:ShapefileDataAdapter FileUri="/Data/Hotel1.shp">
        <dxm:ShapefileDataAdapter.SourceCoordinateSystem>
            <dxm:CartesianSourceCoordinateSystem/>
        </dxm:ShapefileDataAdapter.SourceCoordinateSystem>
    </dxm:ShapefileDataAdapter>
</dxm:VectorLayer>
<!--...-->
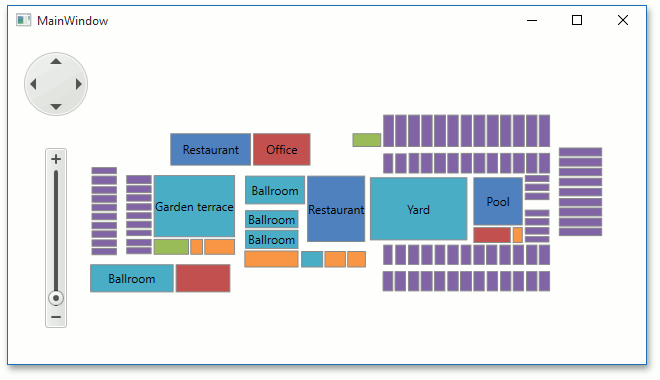
Run the application. It should look like following.
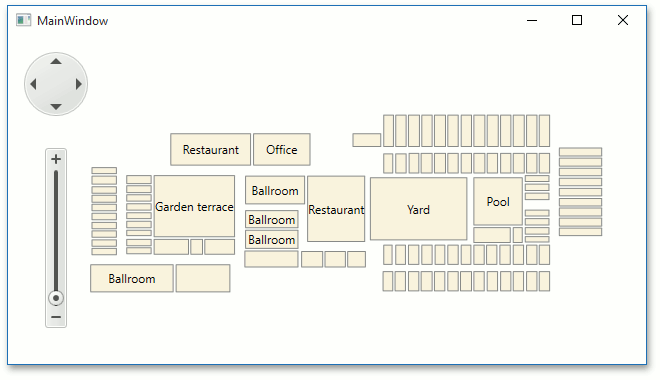
When you look at the map, rooms of the one type can’t be easily distinguished from rooms of another type. Colorize different room types using different colors. Use the Colorizers to solve this.
Step 4. Customize a Colorizer
To get this done, do the following.
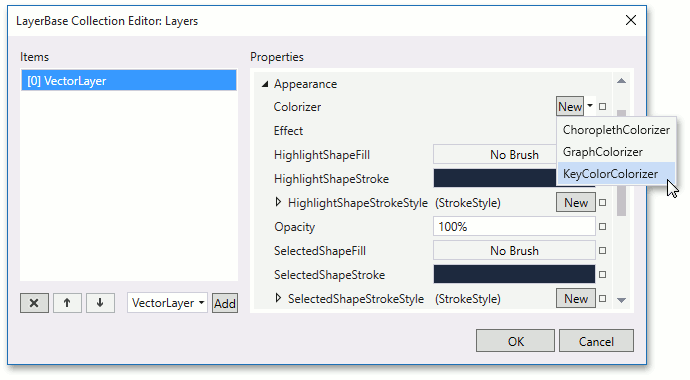
Assign the KeyColorColorizer as the VectorLayer.Colorizer property value.
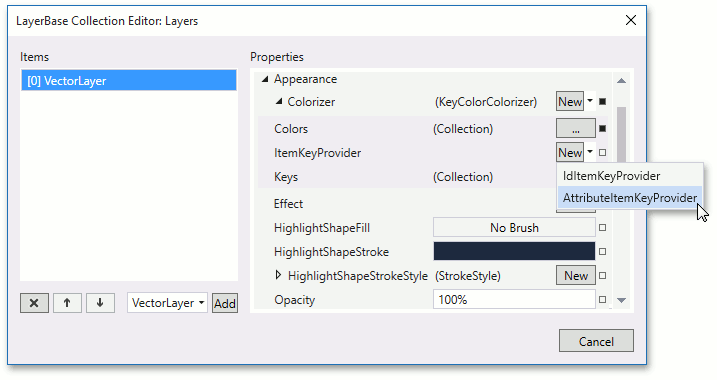
Set the KeyColorColorizer.ItemKeyProvider property value to AttributeItemKeyProvider.
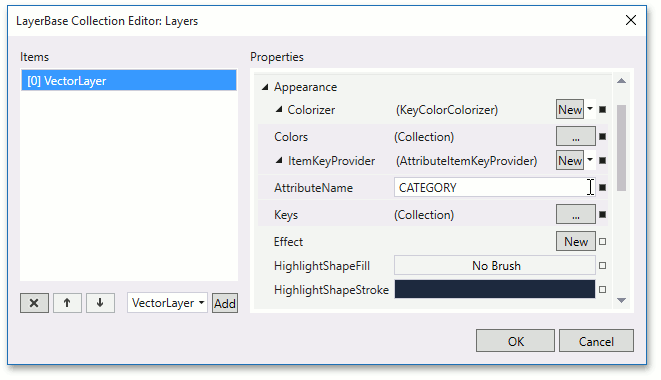
Specify the NamedAttributeProviderBase.AttributeName property as shown below.
Add the following key-name pairs to the KeyColorColorizer.Keys collection. Note that the key type should be Int32.
- 1 - Restaurant
- 2 - Business room
- 3 - Bathroom
- 4 - Living room
- 5 - Other
- 6 - Service room
- 7 - Pool
- 8 - Gym
As a result, the XAML should look like following.
<!--...-->
<dxm:VectorLayer>
    <dxm:VectorLayer.Colorizer>
        <dxm:KeyColorColorizer>
            <dxm:KeyColorColorizer.ItemKeyProvider>
                <dxm:AttributeItemKeyProvider AttributeName="CATEGORY"/>
            </dxm:KeyColorColorizer.ItemKeyProvider>
            <dxm:KeyColorColorizer.Keys>
                <dxm:ColorizerKeyItem Name="Restaurant">
                    <dxm:ColorizerKeyItem.Key>
                        <sys:Int32>1</sys:Int32>
                    </dxm:ColorizerKeyItem.Key>
                </dxm:ColorizerKeyItem>
                <dxm:ColorizerKeyItem Name="Business Room">
                    <dxm:ColorizerKeyItem.Key>
                        <sys:Int32>2</sys:Int32>
                    </dxm:ColorizerKeyItem.Key>
                </dxm:ColorizerKeyItem>
                <dxm:ColorizerKeyItem Name="Bathroom">
                    <dxm:ColorizerKeyItem.Key>
                        <sys:Int32>3</sys:Int32>
                    </dxm:ColorizerKeyItem.Key>
                </dxm:ColorizerKeyItem>
                <dxm:ColorizerKeyItem Name="Living Room">
                    <dxm:ColorizerKeyItem.Key>
                        <sys:Int32>4</sys:Int32>
                    </dxm:ColorizerKeyItem.Key>
                </dxm:ColorizerKeyItem>
                <dxm:ColorizerKeyItem Name="Other">
                    <dxm:ColorizerKeyItem.Key>
                        <sys:Int32>5</sys:Int32>
                    </dxm:ColorizerKeyItem.Key>
                </dxm:ColorizerKeyItem>
                <dxm:ColorizerKeyItem Name="Service Room">
                    <dxm:ColorizerKeyItem.Key>
                        <sys:Int32>6</sys:Int32>
                    </dxm:ColorizerKeyItem.Key>
                </dxm:ColorizerKeyItem>
                <dxm:ColorizerKeyItem Name="Pool">
                    <dxm:ColorizerKeyItem.Key>
                        <sys:Int32>7</sys:Int32>
                    </dxm:ColorizerKeyItem.Key>
                </dxm:ColorizerKeyItem>
                <dxm:ColorizerKeyItem Name="Gym">
                    <dxm:ColorizerKeyItem.Key>
                        <sys:Int32>8</sys:Int32>
                    </dxm:ColorizerKeyItem.Key>
                </dxm:ColorizerKeyItem>
            </dxm:KeyColorColorizer.Keys>
        </dxm:KeyColorColorizer>
    </dxm:VectorLayer.Colorizer>
<!--...-->
Run the application. It should look like following.
Now different types of rooms have different colors, but despite displaying this information, you cannot determine the type of the room it is. Let us add a legend to solve this.
Step 5. Customize a Legend
To add a legend to the Map control, do the following.
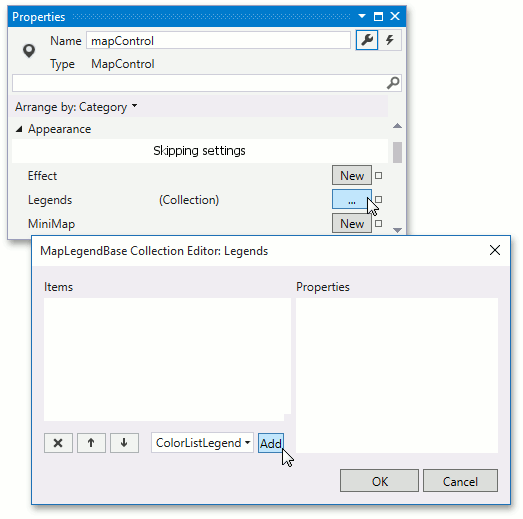
Locate the MapControl.Legends property in the Properties window, and click the ellipsis button to invoke Legends Editor. Choose the ColorListLegend from a drop-down list and click the Add button.
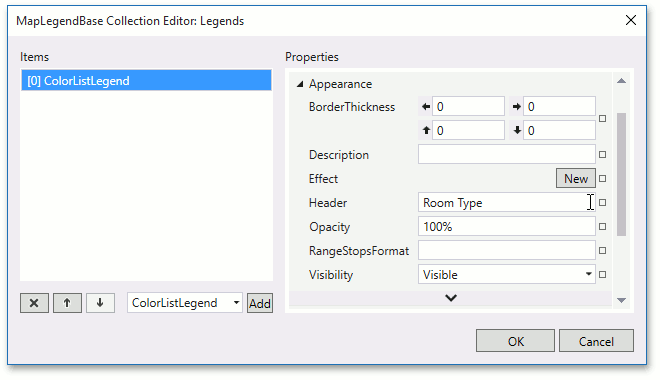
Set the MapLegendBase.Header property value to Room Type.
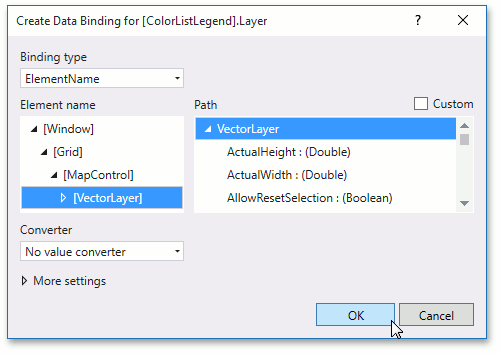
Bind the ItemsLayerLegend.Layer property to the vector layer. For this click the property marker and select the Create Data Binding… item.

In the invoked the Create Data Binding dialog select the previously added vector layer and click OK.
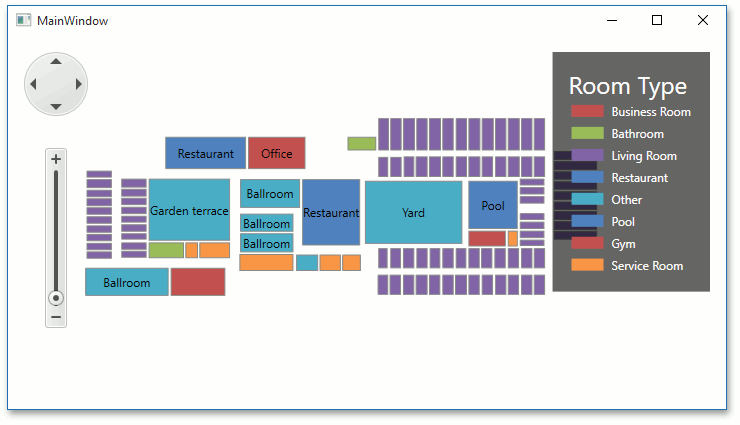
The application is completed.
Result
The complete code of the application is represented below.
<Window xmlns="http://schemas.microsoft.com/winfx/2006/xaml/presentation"
        xmlns:x="http://schemas.microsoft.com/winfx/2006/xaml"
        xmlns:sys="clr-namespace:System;assembly=mscorlib"
        xmlns:dxm="http://schemas.devexpress.com/winfx/2008/xaml/map"
        x:Class="MapLesson2.MainWindow"
        Title="MainWindow" Height="412" Width="734">
    <Grid>
        <dxm:MapControl MaxZoomLevel="3"
                        Background="White">
            <dxm:MapControl.Legends>
                <dxm:ColorListLegend Header="Room Type"
                                     Layer="{Binding ElementName=vectorLayer, Mode=OneWay}"/>
            </dxm:MapControl.Legends>
            <dxm:MapControl.CenterPoint>
                <dxm:CartesianPoint X="-82" Y="-47"/>
            </dxm:MapControl.CenterPoint>
            <dxm:MapControl.CoordinatesPanelOptions>
                <dxm:CoordinatesPanelOptions Visible="False"/>
            </dxm:MapControl.CoordinatesPanelOptions>
            <dxm:MapControl.ScalePanelOptions>
                <dxm:ScalePanelOptions Visible="False"/>
            </dxm:MapControl.ScalePanelOptions>
            <dxm:MapControl.CoordinateSystem>
                <dxm:CartesianMapCoordinateSystem/>
            </dxm:MapControl.CoordinateSystem>
            <dxm:VectorLayer x:Name="vectorLayer">
                <dxm:VectorLayer.Colorizer>
                    <dxm:KeyColorColorizer>
                        <dxm:KeyColorColorizer.ItemKeyProvider>
                            <dxm:AttributeItemKeyProvider AttributeName="CATEGORY"/>
                        </dxm:KeyColorColorizer.ItemKeyProvider>
                        <dxm:KeyColorColorizer.Keys>
                            <dxm:ColorizerKeyItem Name="Restaurant">
                                <dxm:ColorizerKeyItem.Key>
                                    <sys:Int32>1</sys:Int32>
                                </dxm:ColorizerKeyItem.Key>
                            </dxm:ColorizerKeyItem>
                            <dxm:ColorizerKeyItem Name="Business Room">
                                <dxm:ColorizerKeyItem.Key>
                                    <sys:Int32>2</sys:Int32>
                                </dxm:ColorizerKeyItem.Key>
                            </dxm:ColorizerKeyItem>
                            <dxm:ColorizerKeyItem Name="Bathroom">
                                <dxm:ColorizerKeyItem.Key>
                                    <sys:Int32>3</sys:Int32>
                                </dxm:ColorizerKeyItem.Key>
                            </dxm:ColorizerKeyItem>
                            <dxm:ColorizerKeyItem Name="Living Room">
                                <dxm:ColorizerKeyItem.Key>
                                    <sys:Int32>4</sys:Int32>
                                </dxm:ColorizerKeyItem.Key>
                            </dxm:ColorizerKeyItem>
                            <dxm:ColorizerKeyItem Name="Other">
                                <dxm:ColorizerKeyItem.Key>
                                    <sys:Int32>5</sys:Int32>
                                </dxm:ColorizerKeyItem.Key>
                            </dxm:ColorizerKeyItem>
                            <dxm:ColorizerKeyItem Name="Service Room">
                                <dxm:ColorizerKeyItem.Key>
                                    <sys:Int32>6</sys:Int32>
                                </dxm:ColorizerKeyItem.Key>
                            </dxm:ColorizerKeyItem>
                            <dxm:ColorizerKeyItem Name="Pool">
                                <dxm:ColorizerKeyItem.Key>
                                    <sys:Int32>7</sys:Int32>
                                </dxm:ColorizerKeyItem.Key>
                            </dxm:ColorizerKeyItem>
                            <dxm:ColorizerKeyItem Name="Gym">
                                <dxm:ColorizerKeyItem.Key>
                                    <sys:Int32>8</sys:Int32>
                                </dxm:ColorizerKeyItem.Key>
                            </dxm:ColorizerKeyItem>
                        </dxm:KeyColorColorizer.Keys>
                    </dxm:KeyColorColorizer>
                </dxm:VectorLayer.Colorizer>
                <dxm:ShapefileDataAdapter FileUri="Data/Hotel1.shp">
                    <dxm:ShapefileDataAdapter.SourceCoordinateSystem>
                        <dxm:CartesianSourceCoordinateSystem/>
                    </dxm:ShapefileDataAdapter.SourceCoordinateSystem>
                </dxm:ShapefileDataAdapter>
            </dxm:VectorLayer>
        </dxm:MapControl>
    </Grid>
</Window>
Run the application to see the result.