Lesson 2 - Data Editing and Displaying
- 4 minutes to read
This topic covers the basics behind the editing of data and its display within the GridControl.
Note
Lesson requirements The code examples in this lesson are based on the solution implemented in the Lesson 1.
Manipulating a set of columns
In the previous lesson, the GridControl automatically generated its columns for all bound data source fields. The columns were placed inside the grid in the same order the data source fields were defined. The GridControl allows you to manually define which data source fields (and in which order) should be displayed within the grid. To do this, invoke the grid’s smart tag and select “Generate columns”.
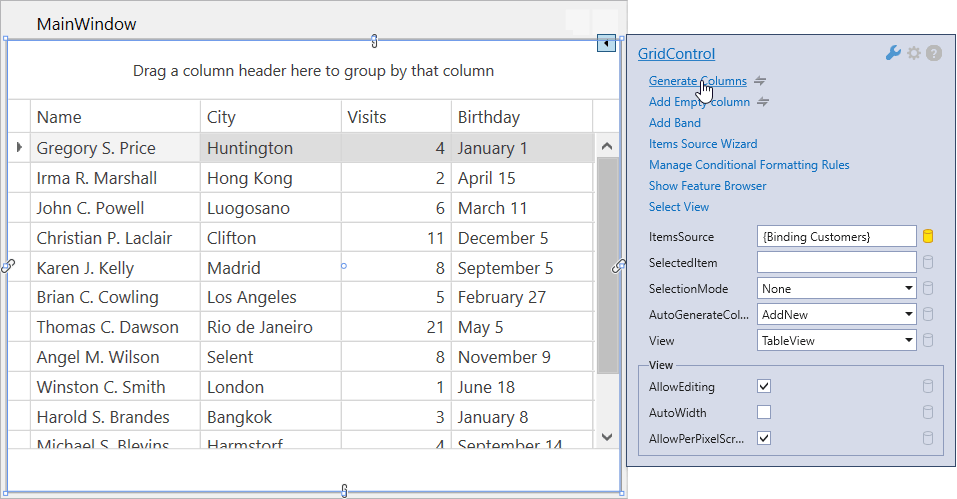
As a result, the grid’s XAML will look as follows.
<dxg:GridControl AutoGenerateColumns="AddNew" EnableSmartColumnsGeneration="True" ItemsSource="{Binding Customers}">
    <dxg:GridControl.Columns>
        <dxg:GridColumn FieldName="Name" IsSmart="True"/>
        <dxg:GridColumn FieldName="City" IsSmart="True"/>
        <dxg:GridColumn FieldName="Visits" IsSmart="True"/>
        <dxg:GridColumn FieldName="Birthday" IsSmart="True"/>
    </dxg:GridControl.Columns>
    <dxg:GridControl.View>
        <dxg:TableView AllowPerPixelScrolling="True" ShowTotalSummary="True"/>
    </dxg:GridControl.View>
</dxg:GridControl>
Now, you can define settings for the individual columns.
Extending column editing features
When created (manually or automatically), a GridControl column gets its in-place editor depending on its content. The CheckEdit is used to edit Boolean columns. The DateEdit is used by columns with DateTime values. For all other columns, the TextEdit is used.
GridControl allows you to define a custom data editor for any of its columns.
The image below demonstrates how the ComboBoxEdit allows end-users to edit column values.
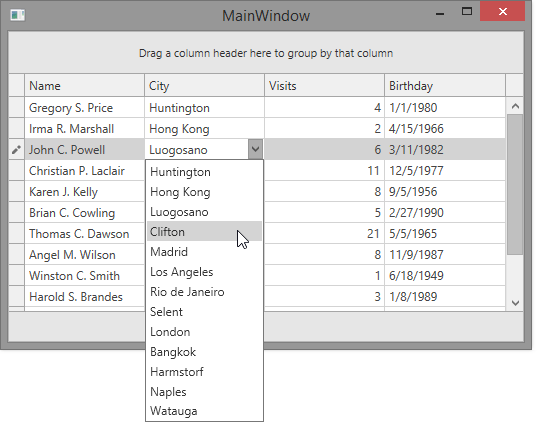
Refer to the following steps to learn how to implement the editing of column values with the ComboBoxEdit.
Items for the ComboBoxEdit control.
In this tutorial, the ComboBoxEdit control is used to edit values of the “City” column. Edit the ViewModel code, so it will be able to expose a list of cities from which the ComboBoxEdit will retrieve its items.
using System.Collections.Generic;
using System.Linq;

namespace DxGridGettingStarted {
    public class MainWindowViewModel {
        public MainWindowViewModel() {
            this.Customers = Customer.GetCustomers();
            var cities = from c in Customer.GetCustomers() select c.City;
            this.Cities = cities.ToList();
        }
        public List<Customer> Customers { get; set; }
        // A list of cities for ComboBoxEdit
        public List<string> Cities { get; set; }
    }
}
Embed ComboBoxEdit to a column
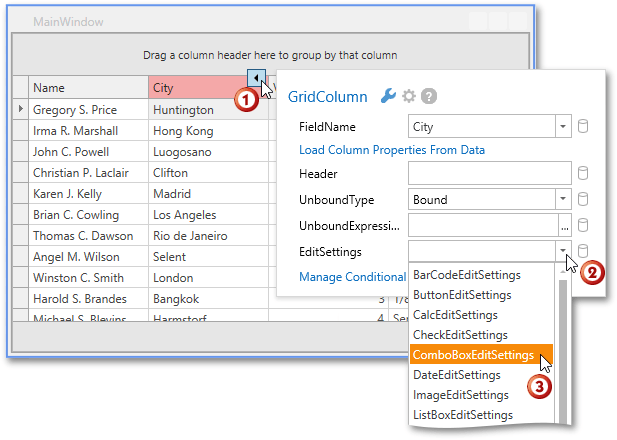
To build the ComboBoxEdit into a grid column, pass the ComboBoxEditSettings object to the column’s ColumnBase.EditSettings property. The image below illustrates how you can do this without coding at design time.
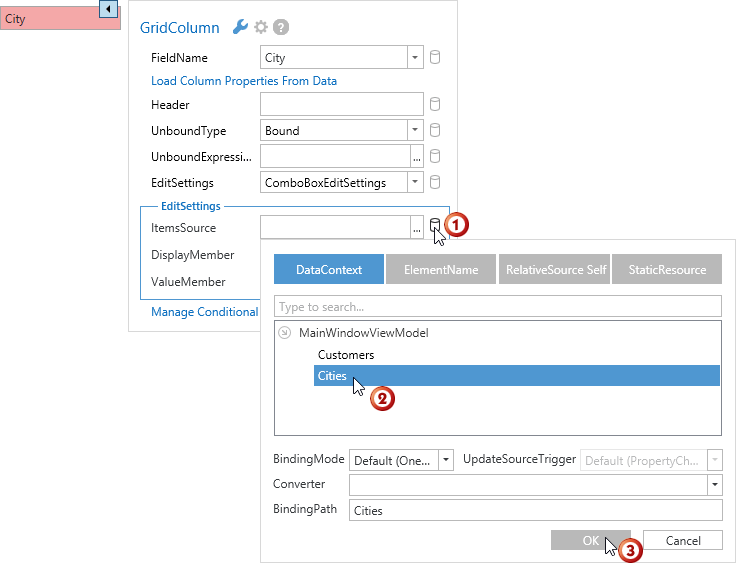
Bind ComboBoxEdit to data
Build solution. You need to bind the column’s built-in ComboBoxEdit control to a list of cities that will be displayed in the control’s dropdown window. The image below illustrates how to bind the grid’s built-in ComboBoxEdit to data.
The code sample below demonstrates the generated code.
<Window xmlns:dxg="http://schemas.devexpress.com/winfx/2008/xaml/grid"
        xmlns:dxe="http://schemas.devexpress.com/winfx/2008/xaml/editors"
        xmlns="http://schemas.microsoft.com/winfx/2006/xaml/presentation"
        xmlns:x="http://schemas.microsoft.com/winfx/2006/xaml"
        xmlns:local="clr-namespace:DxGridGettingStarted"
        x:Class="DxGridGettingStarted.MainWindow"
        Title="MainWindow" Height="350" Width="525">
    <Window.DataContext>
        <local:MainWindowViewModel/>
    </Window.DataContext>
    <Grid>
        <dxg:GridControl AutoGenerateColumns="AddNew" EnableSmartColumnsGeneration="True" ItemsSource="{Binding Customers}">
            <dxg:GridControl.Columns>
                <dxg:GridColumn FieldName="Name" IsSmart="True"/>
                <dxg:GridColumn FieldName="City" IsSmart="True">
                    <dxg:GridColumn.EditSettings>
                        <dxe:ComboBoxEditSettings ItemsSource="{Binding Cities}"/>
                    </dxg:GridColumn.EditSettings>
                </dxg:GridColumn>
                <dxg:GridColumn FieldName="Visits" IsSmart="True"/>
                <dxg:GridColumn FieldName="Birthday" IsSmart="True"/>
            </dxg:GridControl.Columns>
            <dxg:GridControl.View>
                <dxg:TableView AllowPerPixelScrolling="True" ShowTotalSummary="True"/>
            </dxg:GridControl.View>
        </dxg:GridControl>
    </Grid>
</Window>
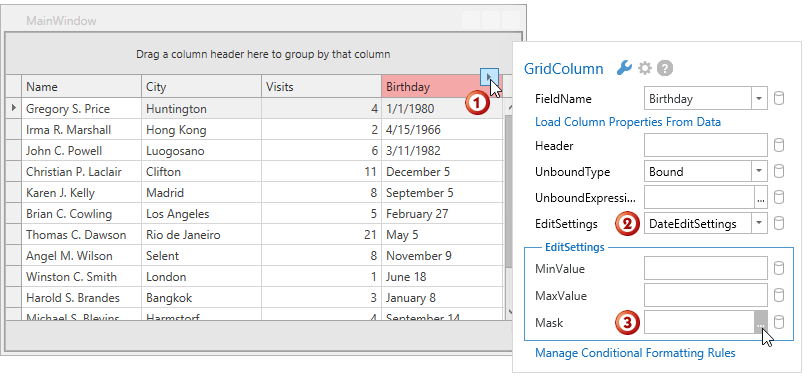
Formatting displayed and edited values
In-place data editors allow you to configure how your data will be displayed within the grid in both edit and display modes. For example, you can use the mask editing functionality for this purpose. The defined mask can be used as a display format when the TextEditSettings.MaskUseAsDisplayFormat property of in-placed editor settings is set to true.
This tutorial demonstrates how to enable data formatting for the “Birthday” column. Invoke the column’s smart tag and set the EditSettings option to DateEditSettings. Then, invoke the Mask Editor to define the Mask option.
When the Mask Editor opens, select any of the predefined masks (Month day in this example). Then, enable the “Use mask as DisplayFormat” option.
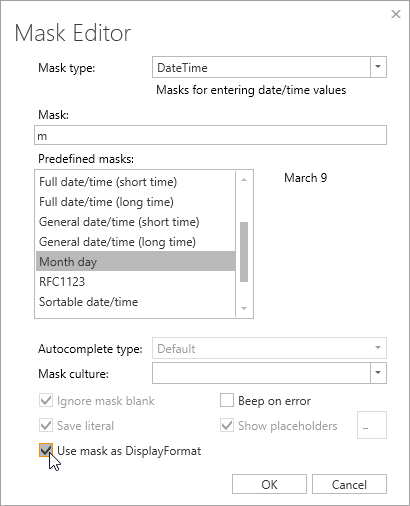
Click OK to apply settings. The column’s code will look as follows.
...
<dxg:GridColumn FieldName="Birthday" IsSmart="True">
    <dxg:GridColumn.EditSettings>
        <dxe:DateEditSettings Mask="m" MaskUseAsDisplayFormat="True"/>
    </dxg:GridColumn.EditSettings>
</dxg:GridColumn>
...
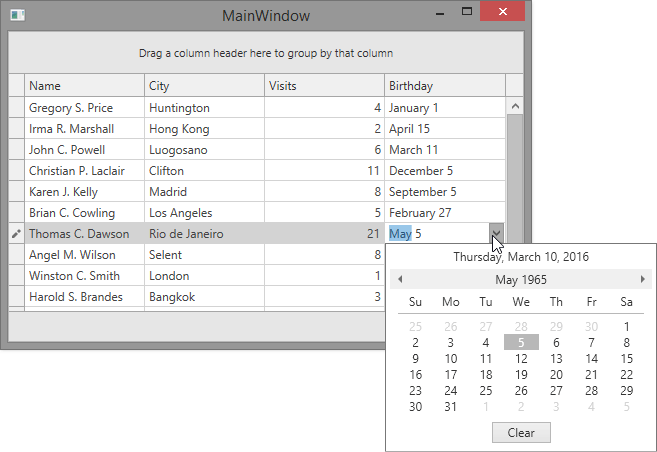
The image below illustrates the result.