How to: Add a Map Control via Code
- 2 minutes to read
This short introductory example describes how to add a Map Control to your WPF application in code.
- Run the MS Visual Studio 2012, 2013, 2015 or 2017.
- Create a new WPF Application project or open an existing one.
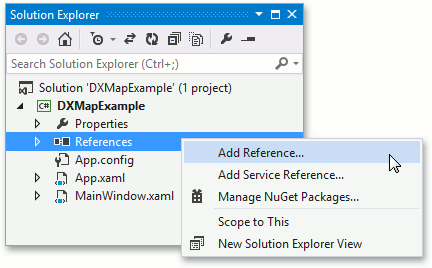
Open the Solution Explorer, right-click References and choose Add Reference… to add the Map Control Library.
Then, locate the DevExpress.Xpf.Map.v18.2 assembly and click it.
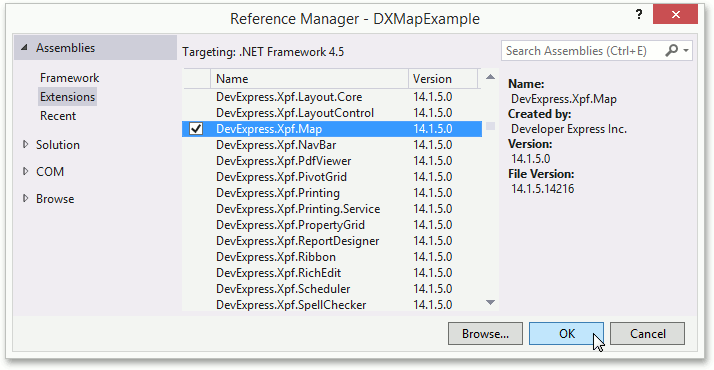
Repeat this step to add the DevExpress.Data.v18.2 and DevExpress.Map.v18.2.Core references.
Click OK to apply changes and close the window.
Write the following code (or something similar).
using DevExpress.Xpf.Map;
using System.Windows;

namespace DXMapExample {

    public partial class MainWindow : Window {
        public MainWindow () {
            InitializeComponent();
        }

        private void Window_Loaded (object sender, RoutedEventArgs e) {
            // Create a map control and add it to the window.
            MapControl map = new MapControl();
            this.Content = map;

            // Create a layer.
            ImageLayer layer = new ImageLayer() {
                DataProvider = new OpenStreetMapDataProvider()
            };
            map.Layers.Add(layer);
        }

    }
}
The MapControl has now been added to your application.
Tip
A complete sample project is available in the DevExpress Code Examples database at http://www.devexpress.com/example=E3610.
See Also