How to: Create a SearchLookUpEdit and Bind it to Data
- 3 minutes to read
The SearchLookUpEdit editor combines the functionality of the LookUpEdit with the built-in Find box feature that allows you to quickly locate data.
This document demonstrates how to create a SearchLookUpEdit control and bind it to data.
Follow the steps listed below.
- Steps 1-4. Create a New Project and Add a SearchLookUpEdit
- Steps 5-10. Create Data Objects
- Steps 11-13. Bind SearchLookUpEdit to Data
Steps 1-4. Create a New Project and Add a SearchLookUpEdit
- Run MS Visual Studio 2010.
- Create a new WPF Application project. For this, choose New Project on the File menu or press Ctrl+Shift+N, and then choose the WPF Application.
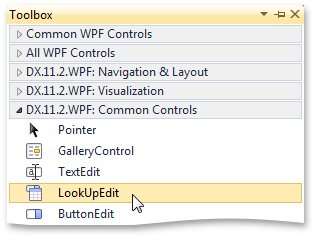
Add a LookUpEdit component to the project.
To do this, open the Visual Studio toolbox, choose the LookUpEdit toolbox item and drop it onto the window.
<Window x:Class="SearchLookUpEdit.MainWindow"
        xmlns="http://schemas.microsoft.com/winfx/2006/xaml/presentation"
        xmlns:x="http://schemas.microsoft.com/winfx/2006/xaml"
        Title="MainWindow" Height="375" Width="525" xmlns:dxg="http://schemas.devexpress.com/winfx/2008/xaml/grid"
        xmlns:dx="http://schemas.devexpress.com/winfx/2008/xaml/core" dx:ThemeManager.ThemeName="Office2010Black"
        xmlns:dxe="http://schemas.devexpress.com/winfx/2008/xaml/editors">
    <Grid>
        <dxg:LookUpEdit VerticalAlignment="Top" HorizontalAlignment="Stretch" Name="searchLookUpEdit" Height="30" />
    </Grid>
</Window>
Note
To apply the custom “Office2010Black” theme, manually add a reference to the DevExpress.Xpf.Core.v19.1.dll library.
To enable the Find box feature, set the StyleSettings property to “SearchLookUpEditStyleSettings”:
<Window x:Class="SearchLookUpEdit.MainWindow"
        xmlns="http://schemas.microsoft.com/winfx/2006/xaml/presentation"
        xmlns:x="http://schemas.microsoft.com/winfx/2006/xaml"
        Title="MainWindow" Height="375" Width="525" xmlns:dxg="http://schemas.devexpress.com/winfx/2008/xaml/grid"
        xmlns:dx="http://schemas.devexpress.com/winfx/2008/xaml/core" dx:ThemeManager.ThemeName="Office2010Black"
        xmlns:dxe="http://schemas.devexpress.com/winfx/2008/xaml/editors">
    <Grid>
        <dxg:LookUpEdit Name="searchLookUpEdit" VerticalAlignment="Top" HorizontalAlignment="Stretch" Height="30">
            <dxg:LookUpEdit.StyleSettings>
                <dxg:SearchLookUpEditStyleSettings/>
            </dxg:LookUpEdit.StyleSettings>
        </dxg:LookUpEdit>
    </Grid>
</Window>
Steps 5-10. Create Data Objects
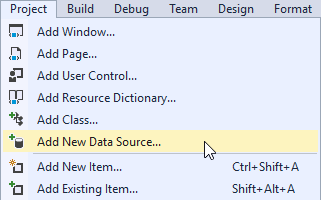
Add a data source to your WPF Application. For this, follow the steps below.
Open the Data menu and click the Add New Data Source item.
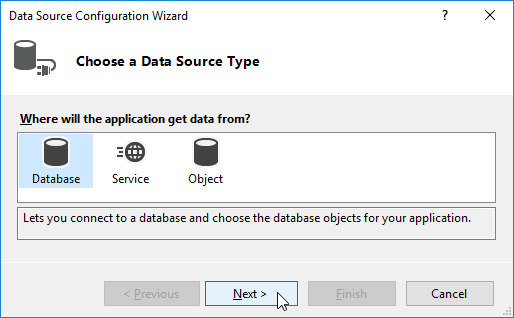
Choose a Database as a type of a data source.
Then choose a Dataset as a Database Model.

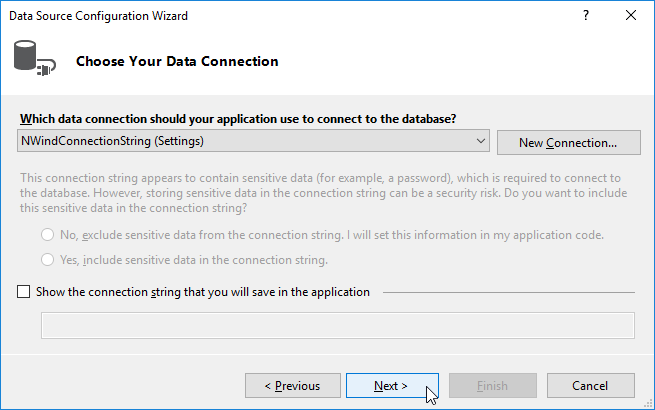
As a data source, choose the Microsoft Access Database File. As a data connection, choose the nwind database. By default, it is stored in the following path.C:\Users\Public\Documents\DevExpress Demos 19.1\Components\Data
In the Tables menu, choose Customers.
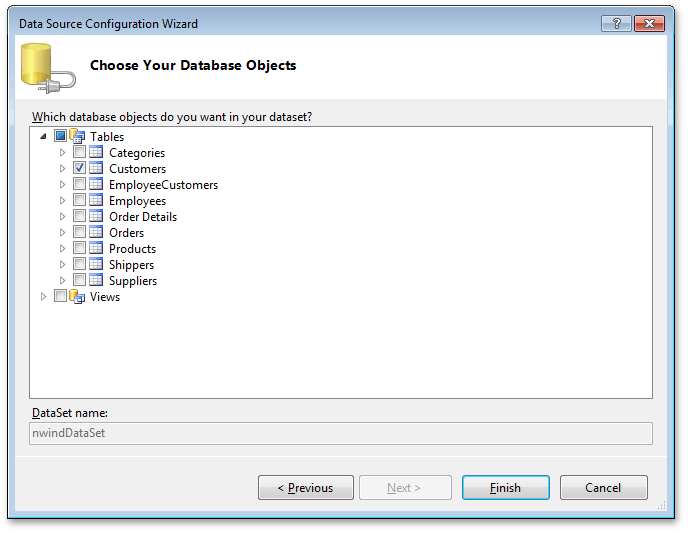
- After this, click Finish to close the wizard.
Steps 11-13. Bind SearchLookUpEdit to Data
Bind the SearchLookUpEdit to the data source. Add the following code.
using System.Windows;

namespace SearchLookUpEdit
{
    public partial class MainWindow : Window
    {
        public MainWindow()
        {
            InitializeComponent();
            searchLookUpEdit.ItemsSource = new nwindDataSetTableAdapters.CustomersTableAdapter().GetData();
        }
    }
}
Set the ValueMember property to “CustomerID”. Set the DisplayMember property to “ContactName”:
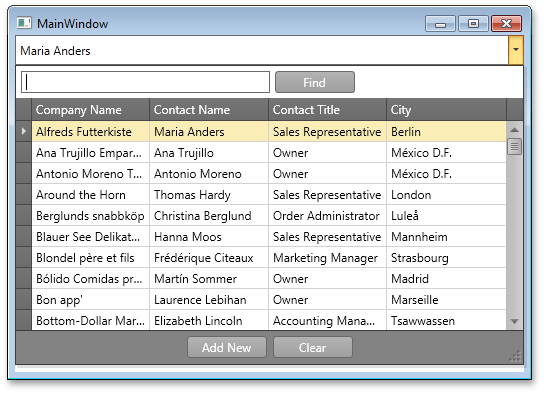
<Window x:Class="SearchLookUpEdit.MainWindow"
        xmlns="http://schemas.microsoft.com/winfx/2006/xaml/presentation"
        xmlns:x="http://schemas.microsoft.com/winfx/2006/xaml"
        Title="MainWindow" Height="375" Width="525" xmlns:dxg="http://schemas.devexpress.com/winfx/2008/xaml/grid"
        xmlns:dx="http://schemas.devexpress.com/winfx/2008/xaml/core" dx:ThemeManager.ThemeName="Office2010Black"
        xmlns:dxe="http://schemas.devexpress.com/winfx/2008/xaml/editors">
    <Grid>
        <dxg:LookUpEdit
                Name="searchLookUpEdit"
                DisplayMember="ContactName"
                ValueMember="CustomerID"
                VerticalAlignment="Top"
                HorizontalAlignment="Stretch"
                Height="30">
            <dxg:LookUpEdit.StyleSettings>
                <dxg:SearchLookUpEditStyleSettings/>
            </dxg:LookUpEdit.StyleSettings>
        </dxg:LookUpEdit>
    </Grid>
</Window>
To disable automatic column creation, set the AutoPopulateColumns property to “False”. Create required columns and bind them to corresponding data fields:
<Window x:Class="SearchLookUpEdit.MainWindow"
        xmlns="http://schemas.microsoft.com/winfx/2006/xaml/presentation"
        xmlns:x="http://schemas.microsoft.com/winfx/2006/xaml"
        Title="MainWindow" Height="375" Width="525" xmlns:dxg="http://schemas.devexpress.com/winfx/2008/xaml/grid"
        xmlns:dx="http://schemas.devexpress.com/winfx/2008/xaml/core" dx:ThemeManager.ThemeName="Office2010Black"
        xmlns:dxe="http://schemas.devexpress.com/winfx/2008/xaml/editors">
    <Grid>
        <dxg:LookUpEdit
                Name="searchLookUpEdit"
                AutoPopulateColumns="False"
                DisplayMember="ContactName"
                VerticalAlignment="Top"
                HorizontalAlignment="Stretch"
                Height="30">
            <dxg:LookUpEdit.StyleSettings>
                <dxg:SearchLookUpEditStyleSettings/>
            </dxg:LookUpEdit.StyleSettings>
            <dxg:LookUpEdit.PopupContentTemplate>
                <ControlTemplate>
                    <dxg:GridControl Name="PART_GridControl">
                        <dxg:GridControl.Columns>
                            <dxg:GridColumn FieldName="CompanyName"/>
                            <dxg:GridColumn FieldName="ContactName"/>
                            <dxg:GridColumn FieldName="ContactTitle"/>
                            <dxg:GridColumn FieldName="City"/>
                        </dxg:GridControl.Columns>
                        <dxg:GridControl.View>
                            <dxg:TableView AutoWidth="True"/>
                        </dxg:GridControl.View>
                    </dxg:GridControl>
                </ControlTemplate>
            </dxg:LookUpEdit.PopupContentTemplate>
        </dxg:LookUpEdit>
    </Grid>
</Window>
Run the application to see the result.