Element Selectors
- 15 minutes to read
Actions and assertions use Selector queries to locate their targets.
Selectors filter the DOM and return page elements that match user-defined criteria. They are similar to CSS Selectors in both purpose and syntax.
The Anatomy of Element Selectors
Every Selector query begins with an invocation of the Selector() constructor. The initial results of the Selector query depend on the arguments that you pass to the Selector constructor.
There are three ways to initialize a Selector. In this example, we used a CSS Keyword:
Selector('#big-red-button');
Selector methods perform additional actions with the initial results of the Selector query.
Selector('button').withText('click me');
Simple Selectors and Compound Selectors
Simple Selectors filter the DOM once:
Selector('#big-red-button');
Compound Selectors filter the DOM multiple times:
Selector('nav .button');
// or
Selector('nav').find('.button')
The example above matches button class elements that reside inside nav blocks.
Selector Types
- Keyword-Based Selectors filter the page in search of elements that match a CSS Selector.
- Function-Based Selectors execute a client-side function that traverses the DOM.
- Selector-Based Selectors execute, or filter the results of, another Selector query.
Keyword-Based Selectors
Keyword-Based Selectors filter the page in search of elements that match CSS keywords.
Selector('#some-element');
A few examples:
bodymatches thebodyelement..loginmatches elements with theloginclass name.#inputmatches elements with theinputID.
Selector Keywords
TestCafe Selector keywords are syntactically identical to CSS Selectors. TestCafe actions can’t target pseudo-elements and require additional code to target the Shadow DOM.
Top Tip: Use Custom HTML Attributes
Keywords that reference custom HTML attributes are more reliable, because they don’t reference mutable code.
- Selectors break when you change the page code that they reference.
- Bad Selectors reference class names or DOM relationships – things that change fairly often during development.
- Reliable Selectors reference properties that are independent of page design and layout.
Mark your actions’ targets with custom HTML attributes, and generate better, more reliable Selectors.
- Add a custom HTML attribute (for example:
data-test-id) to all the page elements that your test interacts with. - Assign meaningful values to these custom attributes.
- Add your attribute to the Selector Components list. When TestCafe Studio generates Selector queries, it uses custom attributes from the Selector Components list.
- Reference your attribute when you write Selector queries (test scripts only):
t.click('button').withAttribute('data-test-id','left-button')
Function-based Selectors
Function-based Selectors execute a client-side function that traverses the DOM and returns one of the following objects:
- A DOM node
- An array of DOM nodes
- A
NodeListobject - An
HTMLCollectionobject - A
nullobject - An
undefinedobject
The function-based Selector below retrieves a string from localStorage and finds a DOM element with the identical ID:
const element = Selector(() => {
    const storedElementId = window.localStorage.storedElementId;
    return document.getElementById(storedElementId);
});
Function-based Selectors can have additional parameters:
const elementWithId = Selector(id => {
    return document.getElementById(id);
});

await t.click(elementWithId('buy'));
Selector-Based Selectors
You can create Selectors based on other Selectors. These copies inherit original Selectors’ queries, but do not inherit their return value.
The example code below creates a copy of the ctaButton Selector with a modified visibilityCheck option:
const ctaButton = Selector('.cta-button');
Selector(ctaButton, { visibilityCheck: true });
You can create a new Selector from a DOM Node Snapshot object returned by another Selector. These Selectors inherit the original Selector’s return value, but you can still override their options:
const topMenuSnapshot = await Selector('#top-menu')();
const visibleTopMenu = Selector(topMenuSnapshot, {
        visibilityCheck: true
    });
You can create a new Selector from a Selector Promise:
const elementWithIdOrClassName = Selector(value => {
    return document.getElementById(value) || document.getElementsByClassName(value);
});
const submitButton = Selector(elementWithIdOrClassName('main-element'));
Selector Options
You can customize the behavior of Selectors with constructor options (test scripts only).
Selector Methods
Selector methods perform additional actions with the return value of the main Selector query. Selector methods narrow, expand, or otherwise modify the selection of page elements.
Selector('keyword1 keyword2').method1().method2();
- Filter methods filter the page element selection.
- Related Element Lookup methods look for page elements related to the existing element selection.
Filter Methods
Filter methods filter the page element selection.
nth(index)
Finds the element with the specified index. The index starts at 0. Negative index values indicate the element’s location relative to the final element of the array.
For example:
- nth(2) - Selects the third element.
- nth(-1) - Selects the last element.
withText(string)
Finds elements with a textContent value that contains the specified string (case-sensitive).
To find elements with a specific textContent value, use the withExactText method.
withText(re)
Finds elements with a textContent value that matches the specified regular expression.
Example: withText(/a[b-e]/).
withExactText(string)
Finds elements with a textContent value equal to the specified string (case-sensitive).
To find elements that contain a specific string, use the withText method.
withAttribute(attrName)
Finds elements with the specified attribute, regardless of that attribute’s value.
The method accepts both strings and regular expressions.
For example, withAttribute(‘myAttr’) matches elements that have the myAttr attribute.
withAttribute(attrName, attrValue)
Finds elements with an attribute of specific value.
The method accepts both strings and regular expressions.
For example, withAttribute(‘foo’, /a[0-9]/) returns elements that have a foo attribute with a value that matches the /a[0-9]/ regular expression (‘a7’ or ‘a0’).
filterVisible()
Finds visible elements.
TestCafe considers an element visible if:
- The value of the element’s display property is not none
- The value of the element’s visibility property is not hidden
- The element has a non-zero width and height.
The method does not take the element’s relative z-index value, opacity, or other factors that determine its actual visibility into account.
filterHidden()
Finds hidden elements.
TestCafe considers an element hidden if the element fits at least one of the following criteria:
- The value of the element’s display property is none
- The value of the element’s visibility property is hidden
- The value of the element’s width or height is zero.
Elements can be invisible to the user for reasons other than the ones described above.
filter(cssSelector)
Finds elements that match the specified CSS selector.
For example, filter(‘.someClass’) selects elements with the someClass class.
filter(filterFunction)
Finds elements that meet the conditions of the filterFunction function.
The filterFunction function exposes the following variables when it iterates over the array of page elements:
| Parameter | Description |
|---|---|
| node | Current DOM node. |
| idx | The current DOM node’s index. |
Note
The filter function cannot contain:
- Generators or
async/awaitsyntax - Defined functions
- Defined selectors
Related Element Lookup Methods
Related element lookup methods find elements related to the existing element selection.
find
find(cssSelector) - Looks for element descendants that match the specified CSS Selector.
find(filterFunction) - Filters element descendants with a function.
parent
parent() - Returns an array of parent elements, starting with the closest relatives.
parent(n) - Returns an array of n-th closest parent nodes. The n parameter is an integer. If n is negative, the method returns an array of n-th most distant parent nodes.
parent(cssSelector) - Looks for parent elements that match the CSS Selector parameter.
parent(filterFunction) - Filters parent elements with a function.
child
child() - Returns an array of element descendants, starting with direct descendants.
child(n) - Returns an array of n-th closest descendant nodes. The n parameter is an integer. If n is negative, the method returns an array of n-th most distant descendant nodes.
child(cssSelector) - Looks for element descendants that match the CSS Selector parameter.
child(filterFunction) - Filters element descendants with a function.
sibling
sibling() - Returns an array of sibling elements, starting with the closest relatives.
sibling(n) - Returns an array of n-th closest sibling nodes. The n parameter is an integer. If n is negative, the method returns an array of n-th most distant sibling nodes.
sibling(cssSelector) - Looks for element siblings that match the CSS Selector parameter.
sibling(filterFunction) - Filters element siblings with a function.
nextSibling
nextSibling() - Returns an array of succeeding sibling elements, starting with the closest relatives.
nextSibling(n) - Returns an array of n-th closest succeeding sibling nodes. The n parameter is an integer. If n is negative, the method returns an array of n-th most distant succeeding sibling nodes.
nextSibling(cssSelector) - Looks for elements’ succeeding siblings that match the CSS Selector parameter.
nextSibling(filterFunction) - Filters elements’ succeeding siblings with a function.
prevSibling
prevSibling() - Returns an array of preceding sibling elements, starting with the closest relatives.
prevSibling(n) - Returns an array of n-th closest preceding sibling nodes. The n parameter is an integer. If n is negative, the method returns an array of n-th most distant preceding sibling nodes.
prevSibling(cssSelector) - Looks for elements’ preceding siblings that match the CSS Selector parameter.
prevSibling(filterFunction) - Filters elements’ preceding siblings with a function.
shadowRoot
- shadowRoot() - Returns the shadow root node. Chain to other methods to traverse the shadow DOM. Throws an error if the shadow tree is
closedor does not exist.
Note
You cannot target the shadow root node. Only use the shadowRoot() method to enter the shadow DOM.
For more information about shadow DOM testing, read Test the Shadow DOM.
Filter Elements with a Function
Finds elements that meet the conditions of the filterFunction function.
The filterFunction function exposes the following variables when it iterates over the element array:
| Parameter | Description |
|---|---|
| node | Current DOM node. |
| idx | Current node’s array index |
| originNode | The origin node. |
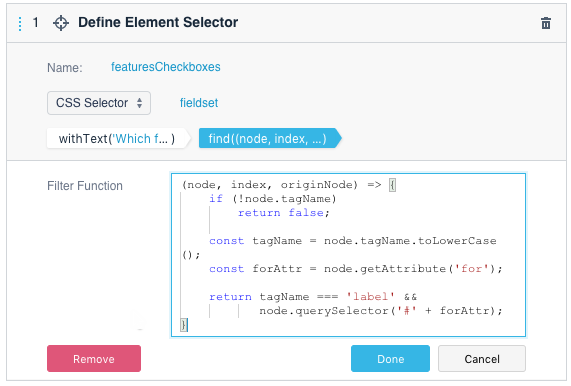
The following example demonstrates how to use a filter function with the find method:
Filter function limitations
Filter functions can not include:
- Generators
async/awaitkeywords- Function definitions
- Selector definitions
Element Selector Timeout
When TestCafe runs tests, it automatically waits for action targets to appear. The value of the element selector timeout variable defines the maximum waiting time. If a visible DOM element that matches a Selector query does not appear on the page within the element selector timeout, the test fails. Adjust the value of the timeout in the run configuration’s Advanced options panel.
See Automatic Waiting for more information.
Test the Shadow DOM
TestCafe Studio does not record actions that target the Shadow DOM. You cannot access Shadow DOM elements directly from the DOM, either. To interact with the Shadow DOM, identify the root node of a shadow tree with the shadowRoot method. Use other selector methods to traverse the shadow tree.
The example below populates an input field inside a Shadow DOM. The shadowRoot method selects the root node of a shadow tree. The find method locates the desired element inside the shadow DOM.
Tip
You can save and reuse shadowRoot Selector queries.
Warning
You cannot perform actions with the shadowRoot() element, or use it in assertions. Use this element as an entry point to the shadow DOM.
Automatic Selectors
Automatic Selector Generation
TestCafe Studio automatically generates Selectors:
When you interact with the page during test recording.
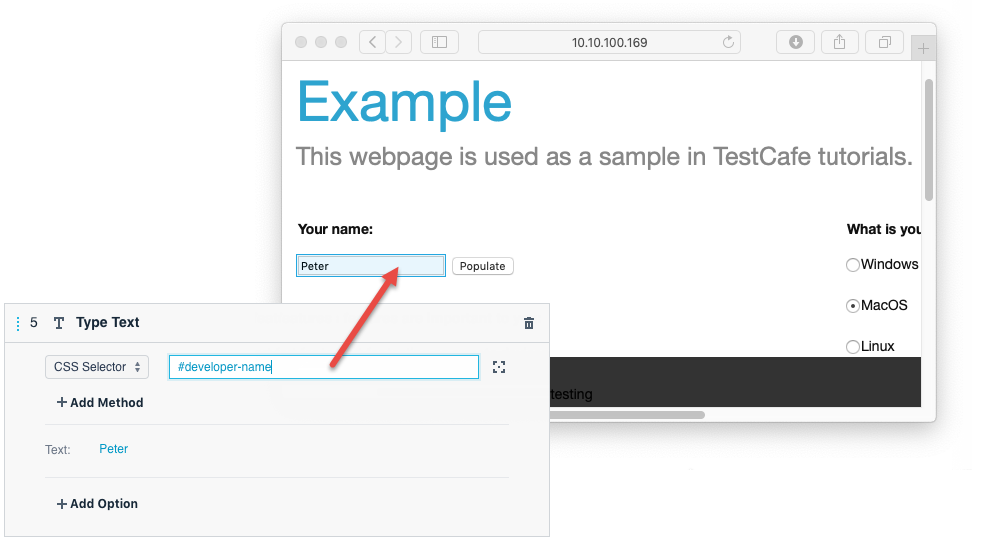
When you record a codeless test, TestCafe Studio adds Selector queries to action settings.
When you record a test script, TestCafe Studio adds Selector queries to action code.
When you use the element picker (codeless tests only).
Click the
 Pick the target element button next to the Element Selector field in the action parameters area, and select a page element. TestCafe Studio generates Selectors for this element and picks one of them to populate the Element Selector field. For some elements, TestCafe generates a list of Selector candidates.
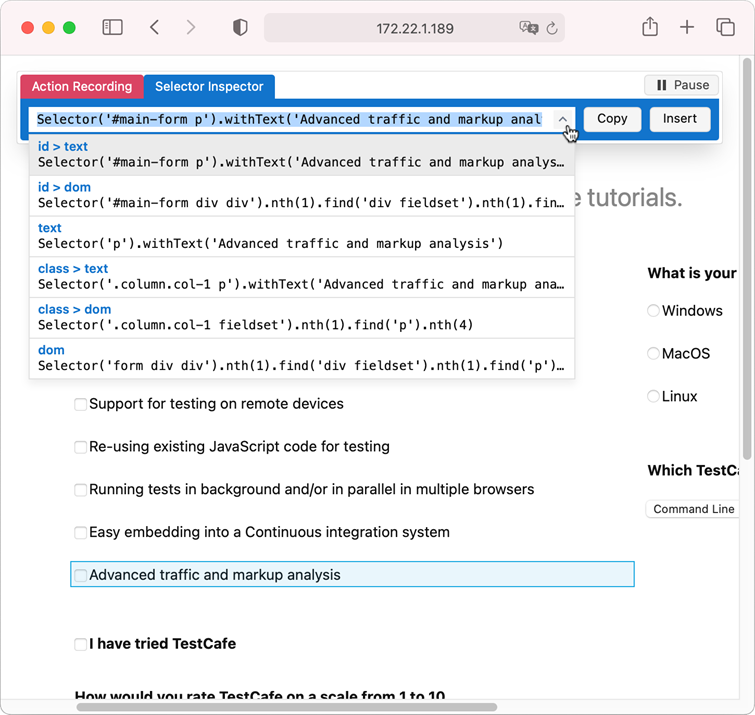
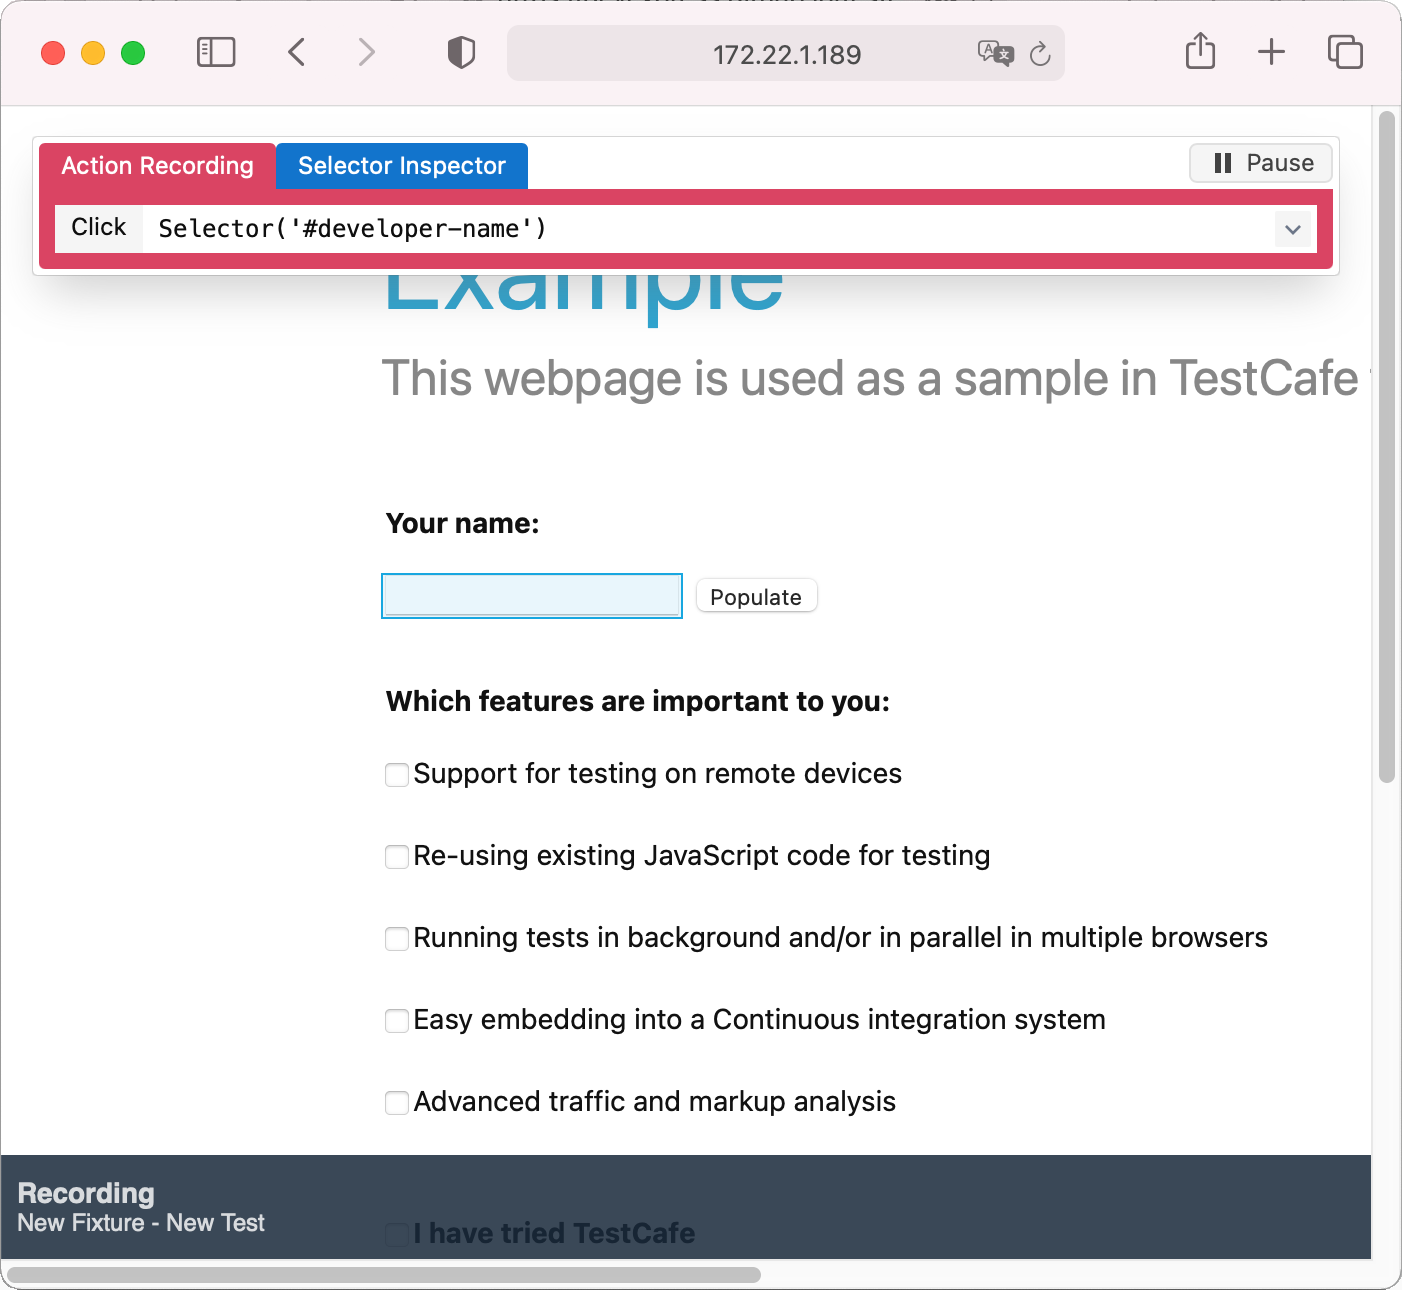
When you use the Selector Inspector on the Recording Panel Tab (test scripts only).
TestCafe Studio displays the Recording Panel when you record test scripts. If you open the Selector Inspector tab and click a page element, TestCafe generates a list of Selectors that match your element. Select an entry from the drop-down menu and press ‘Insert’ to insert that Selector string into the script.
Pick a Selector
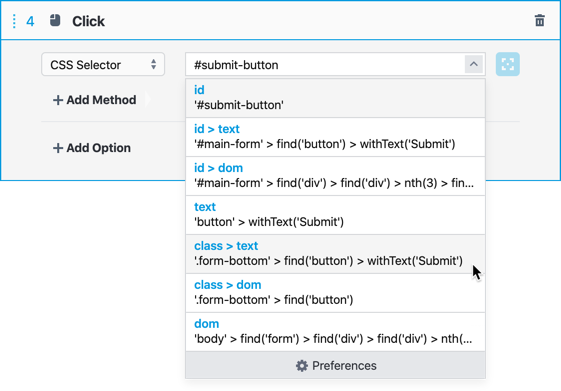
TestCafe Studio generates more than one Selector query for each action. It ranks them in order of component priority, and automatically enables the top entry.
Sometimes the default Selector query doesn’t work well with user code. This is often the case when an application generates dynamic IDs or class names.
If you aren’t satisfied with the default Selector query, click the button next to the Selector Input field and view the list of Selector candidates. The Selector Input field is located in codeless test actions’ action parameters area, as well as on the test script recording panel. Click an entry from the Selector list to enable a different Selector query.
If default Selector queries rarely fit you, and you routinely find yourself picking alternative Selectors, you can help TestCafe Studio generate better Selector queries automatically. Introduce custom Selector keywords and/or change your component priority to get better Selector suggestions.
Element Highlighting
TestCafe Studio highlights page elements to help users pick the correct Selector:
- When you use the selector creation dialog to modify selectors during codeless test recording.
- When you focus the Selector input field of the test script recording panel.
Selector Components
TestCafe Studio constructs auto-generated Selectors from the following components:
| Component Category | Matching Element | Examples | Default Priority |
|---|---|---|---|
tagName |
An element with the specified HTML tag (<html>, <body>, <header>, <footer>, and <main> tags only) |
'body' |
1 |
id |
An element with the specified ID. | 1. matches an element with id="populate" : '#populate' 2. matches an element with an auto-generated ID: 'div' > withAttribute('id', /test1_ctl\d+_test2/) |
2 |
text |
An element with the specified innerText (or textContent — for option elements) |
'p' > withText('Hello world!') |
3 |
class |
An element of the specified class. |
[class="container"] |
4 |
attr |
An element with the specified attribute. The following attributes can be used: alt, name, title, and data-* (unless you create a custom selector type for the attribute). |
1. one attribute: '[name="name"]' 2. multiple attributes: '.some-class[alt="someAlt"]' > withAttribute('data-attr', /foo\s+bar/) |
5 |
dom |
An element at the specified position in the DOM hierarchy. | 'body' > find('form') > find('div') > find('header') > find('h1') |
6 |
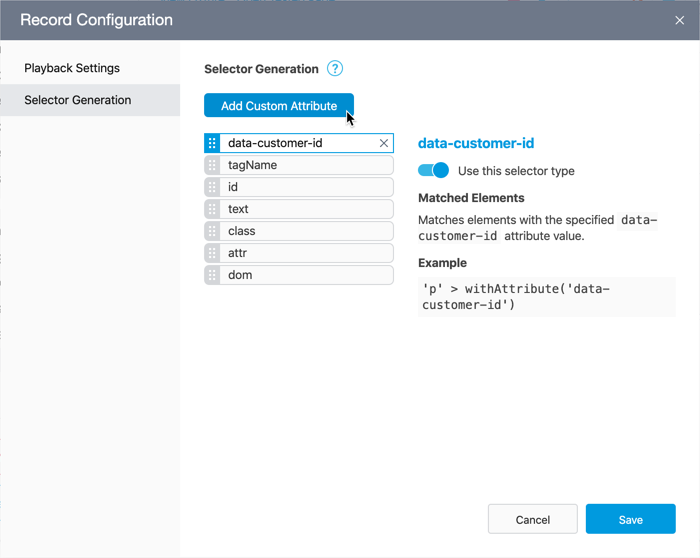
Add a Custom Attribute
TestCafe Studio can generate Selectors that reference custom HTML attributes. Read the section about custom attributes to learn why this is desirable.
- Open the Selector Generation pane in the Record Configuration Dialog, click Add Custom Attribute, and specify the attribute’s name.
- Elevate the priority of the attribute to make sure that TestCafe Studio prioritises it when it generates Selectors.
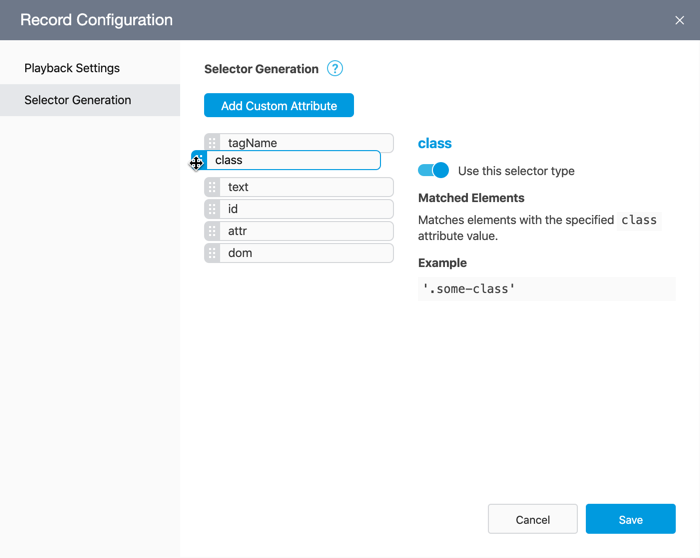
Selector Priority
Different categories of Selector keywords have different priority levels. When TestCafe Studio generates Selectors, it favors higher priority keywords.
Open the Selector Generation pane of the Record Configuration Dialog to view the list of Selector components, ranked in order of their priority. Re-order the list to change component priority.
Raise the priority of a keyword (like the aforementioned
data-test-idcustom attribute) to make sure that automatic Selector queries feature it whenever possible.Lower the priority of a keyword if it offers no semantic value (like a dynamic ID), and you want TestCafe Studio to avoid it.
Hide a keyword to completely disable a Selector component.
Compound Selector Priority
The priority of compound Selectors depends on the priority of their individual components.
- The first component of a Selector determines the Selector’s initial priority.
- When TestCafe Studio decides between two Selectors with an identical first component, the priority of the second component determines the outcome, and so on.
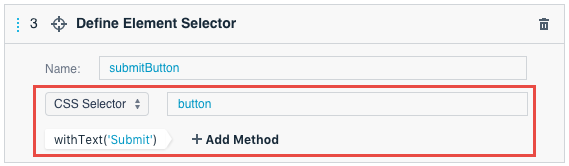
Element Selector Creation Dialog
Use the Element Selector Creation Dialog to create custom selectors for codeless tests.
TestCafe Studio displays the Element Selector Creation Dialog when you add a new Define Element Selector action.
Additionally, you can access the dialog:
From the action parameters interface
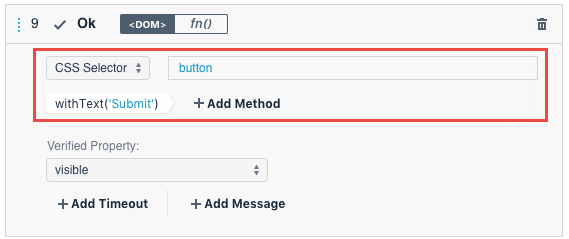
From the assertion parameters interface
Start the query
You can start the Selector query with one of the following components:
A CSS Selector.
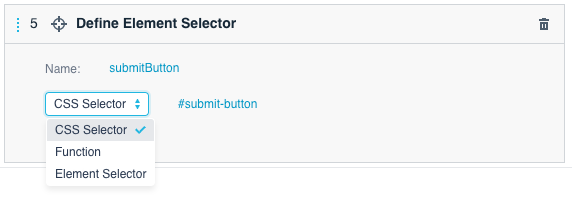
A Function that traverses the DOM and returns an array of elements. Use functions when you need to implement custom logic to obtain the target element.
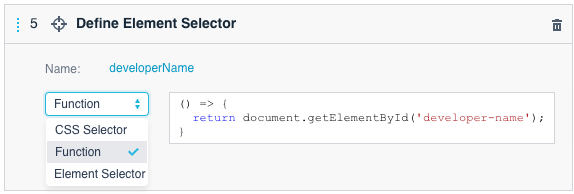
See filter function limitations for more info.
A previously defined Element Selector.
Note
If you specify a selector, TestCafe Studio highlights all matching elements
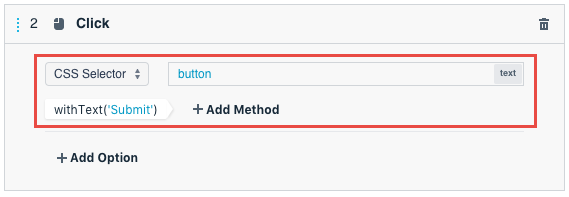
Add Selector Methods
Chain one or more element selector methods to filter the array of elements, or search for related elements.
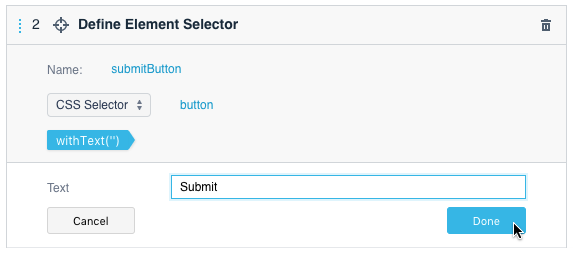
Click the Add Method button and select a method from the list.
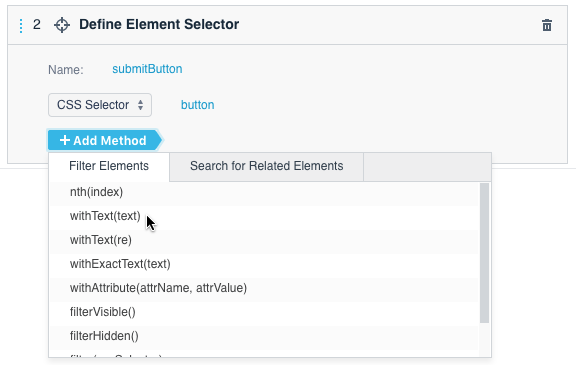
Specify the parameters (if needed) and click Done.
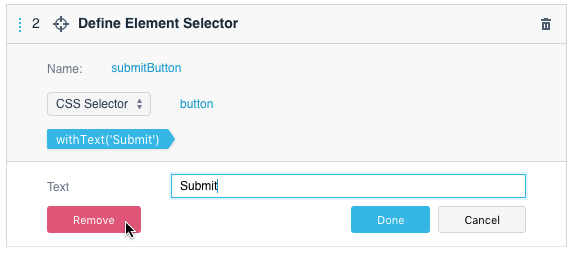
Remove Methods
Click the Remove button next to the method entry in order to remove it.
Reorder Methods
Drag method entries to reorder them.
Example
The animation below demonstrates how to create a reusable element selector that:
- locates all
ulelements; - finds
labelelements within them; - finds a
div.containerparent for eachlabel.
Note
Element selectors can return multiple items. If you use this selector in an on-page action, the action is performed on the first matching element. If you use it in an assertion, the assertion checks properties for the first element.
If added methods filter out all elements, an element selector returns null. If a test action or an assertion uses this selector, the test fails.
Reuse Element Selectors
Selector queries take time to resolve. Tests that repeat identical Selector queries are slower and harder to maintain. Save the results of a Selector query to only declare it once, but use it multiple times.
Save Selectors (test scripts)
Assign the value of a Selector query to a constant, and use that constant later in code.
const myBeautifulSelector = Selector('div').withText('hello world');
<…>
await t.click(myBeautifulSelector);
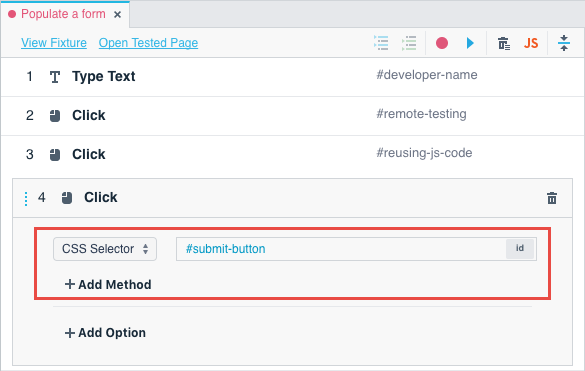
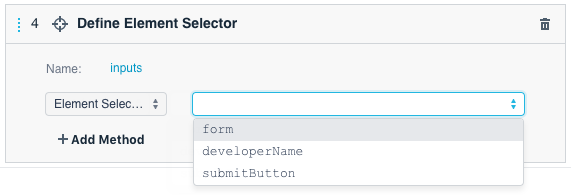
Define Element Selector action (codeless tests)
The Define Element Selector action allows you to re-use the results of a Selector query.
Add the Define Element Selector action from the Actions panel.
Specify a unique name for your Selector. Names cannot include the following reserved words: t, fixture, test, Selector, ClientFunction, RequestLogger, RequestMock, RequestHook.
Use the Element Selector Creation Dialog to generate a Selector query.
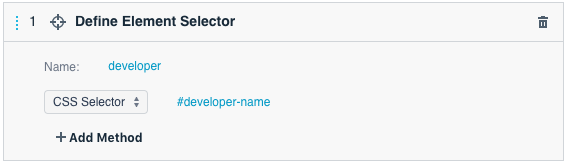
- Reference your new Selector when you define actions and assertions.