Run Configurations Dialog
- 5 minutes to read
The Run Configurations dialog allows you to create, modify, and delete run configurations.
This dialog opens when you click the ![]() button next to the Run Configuration drop-down menu on the main toolbar.
button next to the Run Configuration drop-down menu on the main toolbar.
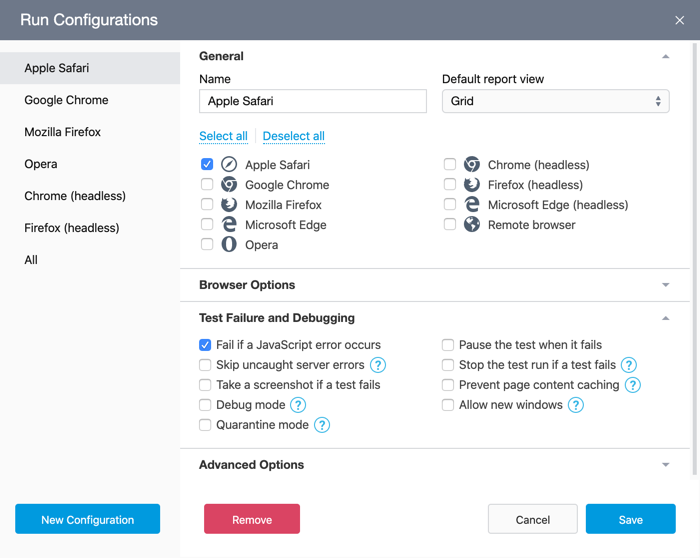
The dialog's left panel lists the available run configurations. When you select a configuration, the dialog's right section displays its settings organized into several categories.
Run Configuration Settings
General
| Setting | Description |
|---|---|
| Name | The configuration's name. It is displayed in the Run Configurations drop-down menu on the main toolbar. |
| Default report view | The test report's format used in the Report view. The available formats are grid, json, list, minimal, spec, and xunit. |
Browsers
This section lists locally installed browsers TestCafe Studio detects. You can select on which browsers you want to run tests.
You can also select the Remote browser checkbox to run tests on remote machines. See the following help topic for details: Running Tests in Remote Browsers.
Tests can run in multiple browsers simultaneously. You can use the Select All and Deselect All buttons to select or remove the selection of all browsers.
Browser Options
This section allows you to specify options for each selected local browser. TestCafe Studio passes these options to the browsers when it launches them.
NOTE
You cannot specify browser options for remote browsers because you start these browsers manually.
| Option | Description | Supported Browsers |
|---|---|---|
| CLI flags | Command line flags used to configure browser settings. | All local browsers except Safari. |
| Emulated device | Chromium device emulation settings. Specify these settings to enable mobile device emulation in Chromium-based browsers. | Google Chrome (UI and headless), Chromium (UI and headless), Microsoft Edge (Chromium-based; UI only). |
| Load user profile | Launches the browser with the current user profile (usually includes extensions, bookmarks, etc.). If unchecked, the browser is launched with an empty profile. | Google Chrome, Mozilla Firefox, and Microsoft Edge. Not supported in headless mode. |
Test Failure and Debugging
| Setting | Description |
|---|---|
| Fail if a JavaScript error occurs on a page | Specifies whether a test is flagged as failed if a JavaScript error occurs on the tested page. If unchecked, JavaScript errors are ignored. |
| Skip uncaught server errors | Specifies whether uncaught errors or unhandled promise rejections that occur on the server are ignored. If unchecked, the test fails when an error or promise rejection occurs. |
| Take a screenshot if a test fails | Specifies whether TestCafe Studio takes a screenshot of the tested page when a test fails. Note: TestCafe cannot take screenshots on remote devices. |
| Debug mode | Activates the debug mode. |
| Quarantine mode | Enables the quarantine mode for tests that fail. In this mode, a failed test is executed several times. The test result depends on the outcome (passed or failed) that occurs most often. That is, if the test fails on most attempts, the result is failed. If the test result differs between test runs, the test is marked as unstable. |
| Pause the test when it fails | Specifies whether to activate the debug mode when a test fails. |
| Stop the test run if a test fails | Specifies whether TestCafe should stop the test run after the first test failure. |
| Prevent page content caching | Disables page caching. Enable this option if tests fail unexpectedly after authentication. In order to guarantee seamless test execution, browsers that run TestCafe tests should always fetch the tested page from the TestCafe proxy server. This ensures that automation scripts on the page are in sync with the server side. However, if the browser uses a cached copy of the page, automation mechanisms may be interrupted. Among other issues, this could reset authentication data in the cookies, local and session storage during navigation. The Prevent page content caching option fixes these issues. |
| Allow new windows | Allows the tested pages to open new windows. If a page tries to open a new window when this option is disabled, TestCafe Studio opens the URL in the same window. The browser navigates to the previous page when the test scenario returns to the original window. |
Advanced Options
| Setting | Description | Default |
|---|---|---|
| Reports path | The directory where test run reports are saved. | /TestCafeStudio/reports |
| Screenshots path | The base directory where screenshots are saved. See the following help topic for details: Screenshot Directory. | /TestCafeStudio/reports/screenshots |
| Selector timeout | Specifies the time (in milliseconds) element selectors can obtain target elements. | 10000 |
| Assertion timeout | Specifies the time (in milliseconds) an assertion can take to pass. The assertion retries to pass multiple times within this timeout, and each time it verifies the actual value. The test fails if the assertion could not be completed successfully within the timeout. | 3000 |
| Page load timeout | Specifies the time elapsed (in milliseconds) after the DOMContentLoaded event, during which TestCafe Studio waits for the window.load event to fire. After the timeout passes or the window.load event is raised (whichever happens first), TestCafe Studio starts the test. |
3000 |
| Speed | Specifies the test speed from 0.01 to 1. | 1 |
| Concurrency | Specifies the number of browser instances to execute tests concurrently. See the following help topic for details: Concurrent Test Execution. | 1 |
Managing Configurations
Click New Configuration to create a new run configuration. TestCafe Studio adds a new configuration to the configuration list.
To edit a run configuration, select it in the dialog's left panel and modify its settings. Next, click Apply to apply the changes without leaving the dialog, or OK to apply the changes and close the dialog.
To remove a run configuration, click the Remove button.