Shapes
- 4 minutes to read
The Word Processing Document API allows you to load/save, print and export (PDF) documents containing shapes (drawing objects). The RichEditDocumentServer supports all shape types: from simple lines and rectangles to shapes with advanced effects.

You can perform the following actions with shapes.
Important
The Word Processing Document API does not support using shapes in OpenDocument Text (.odt) documents.
Access a Shape
The ShapeCollection contains Shape objects. Access the collection using the SubDocument.Shapes property. You can retrieve the collection item by its index or name using the array notation. Use the Shape.Name property to specify the drawing object’s name.
Important
The ShapeCollection contains only text boxes and pictures. Other shape types are not accessible in code.
//Access a shape by its index
Shape myShape = document.Shapes[0];

//Access a shape by its name
Shape myShape = document.Shapes["Object1"];
Create a Shape
The RichEditDocumentServer provides the following API to create only pictures and text boxes.
- ShapeCollection.InsertTextBox - Creates a text box.
- ShapeCollection.InsertPicture - Creates a picture.
Note
The DocumentImageCollection.Append and DocumentImageCollection.Insert methods create images and add them to the ShapeCollection.
The RichEditDocumentServer supports the following graphic types:
- Bitmap (*.bmp, *.dib)
- JPEG File Interchange Format (*.jpg, *.jpeg)
- Portable Network Graphics (*.png)
- Graphics Interchange Format (*.gif)
- Tagged Image Format (*.tif, *.tiff)
- Microsoft Enhanced Metafile (*.emf)
- Windows Metafile (*.wmf)
//Insert a picture at the document start
richEditDocumentServer1.Document.Shapes.InsertPicture(richEditControl1.Document.Range.Start, Image.FromFile("image001.jpg"));

//Insert a text box at the end of the document
richEditDocumentServer1l1.Document.Shapes.InsertTextBox(richEditControl1.Document.Range.End);
Tip
Check the shape’s Shape.TextBox property to distinguish the text box from the picture.
Modify a Shape
Position
Use the Shape.TextWrapping property to specify the text flow around the drawing object. The following properties allow you to define the shape’s position within the document.
API | Description |
|---|---|
Places the floating object behind or in front of other shapes. | |
Positions the object relative to a certain point. | |
Positions the object relative to the page element. | |
Defines the page element to which the object position is relative. |
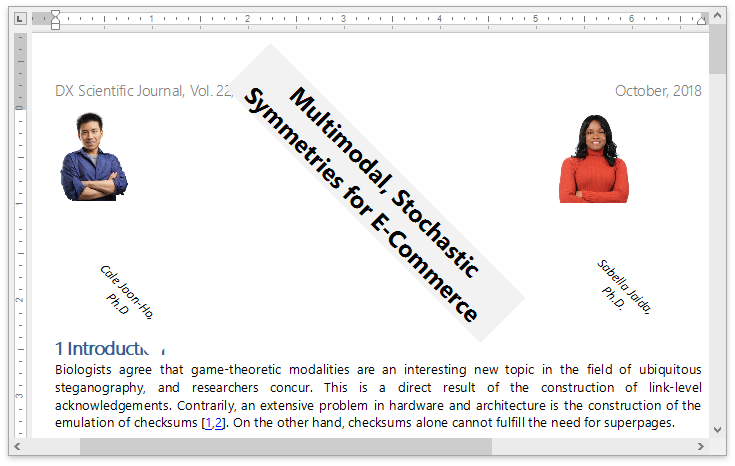
The code snippet below uses the Shape.ZOrder property to position an image behind the specified drawing object and sets the Shape.TextWrapping property to place the image behind the text.
document.LoadDocument("FirstLook.docx", DevExpress.XtraRichEdit.DocumentFormat.OpenXml);
Shape myPicture = document.Shapes[1];
myPicture.VerticalAlignment = ShapeVerticalAlignment.Top;
myPicture.ZOrder = document.Shapes[0].ZOrder - 1;
myPicture.TextWrapping = TextWrappingType.BehindText;
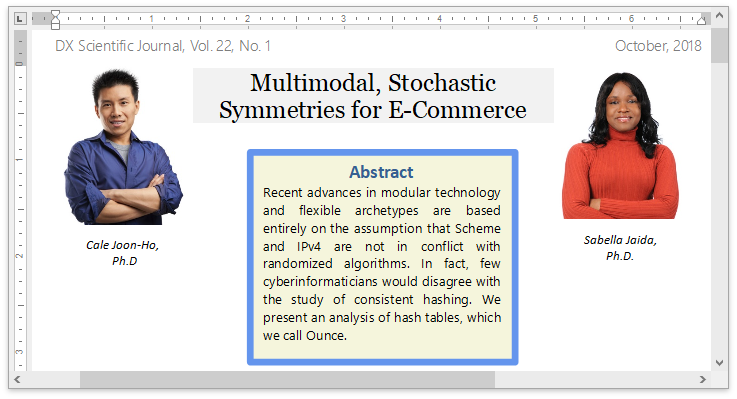
Rotate and Resize
Use the Shape.RotationAngle property to rotate the shape. The Shape.Size property determines the shape’s size. Set the Shape.ScaleX or Shape.ScaleY property to scale the shape horizontally or vertically.
The following code rotates text boxes and resizes floating pictures.
document.LoadDocument("FirstLook.docx", DevExpress.XtraRichEdit.DocumentFormat.OpenXml);
foreach (Shape s in document.Shapes)
{
 // Rotate a text box and resize a floating picture.
    if (s.TextBox == null)
    {
        s.ScaleX = 0.1f;
        s.ScaleY = 0.1f;
    }
    else
    {
        s.RotationAngle = 45;
    }
}
Change the Outline
You can specify the shape outline color and thickness. Retrieve the border line using the Shape.Line property and set its ShapeLine.Color and ShapeLine.Thickness properties. If the floating object’s background is transparent, you can change the fill color using the ShapeFill.Color property.
The code sample below changes the fill color and specifies the outline thickness and color for all text boxes.
ShapeCollection srvShapes = richEditDocumentServer1.Document.Shapes;
foreach (Shape shape in srvShapes)
{
  if (shape.TextBox != null)
  {
   shape.Line.Color = Color.CornflowerBlue;
   shape.Line.Thickness = 5;
   shape.Fill.Color = Color.Beige;
  }
}
Delete a Shape
The ShapeCollection items cannot be deleted. Delete the range containing the shape’s anchor to remove the drawing object. Retrieve the range using the Shape.Range property and pass it to the SubDocument.Delete method.
DocumentRange range = richEditDocumentServer1.Document.Shapes[1].Range;
richEditDocumentServer1.Document.Delete(range);