Template Document
- 6 minutes to read
Creating a template is one of the steps required to perform a mail merge with Workbook - merged documents are generated based on a template (Workbook.GenerateMailMergeDocuments) bound to a data source (Workbook.MailMergeDataSource and Workbook.MailMergeDataMember).
A mail merge template is a workbook with a single worksheet. It contains the information that will be the same in each merged document, as well as the placeholders (mail merge fields that will be filled with unique data values retrieved from the bound data source in each merged document.
A template also holds special defined names indicating whether data records should be merged into a single worksheet, separate worksheets or separate documents (mail merge mode and whether the resulting worksheet should have a vertical or horizontal orientation (the document orientation).
Note
Loading the mail merge templates with the ObjectDataSource data source may be unsafe if the data source is contained in a compiled assembly. Create and register a custom service that implements the IObjectDataSourceValidationService interface to validate an ObjectDataSource contained in the template and prevent the data source from loading.
This topic explains how to create a mail merge template and describes its elements.
- Create a Template
- Insert Fields
- Specify Template Ranges
- Select a Mail Merge Mode
- Set Document Orientation
Create a Template
The easiest way to create a mail merge template is to load the template document into the SpreadsheetControl and modify it using the SpreadsheetControl’s Mail Merge Ribbon UI.
Alternatively, you can create a template worksheet programmatically. Provide static content, insert the required mail merge fields specify template ranges and select the mail merge mode and document orientation.
Insert Fields
A mail merge field is a placeholder in which a value from the specified data source field will appear in a merged document. When you perform a mail merge, a separate merged document (depending on the mail merge mode used, it can be a cell range, worksheet or workbook) is created for each record of the bound data source. Each merged document is a template copy where mail merge fields are replaced with unique information from a particular row of the data source.
To insert fields into template cells, use the following special functions in cell formulas: FIELD and FIELDPICTURE. Specify the name of the data source field from which values should be inserted in place of a merge field as a function argument. For more information on these functions, see the Mail Merge Functions document.
Note
You need to know the column names of the data source to insert mail merge fields.
Specify Template Ranges
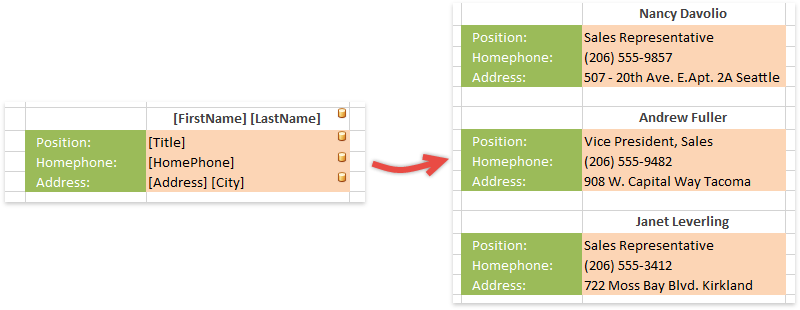
Besides an ordinary mail merge template that is simply copied for each record of the bound data source, you can also create an advanced template by specifying Detail, Header and Footer ranges.
Since a template range is actually a cell range specified by the corresponding defined name (“DETAILRANGE”, “HEADERRANGE” and “FOOTERRANGE”), you can programmatically divide a template into ranges by naming cell ranges. For example, the following code creates the same detail and header ranges in the template as shown in the image above.
using DevExpress.Spreadsheet;
// ...

Workbook workbook = new DevExpress.Spreadsheet.Workbook();
Worksheet template = workbook.Worksheets[0];

// Set a detail range in the template.
Range detail = template.Range["A6:E10"];
detail.Name = "DETAILRANGE";

// Set a header range in the template.
Range header = template.Range["A1:E2"];
header.Name = "HEADERRANGE";
Defined names specifying template ranges are added to the Worksheet.DefinedNames collection of the template worksheet.
Detail
When you specify a detail range in a template, only this range (with header and footer ranges, if they are also specified) will be copied for each record of the bound data source and will appear in the resulting document. Mail merge fields are usually placed within the detail range.
Header and Footer
Header and footer ranges can be specified in addition to a detail range. These ranges are placed above and below (if the vertical document orientation is used) all detail range instances in the resulting document if all data records are merged into a single worksheet. In other mail merge modes, the header and footer accompany each detail range copy.
Header and footer ranges do not take effect if a detail range is not specified in the template.
Mail Merge Mode
When creating a template, you can specify how the result of the mail merge should be generated by selecting one of the available modes.
- Multiple Documents - The merged range for each record of the data source is inserted into a separate workbook.
- Multiple Sheets - The merged range for each record of the data source is inserted into a separate worksheet in a single workbook.
- Single Sheet - Merged ranges for all records of the data source are inserted one after the other (vertically or horizontally, depending on the document orientation into a single worksheet. If a template is divided into ranges the resulting worksheet will have the following structure: a header, a set of detail ranges repeated for all records of the data source, and a footer. This mode is used by default.
The selected mail merge mode is stored as a defined name in a mail merge template. By default, this defined name does not exist in the template workbook, and the “Single Sheet” mode is used. You can specify a mail merge mode programmatically by setting the “MAILMERGEMODE” defined name to the “Worksheets” or “OneWorksheet” string constant explicitly within the Workbook.DefinedNames collection of the template workbook.
DevExpress.Spreadsheet.Workbook workbook = new DevExpress.Spreadsheet.Workbook();

// Select the "Multiple Documents" mail merge mode.
workbook.DefinedNames.Add("MAILMERGEMODE", "\"Documents\"");

// Switch the mail merge mode to "Multiple Sheets".
workbook.DefinedNames.GetDefinedName("MAILMERGEMODE").RefersTo = "\"Worksheets\"";

// Switch the mail merge mode to "Single Sheet".
workbook.DefinedNames.GetDefinedName("MAILMERGEMODE").RefersTo = "\"OneWorksheet\"";
Document Orientation
Set the document orientation to specify how template ranges should be arranged in the resulting worksheet. Header, detail and footer ranges are located one after the other from top to bottom, or from left to right, depending on the document orientation selected.
In the “Single Sheet” mode detail range copies created for each record of the data source are placed one under the other (in a vertical orientation), or one to the right of the other (in a horizontal orientation) between a header and a footer.
The document orientation is saved as a defined name in the Workbook.DefinedNames collection of the template workbook. By default, this defined name does not exist and the vertical document orientation is used.
| Document Orientation | Name | RefersTo |
|---|---|---|
| Vertical | HORIZONTALMODE | FALSE |
| Horizontal | HORIZONTALMODE | TRUE |