Edit Cells
- 6 minutes to read
The DataGridView allows users to edit cell values using in-place editors or edit form.
In-Place Editors
Use the DataGridView.EditorShowMode property to specify a gesture that should invoke an in-place editor for a cell. An editor type is automatically defined depending on the type of a column to which a cell belongs, but it is required to specify an in-place editor for a TemplateColumn.
This example demonstrates how to set an in-place editor template for a TemplateColumn‘s cell.
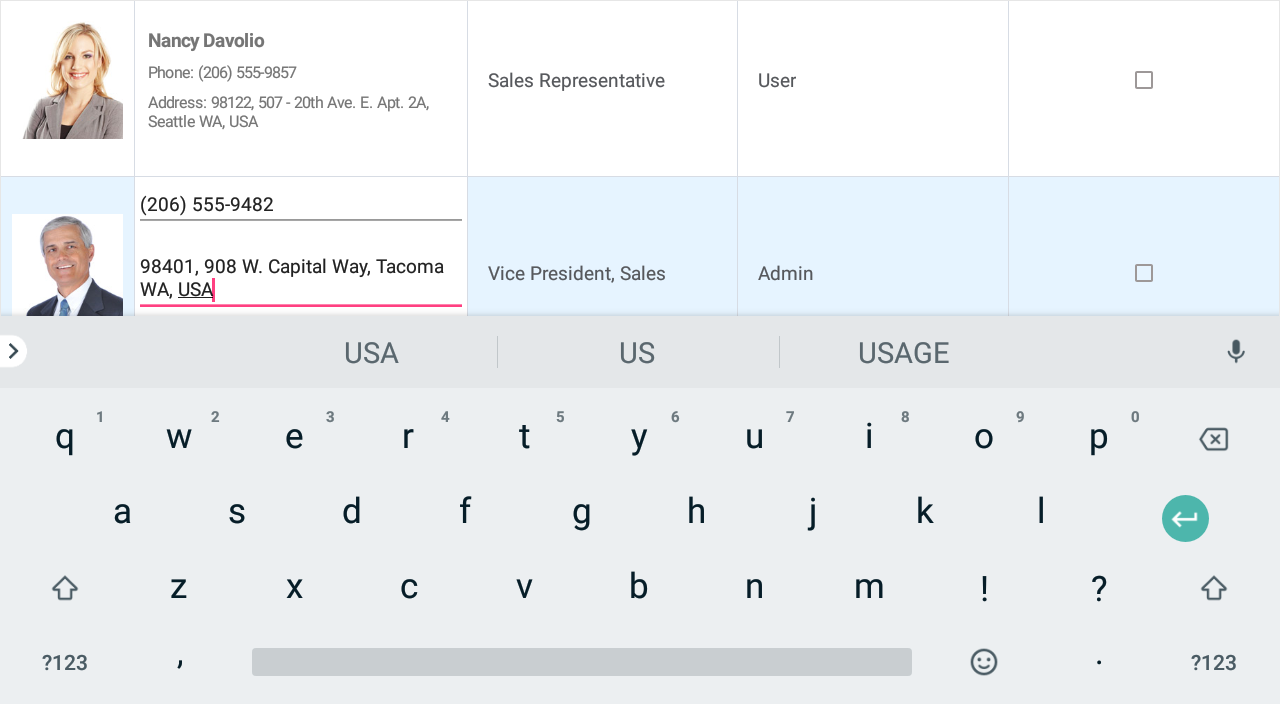
Assign a DataTemplate object to the TemplateColumn.EditTemplate property.
<dxg:DataGridView x:Name = "grid" ItemsSource ="{Binding Employees}" EditorShowMode="Tap">
    <dxg:DataGridView.Columns>
        <dxg:ImageColumn FieldName="Photo" Width="100"/>
        <dxg:TemplateColumn FieldName="Name" Caption="Employee" MinWidth="250">
            <dxg:TemplateColumn.DisplayTemplate>
                <DataTemplate>
                    <Grid VerticalOptions="Center" Padding="10, 0, 0, 0">
                        <Grid.RowDefinitions>
                            <RowDefinition Height="Auto" />
                            <RowDefinition Height="Auto" />
                            <RowDefinition Height="Auto" />
                        </Grid.RowDefinitions>
                        <Label Text="{Binding Item.Name}" Font="Bold, 14" Grid.Row="0" />
                        <Label Text="{Binding Item.Phone, StringFormat = 'Phone: {0}'}"
                                Font="Small" Grid.Row="1"/>
                        <Label Text="{Binding Item.Address, StringFormat = 'Address: {0}'}"
                                Font="Small" Grid.Row="2" />
                    </Grid>
                </DataTemplate>
            </dxg:TemplateColumn.DisplayTemplate>
            <dxg:TemplateColumn.EditTemplate>
                <DataTemplate>
                    <Grid>
                        <Grid.RowDefinitions>
                            <RowDefinition Height="Auto" />
                            <RowDefinition Height="Auto" />
                        </Grid.RowDefinitions>
                        <Editor Text="{Binding Item.Phone, StringFormat = '{0}'}"
                                FontSize="Small" Grid.Row="0"/>
                        <Editor Text="{Binding Item.Address, StringFormat = '{0}'}"
                                FontSize="Small" Grid.Row="1" />
                    </Grid>
                </DataTemplate>
            </dxg:TemplateColumn.EditTemplate>
        </dxg:TemplateColumn>
        <dxg:TextColumn FieldName="Position"  MinWidth="200"/>
        <dxg:PickerColumn FieldName="Access" Caption = "Access Level" MinWidth="100"/>
        <dxg:CheckBoxColumn FieldName="OnVacation" MinWidth="100"/>
    </dxg:DataGridView.Columns>
</dxg:DataGridView>
To open and close a cell in-place editor in code, use the OpenEditor and CloseEditor methods. The ShowingEditor event fires when a cell editor is about to be displayed and allows you to cancel the action.
Edit Form
The grid’s EditFormPage is an edit form that allows users to edit cell values. You can specify a gesture (for example, tap or double tap) that invokes it.
To customize the edit form appearance, use properties of the DataFormView object that the EditFormPage‘s Content property returns.
The default form contains editors for all columns visible in the grid. Editors are arranged in a column from top to bottom. Each editor displays a caption (the column’s display name or the GridColumn.EditFormCaption property value) to the left of the edit field. You can define a custom template to replace the default view of the edit form. This can be useful when you need to change a set of editors displayed in the form, specify a custom editor caption, or adjust editor sizes.
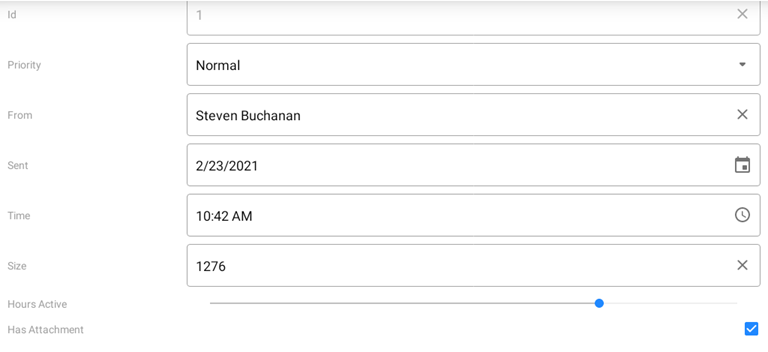
How to: Enable the Edit Form
This example shows how to set up the grid to display the Edit Values form when a user taps a cell. The grid is bound to a collection of orders.
Subscribe to the DataGridView.Tap event.
<dxg:DataGridView x:Name="grid" ItemsSource="{Binding Orders}" Tap="Grid_Tap">
    <dxg:DataGridView.Columns>
        <dxg:TextColumn FieldName="Product.Name" Caption="Product" />
        <dxg:NumberColumn FieldName="Product.UnitPrice" Caption="Price" DisplayFormat="C0"/>
        <dxg:NumberColumn FieldName="Quantity" />
        <dxg:NumberColumn FieldName="Total"
                          UnboundType="Integer" UnboundExpression="[Quantity] * [Product.UnitPrice]"
                          IsReadOnly="True" DisplayFormat="C0" />
        <dxg:DateColumn FieldName="Date" DisplayFormat="d" />
        <dxg:CheckBoxColumn FieldName="Shipped" />
    </dxg:DataGridView.Columns>
</dxg:DataGridView>
In the event handler:
- Create an EditFormPage instance with the grid and data source’s record object to which the grid’s current row corresponds passed as constructor parameters.
Call the Navigation.PushAsync method and pass the created page as a parameter.
using Xamarin.Forms;
using DevExpress.XamarinForms.DataGrid;

namespace DataGridExample {
    public partial class MainPage : ContentPage {
        public MainPage() {
            DevExpress.XamarinForms.DataGrid.Initializer.Init();
            InitializeComponent();
        }

        private void Grid_Tap(object sender, DataGridGestureEventArgs e) {
            if (e.Item != null) {
                var editForm = new EditFormPage(grid, grid.GetItem(e.RowHandle));
                Navigation.PushAsync(editForm);
            }
        }
    }
}
In the App.xaml.cs file, assign a NavigationPage instance to the Application.MainPage property and add the MainPage content page to the navigation stack (the application’s root page):
namespace DataGridExample {
    public partial class App : Application {
        public App() {
            InitializeComponent();

            // MainPage = new MainPage();
            MainPage = new NavigationPage(new MainPage());
        }

        // ...
    }
}
The grid now displays the Edit Values form when a user taps a data cell.
How to: Customize the Edit Form Appearance
This example demonstrates how to customize the grid’s edit form appearance.
Use the EditFormPage object’s Content property to access a DataFormView object that is the form’s default view and stores its appearance settings:
- Background color (BackgroundColor);
- Font settings (EditorLabelFontSize, EditorLabelColor, EditorLabelFontAttributes, EditorLabelFontFamily);
- Content paddings (ContentPadding, EditorPadding).
To specify a custom caption for an editor, use the GridColumn.EditFormCaption property.
<dxg:DataGridView x:Name="dataGridView"
                  EditorShowMode="Never"
                  ItemsSource="{Binding Path=OutlookData}"
                  Tap="Handle_Tap">
    <dxg:DataGridView.Columns>
        <dxg:NumberColumn FieldName="Id" Width="70" IsReadOnly="true"/>
        <dxg:ComboBoxColumn FieldName="Priority" MinWidth="120"/>
        <dxg:TextColumn FieldName="From.Name" Caption="From" MinWidth="150" ClearIconVisibility="Auto"/>
        <dxg:DateColumn FieldName="Sent" Width="110"/>
        <dxg:TimeColumn FieldName="Time" Width="100"/>
        <dxg:NumberColumn FieldName="Size" Width="120" DisplayFormat="{}{0} B" IsUpDownIconVisible="True" UpDownIconAlignment="Start"/>
    </dxg:DataGridView.Columns>
</dxg:DataGridView>
using Xamarin.Forms;
using DevExpress.XamarinForms.DataGrid;

namespace DataGridExample {
    public partial class MainPage : ContentPage {
        public MainPage() {
            InitializeComponent();
        }

        private void Handle_Tap(object sender, DataGridGestureEventArgs e) {
            if (e.Item != null) {
                var editForm = new EditFormPage(grid, grid.GetItem(e.RowHandle));

                DataFormView view = (DataFormView)editForm.Content;
                view.BackgroundColor = Color.FromHex("#333333");
                view.EditorLabelFontSize = 18;
                view.EditorLabelColor = Color.White;
                view.EditorPadding = new Thickness(0, 0, 0, 30);
                view.ContentPadding = new Thickness(10, 10, 10, 10);

                Navigation.PushAsync(editForm);
            }
        }
    }
}
How to: Define a Custom Template for the Edit Form
This example shows how to create a custom view for the grid’s edit form and set up the grid to invoke this form when a user double taps a cell.
The grid is bound to a collection of Employee objects and contains columns to display employee information (photo, name, position, phone, address, hire and birth dates, access level, and information about vacation). A custom edit form will display an employee’s photo and name, and contain editors to modify employee’s phone and address.
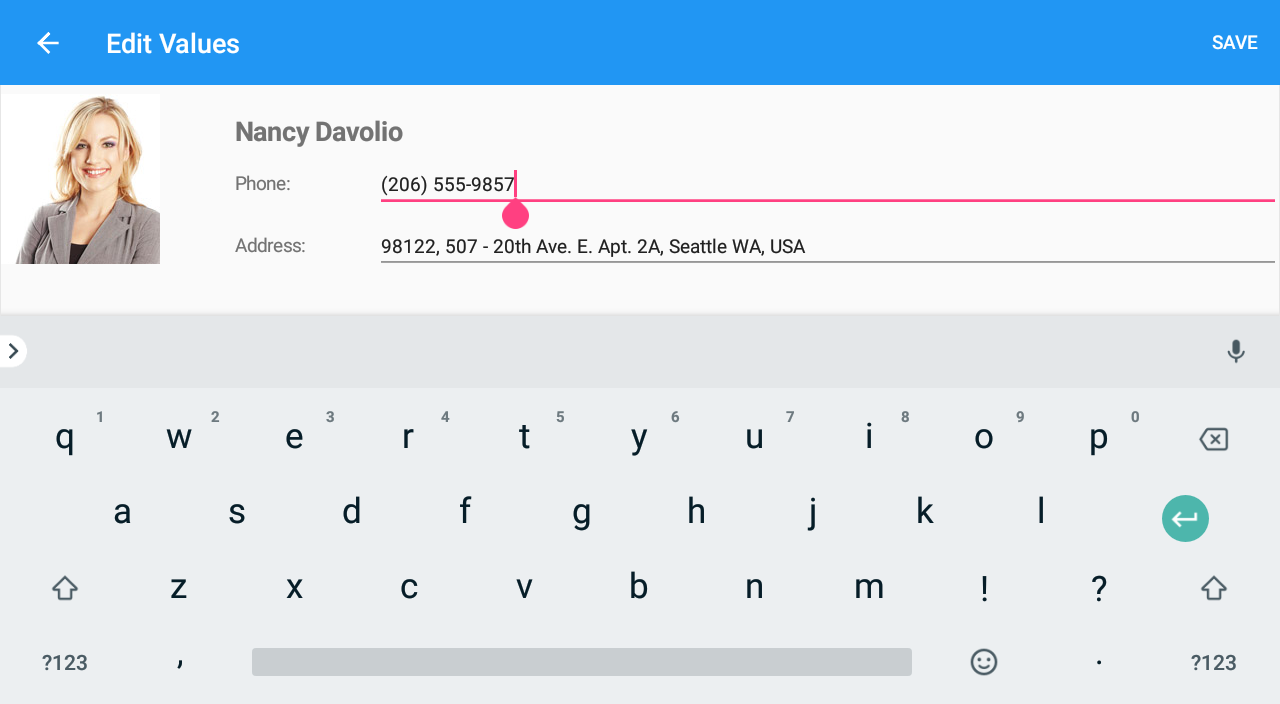
Custom Edit Form
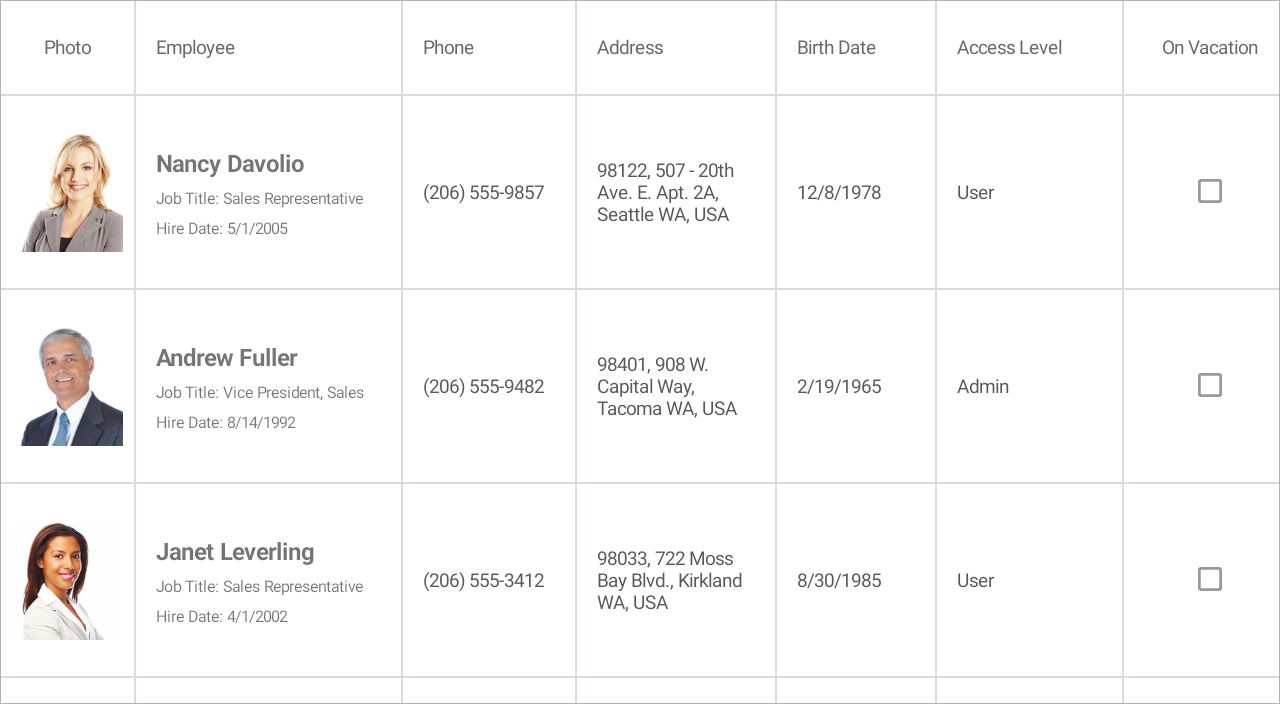
Grid Columns
Follow the steps below to implement a custom edit form.
Define a data template to be a content for the edit form page. In this example, it is a Xamarin.Forms.Grid with a set of labels and editors inside. Its BindingContext is an EditRowViewModel object. Use its Item property to access an object that represents a data source’s record (Employee) and bind editors to its properties.
<ContentPage xmlns="http://xamarin.com/schemas/2014/forms"
            xmlns:x="http://schemas.microsoft.com/winfx/2009/xaml"
            xmlns:dxg="http://schemas.devexpress.com/xamarin/2014/forms/datagrid"
            x:Class="DataGridExample.MainPage">
    <ContentPage.Resources>
        <DataTemplate x:Key="CustomEditFormContent">
            <ScrollView>
                <Grid>
                    <Grid.RowDefinitions>
                        <RowDefinition Height="Auto" />
                    </Grid.RowDefinitions>
                    <Grid.ColumnDefinitions>
                        <ColumnDefinition Width="Auto" />
                        <ColumnDefinition Width="*" />
                    </Grid.ColumnDefinitions>
                    <Image Source="{Binding Path=Item.Photo}" Grid.Row="0" Grid.Column="0"/>
                    <StackLayout Orientation="Vertical" Padding="50, 20, 0, 0"
                                 Grid.Row="0" Grid.Column="1">
                        <Label Text="{Binding Path=Item.Name}"  VerticalOptions="Start"
                               FontSize="20" FontAttributes="Bold" />
                        <StackLayout Orientation="Horizontal">
                            <Label Text="Phone:"  FontSize="14" WidthRequest="100"
                                   HorizontalOptions="Start" VerticalOptions="Center" />
                            <Editor Text="{Binding Path=Item.Phone, Mode=TwoWay}"
                                    FontSize="Small" HorizontalOptions="FillAndExpand"/>
                        </StackLayout>
                        <StackLayout Orientation="Horizontal">
                            <Label Text="Address:"  FontSize="14" WidthRequest="100"
                                   HorizontalOptions="Start" VerticalOptions="Center" />
                            <Editor Text="{Binding Path=Item.Address, Mode=TwoWay}"
                                    FontSize="Small" HorizontalOptions="FillAndExpand"/>
                        </StackLayout>
                    </StackLayout>
                </Grid>
            </ScrollView>
        </DataTemplate>
    </ContentPage.Resources>
    <!-- ... -->
</ContentPage>
In the grid’s DoubleTap event handler, create an EditFormPage instance and pass the specified data template to its constructor as a third parameter.
<dxg:DataGridView x:Name="grid" ItemsSource="{Binding Employees}" DoubleTap="DataGridView_DoubleTap"> <!-- ... --> </dxg:DataGridView>using Xamarin.Forms; using DevExpress.XamarinForms.DataGrid; namespace DataGridExample { public partial class MainPage : ContentPage { public MainPage() { DevExpress.XamarinForms.DataGrid.Initializer.Init(); InitializeComponent(); } private void DataGridView_DoubleTap(object sender, DataGridGestureEventArgs e) { if (e.Item != null) { var editForm = new EditFormPage(grid, grid.GetItem(e.RowHandle), (DataTemplate)Resources["CustomEditFormContent"]); Navigation.PushAsync(editForm); } } } }In the App.xaml.cs file, assign a NavigationPage instance to the Application.MainPage property and add the MainPage content page to the navigation stack (the application’s root page):
namespace DataGridExample {
    public partial class App : Application {
        public App() {
            InitializeComponent();

            // MainPage = new MainPage();
            MainPage = new NavigationPage(new MainPage());
        }

        // ...
    }
}