Configure Controls to Validate
- 7 minutes to read
You can validate standalone editors and editors used in composite controls. When you bind them to model properties that have validation attributes, the attributes are applied. An editor’s input value is validated each time the change event is raised.
Note
You can use the ValueChangeEvent method to change the DOM event that triggers validation. For example, you need to validate a TextBox value when the keyup event occurs. To specify this event, use the TextBox’s ValueChangeEvent method.
You can also validate several controls in one click, create multiple validation groups, or submit a form after validation.
Validate an Editor
You can validate editors like TextBox, DateBox, etc.
The following code shows how to create the TextBox editor. The editor is bound to the Name model property that has the Required attribute, so the validation works.
View
@model ApplicationName.Models.Person

@(Html.DevExtreme().TextBox()
    .Name("Name")
    .Value(Model.Name)
)
Model
using System.ComponentModel.DataAnnotations;

namespace ApplicationName.Models {
    public class Person {
        [Required(ErrorMessage = "Name is required")]
        public string Name { get; set; }
    }
}

You can also use ControlFor strongly-typed helpers to bind controls to model properties:
@model ApplicationName.Models.Person

@(Html.DevExtreme().TextBoxFor(model => model.Name))
Note
Demo: Editors - Validation
Validate Editors Used in Composite Controls
The validation engine can validate editors used in composite controls (DataGrid, TreeList, or Form). To set up validation, use validation attributes or create validation rules.
Validation Attributes
To configure composite controls, you can use Control<T> strongly-typed helpers. When you bind control items or columns to model properties with validation attributes, the attributes are applied.
Note
You can also use the DevExtreme scaffolder to configure the DataGrid, TreeList, and Form controls.
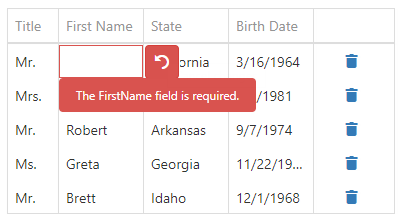
DataGrid Example
The following example demonstrates how to validate DataGrid columns:
View
@using ApplicationName.Models

@(Html.DevExtreme().DataGrid<Person>()
    .Columns(columns => {
        columns.AddFor(m => m.Prefix);
        columns.AddFor(m => m.FirstName);
        // ...
)
Model
using System.ComponentModel.DataAnnotations;

namespace ApplicationName.Models {
    public class Person {
        [Required(ErrorMessage = "The FirstName field is required.")]
        public string FirstName { get; set; }
        // ...
    }
}
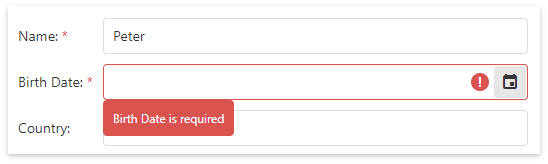
Form Example
The following example demonstrates how to configure the Form control items and validate them:
View
@using ApplicationName.Models

@(Html.DevExtreme().Form<Person>()
    .Items(items => {
        items.AddSimpleFor(model => model.Name);
        items.AddSimpleFor(model => model.BirthDate);
        items.AddSimpleFor(model => model.Country);
    })
)
Model
using System.ComponentModel.DataAnnotations;

namespace ApplicationName.Models {
    public class Person {
        [Required(ErrorMessage = "Name is required")]
        public string Name { get; set; }

        [Required(ErrorMessage = "Birth Date is required")]
        public DateTime BirthDate { get; set; }

        public string Country { get; set; }
        // ...
    }
}
Validation Rules
As an alternative to validation attributes, you can use API methods to create validation rules for DataGrid columns, TreeList columns, and Form simple items. For example, use API methods if a control is not strongly-typed.
To attach validation rules to these controls, call the ValidationRules method. The method’s lambda parameter exposes the following methods: AddCompare, AddEmail, AddNumeric, etc.
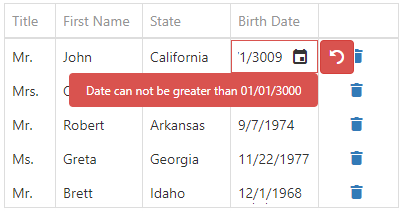
The following example demonstrates how to use the AddRequired and AddRange methods to specify validation rules for the DataGrid columns:
@(Html.DevExtreme().DataGrid<Person>()
    .Columns(columns => {
        columns.AddFor(model => model.Prefix)
            .Caption("Title")
            .Width(50)
            .ValidationRules(rules => rules.AddRequired());

        columns.AddFor(model => model.FirstName)
            .ValidationRules(r => r.AddRequired());

        columns.AddFor(model => model.BirthDate)
            .DataType(GridColumnDataType.Date)
            .ValidationRules(rules => rules.AddRange()
                .Max(new DateTime(3000, 1, 1))
                .Message("Date can not be greater than 01/01/3000")
            );
    })
)
Note
Demo: You can find the provided code in the Data Grid - Collaborative Editing demo.
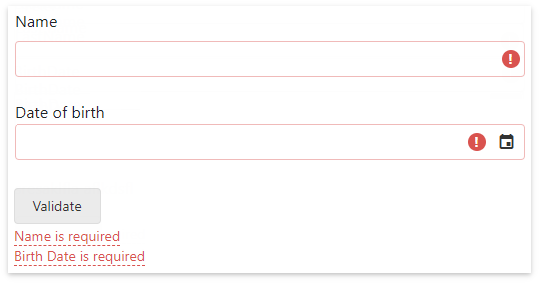
Validate a Group of Controls
If a page contains several controls (editors and forms), you can validate them together in one click. The validation engine combines these controls into a default validation group. To validate the group, add the Button control, handle the button’s click event, and call the validate() client-side method.
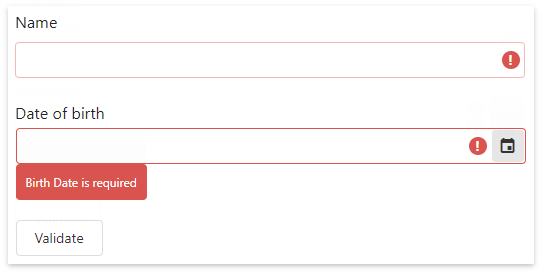
The following example demonstrates how to validate two text boxes simultaneously:
@model ApplicationName.Models.Person

@Html.LabelFor(model => model.Name)
@(Html.DevExtreme().TextBoxFor(model => model.Name))

@Html.LabelFor(model => model.BirthDate, "Date of birth")
@(Html.DevExtreme().DateBoxFor(model => model.BirthDate))

@(Html.DevExtreme().Button()
    .Text("Validate")
    .OnClick("validateButton_click")
)

<script>
    function validateButton_click(e) {
        e.validationGroup.validate();
    }
</script>
Editors with invalid values are highlighted. To view a validation error for an editor, click within the editor.
Validation Summary
You can display all errors relevant to a validation group in one place. To do this, add the ValidationSummary control to your Razor file, for example, after the Button control.
@(Html.DevExtreme().Button()
    .Text("Validate")
    .OnClick("validateButton_click")
)

@(Html.DevExtreme().ValidationSummary())
Note
- You can create multiple validation groups.
- The Button control also allows you to submit a collection of editors after they are validated on the client. Refer to Validate and Submit an HTML Form.
Validate Multiple Groups
You can combine controls into multiple validation groups. This allows you to validate them separately.
For example, you can create one validation group for editors and another group for a form. To define a group, use the ValidationGroup helper. Each group has a button that triggers validation.
@using ApplicationName.Models

@using(Html.DevExtreme().ValidationGroup()) {
    @(Html.DevExtreme().TextBox().Name("Name"))
    @(Html.DevExtreme().TextBox().Name("BirthDate"))

    @(Html.DevExtreme().Button()
        .Text("Validate Editors")
        .OnClick("validateButton_click")
    )

    @(Html.DevExtreme().ValidationSummary())
}

@using(Html.DevExtreme().ValidationGroup()) {
    @(Html.DevExtreme().Form<Person>().Items(...))

    @(Html.DevExtreme().Button()
        .Text("Validate Form")
        .OnClick("validateButton_click")
    )

    @(Html.DevExtreme().ValidationSummary())
}

<script>
    function validateButton_click(e) {
        e.validationGroup.validate();
    }
</script>
Note
You can give a name to a validation group:
Form control: As an alternative to the
ValidationGrouphelper, you can use theValidationGroupmethod to attach the control to a validation group:
You can locate the Button and ValidationSummary controls outside the using block scope, but you should specify a group that they belong to. To do this, use the ValidationGroup method.
@using(Html.DevExtreme().ValidationGroup("myGroup")) {
    // Configure editors or a form
}

@(Html.DevExtreme().Button()
    // ...
    .ValidationGroup("myGroup")
)

@(Html.DevExtreme().ValidationSummary()
    .ValidationGroup("myGroup")
)
Validate and Submit an HTML Form
You can create a form whose fields are simultaneously validated on the client and then submitted to the server. For example, you want to create the following form:
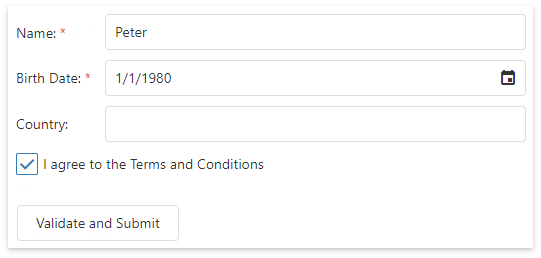
- Use the BeginForm HTML helper to declare an HTML form.
- Define form fields. You can use the Form control or editors.
- Declare the Button control and pass true to the
UseSubmitBehaviormethod. The button triggers validation and submits the form.
@using(Html.BeginForm("EditPerson", "Home", FormMethod.Post)) {
    @(Html.DevExtreme().Form<Person>().Items(...))

    @(Html.DevExtreme().Button()
        .Text("Validate and Submit")
        .UseSubmitBehavior(true)
    )
}
Note
- The Button control can validate different validation groups, but it always submits the HTML form in which it is nested. To avoid mixing up validated and submitted values, it is recommended that an HTML form contains only one validation group.
- Demo: Form - Validation