Create a Blazor Dashboard Application
- 4 minutes to read
Important
Note that we do not have a native Dashboard UI component for Blazor. You can only integrate the client JavaScript Dashboard control into a Blazor application.
If you are not familiar with basic concepts and patterns of Blazor, please review the fundamentals before you continue: Introduction to ASP.NET Core Blazor
This tutorial describes how to integrate the JavaScript Dashboard control into a Blazor application.
Prerequisites
- Visual Studio 2019 with the ASP.NET and Web Development workload
- .NET Core 3.1 or later
- DevExpress Universal Subscription v20.2
Create a Blazor Application
This solution uses the ASP.NET Core backend (server-side Blazor) to process requests from the JavaScript Dashboard. The client side defines the UI for this component and the logic needed to respond to UI updates.
Create a new Blazor app named BlazorDashboardApp. Select the Blazor WebAssembly App template and enable the ASP.NET Core hosted check box. If this template was not installed, review the following topic: Blazor Tutorial - Build your first Blazor app.
Alternative. Run
dotnet new blazorwasm -n BlazorDashboardApp --hostedcommand.
Configure the Server Part
Install the following NuGet packages:
DevExpress.AspNetCore.DashboardMicrosoft.AspNetCore.Mvc.NewtonsoftJson
Create the
App_Data/Dashboardsfolder to store dashboards.Open the Startup.cs file and update the
ConfigureServicesmethod as follows:using DevExpress.AspNetCore; using DevExpress.DashboardAspNetCore; using DevExpress.DashboardCommon; using DevExpress.DashboardWeb; using DevExpress.DataAccess.Json; using Microsoft.Extensions.FileProviders; using System; // ... public Startup(IConfiguration configuration, IWebHostEnvironment hostingEnvironment) { Configuration = configuration; FileProvider = hostingEnvironment.ContentRootFileProvider; } public IConfiguration Configuration { get; } public IFileProvider FileProvider { get; } public void ConfigureServices(IServiceCollection services) { services.AddResponseCompression(opts => { opts.MimeTypes = ResponseCompressionDefaults.MimeTypes.Concat( new[] { "application/octet-stream" }); }); services.AddDevExpressControls(); services.AddMvc() .AddDefaultDashboardController(configurator => { // Register Dashboard Storage configurator.SetDashboardStorage(new DashboardFileStorage(FileProvider.GetFileInfo("App_Data/Dashboards").PhysicalPath)); // Create a sample JSON data source DataSourceInMemoryStorage dataSourceStorage = new DataSourceInMemoryStorage(); DashboardJsonDataSource jsonDataSourceUrl = new DashboardJsonDataSource("JSON Data Source (URL)"); jsonDataSourceUrl.JsonSource = new UriJsonSource( new Uri("https://raw.githubusercontent.com/DevExpress-Examples/DataSources/master/JSON/customers.json")); jsonDataSourceUrl.RootElement = "Customers"; jsonDataSourceUrl.Fill(); dataSourceStorage.RegisterDataSource("jsonDataSourceUrl", jsonDataSourceUrl.SaveToXml()); configurator.SetDataSourceStorage(dataSourceStorage); }); services.AddControllersWithViews(); services.AddRazorPages(); }In the same file, add the
app.UseDevExpressControls()andEndpointRouteBuilderExtension.MapDashboardRoute()method calls to theConfiguremethod in the following order:// ... public void Configure(IApplicationBuilder app, IWebHostEnvironment env) { // ... app.UseStaticFiles(); app.UseDevExpressControls(); app.UseRouting(); app.UseEndpoints(endpoints => { EndpointRouteBuilderExtension.MapDashboardRoute(endpoints, "api/dashboard"); // ... }); }
Configure the Client Part
Add the npm configuration file (package.json) and list the following npm packages required by the Dashboard component:
{
    "dependencies": {
        // ...
        "devexpress-dashboard": "~20.2.13"
        "@devexpress/analytics-core": "~20.2.13",
        "devextreme": "~20.2.13",
        "jquery-ui-dist": "1.12.1"
    },
    // ...
}
Right-click the created package.json file and select Restore Packages.
Alternative. Run
npm installto install these packages.In the
Pagesfolder, create the Dashboard Razor component (Dashboard.razor) and add the code below to render the Web Dashboard:@page "/dashboard" @inject IJSRuntime JSRuntime @implements IDisposable <div id="web-dashboard" style="width: 100%; height: 600px; border: 1px solid rgb(221, 221, 221);"> </div> @code { protected override void OnAfterRender(bool firstRender) { JSRuntime.InvokeAsync<object>("JsFunctions.InitWebDashboard"); } public void Dispose() { JSRuntime.InvokeAsync<string>("JsFunctions.DisposeWebDashboard"); } }Note
You should call the
OnAfterRendermethod for the dashboard component for initialization and theDisposemethod to release unused memory.In the
wwwrootfolder, create the index.js file and implement the logic to initialize and dispose the components:window.JsFunctions = { InitWebDashboard: function () { this.dashboardControl = new DevExpress.Dashboard.DashboardControl(document.getElementById("web-dashboard"), { endpoint: "/api/dashboard" }); this.dashboardControl.render(); }, DisposeWebDashboard: function () { this.dashboardControl.dispose(); } };Install the
BuildBundlerMinifierNuGet package. Create a bundleconfig.json file to bundle scripts and styles required for the Web Dashboard:[ { "outputFileName": "wwwroot/site/styles.css", "inputFiles": [ "node_modules/devextreme/dist/css/dx.light.css", "node_modules/@devexpress/analytics-core/dist/css/dx-analytics.common.css", "node_modules/@devexpress/analytics-core/dist/css/dx-analytics.light.css", "node_modules/@devexpress/analytics-core/dist/css/dx-querybuilder.css", "node_modules/devexpress-dashboard/dist/css/dx-dashboard.light.min.css" ], "minify": { "enabled": false, "adjustRelativePaths": false } }, { "outputFileName": "wwwroot/site/bundle.js", "inputFiles": [ "./index.js", "node_modules/jquery/dist/jquery.min.js", "node_modules/jquery-ui-dist/jquery-ui.min.js", "node_modules/knockout/build/output/knockout-latest.js", "node_modules/ace-builds/src-min-noconflict/ace.js", "node_modules/ace-builds/src-min-noconflict/ext-language_tools.js", "node_modules/ace-builds/src-min-noconflict/theme-dreamweaver.js", "node_modules/ace-builds/src-min-noconflict/theme-ambiance.js", "node_modules/devextreme/dist/js/dx.all.js", "node_modules/@devexpress/analytics-core/dist/js/dx-analytics-core.min.js", "node_modules/@devexpress/analytics-core/dist/js/dx-querybuilder.min.js", "node_modules/devexpress-dashboard/dist/js/dx-dashboard.min.js" ], "minify": { "enabled": false }, "sourceMap": false } ]In the
wwwrootfolder, open the index.html file and reference the following scripts and stylesheets:site/styles.csssite/bundle.jsindex.js
<!DOCTYPE html> <html> <head> <meta charset="utf-8" /> <meta name="viewport" content="width=device-width, initial-scale=1.0, maximum-scale=1.0, user-scalable=no" /> <title>BlazorDashboardApp</title> <base href="/" /> <link href="css/bootstrap/bootstrap.min.css" rel="stylesheet" /> <link href="css/app.css" rel="stylesheet" /> <link href="BlazorDashboardApp.Client.styles.css" rel="stylesheet" /> <link href="site/styles.css" rel="stylesheet" /> </head> <body> <div id="app">Loading...</div> <div id="blazor-error-ui"> An unhandled error has occurred. <a href="" class="reload">Reload</a> <a class="dismiss">🗙</a> </div> <script src="_framework/blazor.webassembly.js"></script> <script src="site/bundle.js"></script> <script src="index.js"></script> </body> </html>In the Shared/NavMenu.razor file, add a new NavLink component to the list to display the Web Dashboard item in the navigation menu:
<div class="@NavMenuCssClass" @onclick="ToggleNavMenu">
    <ul class="nav flex-column">
        <!--...-->
        <li class="nav-item px-3">
            <NavLink class="nav-link" href="dashboard">
                <span class="oi oi-list-rich" aria-hidden="true"></span> Web Dashboard
            </NavLink>
        </li>
    </ul>
</div>
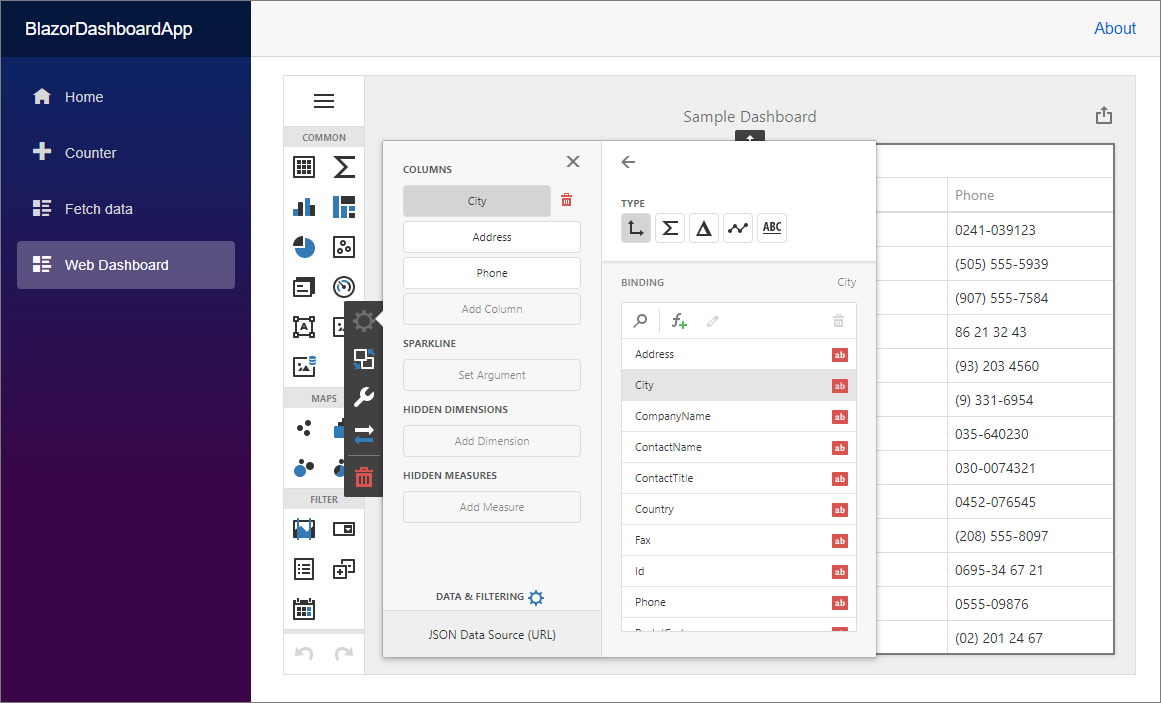
Run the project to see the result: