Create a JavaScript Dashboard Application
- 6 minutes to read
This article assumes that you implement a client-server architecture. An ASP.NET Core or an ASP.NET MVC application serves as the backend (server side). The client (frontend) application includes all the necessary styles, scripts and HTML-templates. Note that client scripts, libraries on the server side, and devexpress npm packages should have matching version numbers.
The tutorial shows how to embed the JavaScript Dashboard control into a new ASP.NET MVC application. When you use this approach, the DashboardControl comes in a pre-assembled dx-dashboard.js bundle. You need to get the scripts and dependencies from the npm package and manually add them to the page.
Requirements
- The script version on the client should match with libraries version on the server.
- All installed DevExpress npm packages should have matching versions.
Create a New Project
In Visual Studio, create a new project and select ASP.NET Web Application (.NET Framework) on the start page as the project template.
Set the project name to
HtmlJavaScriptApp, specify the project location, and click Create.Select the Empty template and enable the MVC checkbox to add folders and core references for MVC. Click Create.
Configure a Client
Install npm Packages
Right-click the project, click Add | New Item… and add npm Configuration File to the project.
Then, open the created file and add following packages:
{
    // ...
    "dependencies": {
        "devextreme-dist": "23.2-stable",
        "@devexpress/analytics-core":"23.2-stable",
        "devexpress-dashboard": "23.2-stable"
    }
}
Right-click package.json and select Restore Packages.
Add and Configure the JavaScript Dashboard
Right-click the project, select Add | HTML Page and change its name to index. Right-click the created file and select Set As Start Page.
Open index.html and attach the following stylesheet and scripts to the project inside the <head> section:
<head>
<!-- ... -->
    <link href="/node_modules/ace-builds/css/ace.css" rel="stylesheet" />
    <link href="/node_modules/ace-builds/css/theme/dreamweaver.css"  rel="stylesheet" />
    <link href="/node_modules/ace-builds/css/theme/ambiance.css"  rel="stylesheet" />
    <link href="node_modules/devextreme-dist/css/dx.light.css" rel="stylesheet" />

    <link href="node_modules/@devexpress/analytics-core/dist/css/dx-analytics.common.css" rel="stylesheet" />
    <link href="node_modules/@devexpress/analytics-core/dist/css/dx-analytics.light.css" rel="stylesheet" />
    <link href="node_modules/@devexpress/analytics-core/dist/css/dx-querybuilder.css" rel="stylesheet" />

    <link href="node_modules/devexpress-dashboard/dist/css/dx-dashboard.light.min.css" rel="stylesheet" />

    <script src="node_modules/jquery/dist/jquery.js"></script>

    <script src="node_modules/knockout/build/output/knockout-latest.js"></script>

    <script src="node_modules/ace-builds/src-min-noconflict/ace.js"></script>
    <script src="node_modules/ace-builds/src-min-noconflict/ext-language_tools.js"></script>
    <script src="node_modules/ace-builds/src-min-noconflict/theme-dreamweaver.js"></script>
    <script src="node_modules/ace-builds/src-min-noconflict/theme-ambiance.js"></script>

    <script src="node_modules/devextreme-dist/js/dx.all.js"></script>

    <script src="node_modules/@devexpress/analytics-core/dist/js/dx-analytics-core.min.js"></script>
    <script src="node_modules/@devexpress/analytics-core/dist/js/dx-querybuilder.min.js"></script>

    <script src="node_modules/devexpress-dashboard/dist/js/dx-dashboard.min.js"></script>
    <!-- ... -->
</head>
Web Dashboard comes with an icon library that provides font icons for all DevExtreme themes. The icons should be in the same folder as the DevExtreme CSS files.
- For npm, the icons folder is
node_modules/devextreme/dist/css/icons. - For manual scripts integration, copy the icons folder from
C:\Program Files\DevExpress 23.2\Components\Sources\DevExpress.Web.Resources\Css\DevExtremeand place it to the directory that contains the DevExtreme CSS files.
Place a <div> element with the specified identifier and position inside the <body> section:
<body>
    <div id="web-dashboard" style="position: absolute; left: 0; right: 0; top: 0; bottom: 0">
    </div>
</body>
In the <head> section, add the following script after the stylesheets and scripts from step 4. The endpoint property specifies the URL used to interact with a backend (to send data requests to a server).
<head>
<!-- ... -->
    <script>
        window.onload = function () {
            var dashboardControl = new DevExpress.Dashboard.DashboardControl(document.getElementById("web-dashboard"), {
                // Specifies a URL where the Web Dashboard's server side is hosted. See the MapDashboardRoute method in Global.asax.cs.
                endpoint: "/api/dashboard"
            });
            dashboardControl.render();
        };
    </script>
</head>
Configure a Server
Add References
In the Solution Explorer, right-click References and select Add Reference… in the context menu. In the Reference Manager, go to Assemblies | Extensions and add the following references:
- DevExpress.Dashboard.Core
- DevExpress.Dashboard.Web
- DevExpress.Dashboard.Web.Mvc5
- DevExpress.DataAccess
Configure a Dashboard Controller
Add a new empty DefaultDashboard controller to the project’s Controllers folder and inherit the DashboardController class:
using DevExpress.DashboardWeb.Mvc;

namespace HtmlJavaScriptApp.Controllers {
    public class DefaultDashboardController : DashboardController {
    }
}
Configure Routing
Go to the Global.asax file and call the RouteCollectionExtension.MapDashboardRoute method in Application_Start. Set api/dashboard as a route prefix and pass the name of the custom dashboard controller (DefaultDashboard):
using DevExpress.DashboardWeb.Mvc;
// ...
namespace HtmlJavaScriptApp {
    public class MvcApplication : System.Web.HttpApplication {
        protected void Application_Start() {
            AreaRegistration.RegisterAllAreas();
            RouteConfig.RegisterRoutes(RouteTable.Routes);
            RouteTable.Routes.MapDashboardRoute("api/dashboard", "DefaultDashboard");
            // ...
        }
    }
}
Create Dashboard Storage
Create a new Dashboards folder inside App_Data.
Then, call the DashboardConfigurator.SetDashboardStorage method to store dashboard XML files in the created folder.
using DevExpress.DashboardWeb;
using DevExpress.DashboardWeb.Mvc;
// ...
namespace HtmlJavaScriptApp {
    public class MvcApplication : System.Web.HttpApplication {
        protected void Application_Start() {
            AreaRegistration.RegisterAllAreas();
            RouteConfig.RegisterRoutes(RouteTable.Routes);
            RouteTable.Routes.MapDashboardRoute("api/dashboard", "DefaultDashboard");
            DashboardConfigurator.Default.SetDashboardStorage(new DashboardFileStorage("~/App_Data/Dashboards"));
            // ...
        }
    }
}
Supply a Web Dashboard with Data
Right-click the App_Data folder, select Add | Existing Item and add the nwind.mdb database from the following path:
C:\Users\Public\Documents\DevExpress Demos 23.2\Components\Data\nwind.mdb
Specify a connection string to the added database within the project’s Web.config file as shown below.
<configuration>
  <connectionStrings>
      <add name="nwindConnection" connectionString="XpoProvider=MSAccess; Provider=Microsoft.ACE.OLEDB.12.0; Data Source=|DataDirectory|\nwind.mdb;" />
  </connectionStrings>
</configuration>
Note
The connection string should contain the XpoProvider parameter that depends on the database type. See Register Default Data Connections for details on how to specify connection strings for different database types.
Go to the Global.asax file. Pass the ConfigFileConnectionStringsProvider instance as the SetConnectionStringsProvider method’s parameter to allow end users to create new data sources based on connection strings from the Web.config file:
using DevExpress.DashboardWeb;
using DevExpress.DashboardWeb.Mvc;
using DevExpress.DataAccess.Web;
using System.Web.Mvc;
using System.Web.Routing;

namespace HtmlJavaScriptApp {
    public class MvcApplication : System.Web.HttpApplication {
        protected void Application_Start() {
            AreaRegistration.RegisterAllAreas();
            RouteConfig.RegisterRoutes(RouteTable.Routes);
            RouteTable.Routes.MapDashboardRoute("api/dashboard", "DefaultDashboard");
            DashboardConfigurator.Default.SetDashboardStorage(new DashboardFileStorage("~/App_Data/Dashboards"));
            DashboardConfigurator.Default.SetConnectionStringsProvider(new ConfigFileConnectionStringsProvider());
        }
    }
}
Create a Dashboard
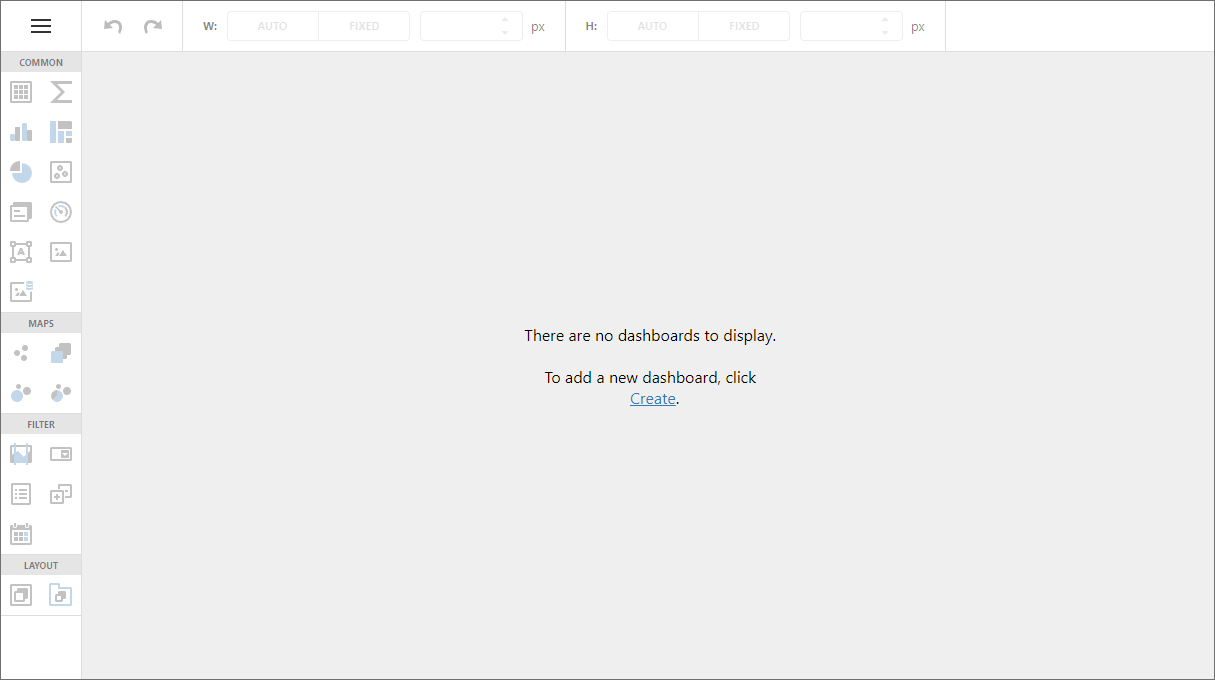
The designer application is now ready. Build and run the project.
Your application should look as follows:
You can now create your first dashboard in the Web Dashboard.
Switch to Viewer Mode
In Designer mode, the control loads the extensions required to design dashboards. Users can access the Data Source Wizard, preview underlying data, and modify dashboards from storage. Requests from the dashboard backend server can be sent to third-party resources. A user can also switch the control to Viewer mode.
After you created and saved a dashboard, switch your Dashboard Designer application to ViewerOnly mode to prevent users from modifying the dashboard and its data.
In a client-side project, open the index.html file. In the DashboardControl’s constructor, add the workingMode option and set it to ViewerOnly.
<head>
    <!-- ...-->
    <script>
        window.onload = function () {
            var dashboardControl = new DevExpress.Dashboard.DashboardControl(document.getElementById("web-dashboard"), {
                endpoint: "/api/dashboard",
                // Enables the Viewer mode:
                workingMode: "ViewerOnly"
            });
            dashboardControl.render();
        };
    </script>
</head>
Warning
Working mode does not influence server settings. Initially, the server works at the ClientTrustLevel.Full trust level. Verify trust level and specify the actions a client can initiate on the server. See the following topic for details: Working Mode Access Rights.
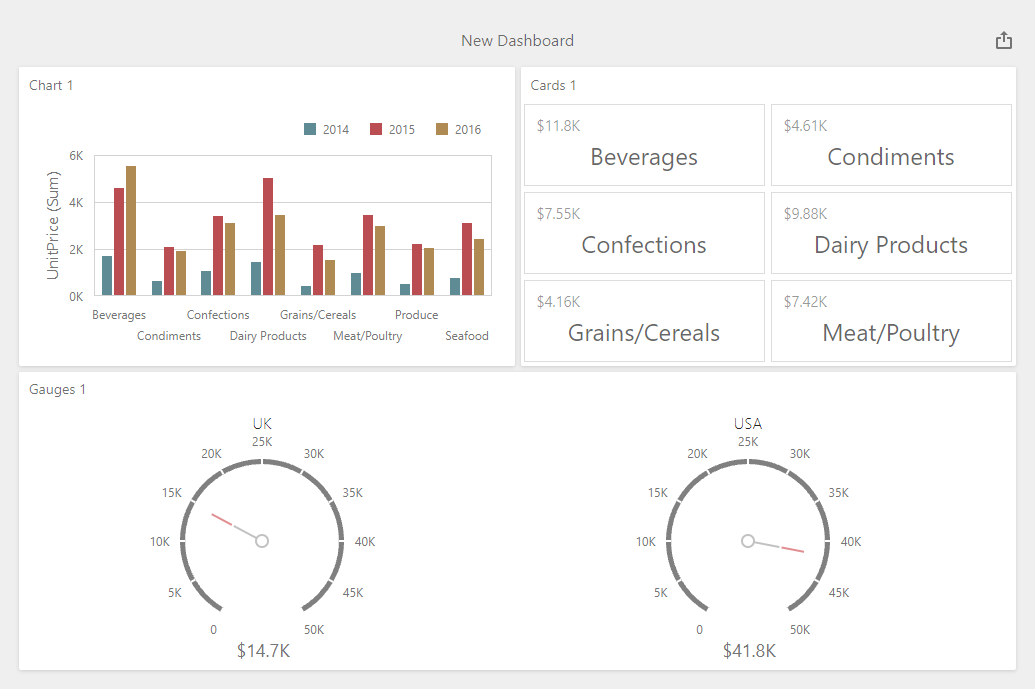
Run the application. The HTML JavaScript Dashboard displays the dashboard from ~/App_Data/Dashboards in Viewer mode:
Next Steps
- Create Dashboards on the Web
- Describes how to create and configure dashboards in the Web Dashboard control.
- JavaScript Dashboard Control
- Contains instructions on how to use the client-side DashboardControl.