Overview - UploadControl
- 2 minutes to read
The UploadControl allows files from the client computer to be uploaded and saved on the server.
To learn more about the UploadControl and see it in action, refer to its online demos.
Implementation Details
The UploadControl is realized by the UploadControlExtension class. Its instance can be accessed via the ExtensionsFactory.UploadControl helper method, which is used to add an UploadControl extension to a view. This method’s parameter provides access to the UploadControl‘s settings implemented by the UploadControlSettings class, allowing you to fully customize the extension.
The UploadControl‘s client counterpart is represented by the MVCxClientUploadControl object.
Declaration
The UploadControl can be added to a view in the following manner.
View code (ASPX):
<%Html.BeginForm();%>
...
<%
Html.DevExpress().UploadControl(
settings => {
settings.Name = "uploadControl";
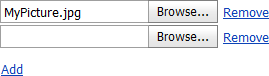
settings.FileInputCount = 2;
settings.ShowAddRemoveButtons = true;
}).Render();
%>
...
<%Html.EndForm();%>
View code (Razor):
@using (Html.BeginForm()) {
...
    @Html.DevExpress().UploadControl(
        settings => {
            settings.Name = "uploadControl";
            settings.FileInputCount = 2;
            settings.ShowAddRemoveButtons = true;
        }).GetHtml()
...
}
Note
The UploadControl should be wrapped with a form to work properly.
Note
The Partial View should contain only the extension’s code.
In addition you should add an exception for the .ashx files to the RegisterRoutes method in the Global.asax.cs file. This exception allows for the correct processing requests from our handler.
...

public static void RegisterRoutes(RouteCollection routes) {
     routes.IgnoreRoute("{resource}.axd/{*pathInfo}");
     routes.IgnoreRoute("{resource}.ashx/{*pathInfo}"); // Add this line
...
The code result is demonstrated by the image below.