Grid View
- 5 minutes to read
The DevExpress ASP.NET MVC GridView is a data bound server extension with advanced client-side API. GridView provides a two-dimensional representation of data from a data source in a grid format. It provides facilities for an end-user to sort, filter and group data against an unlimited number of columns. Delivers group and total summaries.
See Also
GridView - Online Demos | GridView - Getting Started Video (YouTube) | GridView Main Features
Contents
- Adding GridView to a Project Manually
- Adding GridView to a Project Using the Insert Extension Wizard
- Client-Side API
Adding GridView to a Project Manually
Note
Before you start, make sure your project is prepared for using DevExpress ASP.NET MVC Extensions. See this topic to learn how to prepare your project: Integration into an ASP.NET MVC Project.
Model
The data model class is used to represent data records in a database. Each instance of a data model class will correspond to a row within a database table, and each property of the data model class will map to a column within a database table.
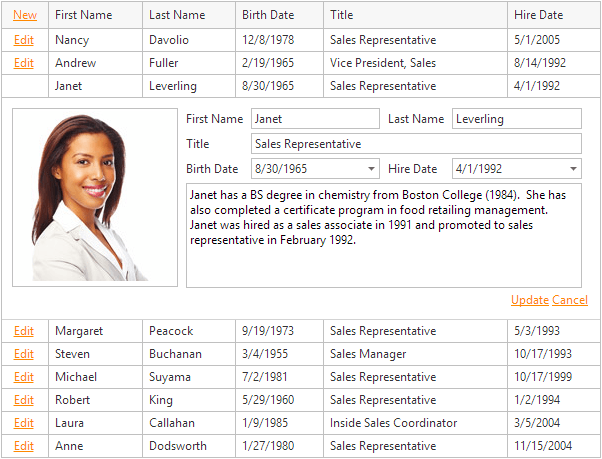
The image below demonstrates how the model class properties are represented within the GridView.

The GridView extension can be bound to an IQueriable or IEnumerable collection of model class instances. To learn more about various approaches of binding the GridView to data, refer to the Binding to Data documentation section.
View
The DevExpress GridView updates itself (when paging, sorting, grouping, etc.) via AJAX callbacks to the server without the updating and reloading the entire page. This mechanism requires declaring the GridView extension in the Partial View. So, in the View code, place a link to the PartialView that will contain the GridView declaration.
View code - “Index” (ASPX):
<%@ Page Language="C#" MasterPageFile="~/Views/Shared/Site.Master" Inherits="System.Web.Mvc.ViewPage" %>

<asp:Content ID="Content2" ContentPlaceHolderID="MainContent" runat="server">

        <div>
            <%
                Html.RenderPartial("GridViewPartial");
            %>
        </div>

</asp:Content>
View code - “Index” (Razor):
@Html.Partial("GridViewPartial")
Now, you should declare the GridView code in the PartialView. To do this, invoke the ExtensionsFactory.GridView helper method. This method returns the GridView extension that is implemented by the GridViewExtension class.
Note
The Partial View should contain only the extension’s code.

To configure the GridView extension, pass the GridViewSettings object to the ExtensionsFactory.GridView helper method as a parameter. The GridViewSettings object contains all the GridView extension settings. It is necessary to define how the callbacks will be routed back to your controller using the GridSettingsBase.CallbackRouteValues property.
Partial View code - “GridViewPartial” (ASPX):
<%@ Control Language="C#" Inherits="System.Web.Mvc.ViewUserControl<dynamic>" %>

<%
    Html.DevExpress().GridView(
        settings =>
        {
            settings.Name = "myGridView";
            settings.CallbackRouteValues = new { Controller = "Home", Action = "GridViewPart" };
            settings.Width = 450;

            settings.Columns.Add("ContactName");
            settings.Columns.Add("CompanyName");
            settings.Columns.Add("City").SortOrder = DevExpress.Data.ColumnSortOrder.Ascending;
            settings.Columns.Add("Region");
            settings.Columns.Add("Country");
        })
        .Bind(Model)
        .Render();
%>
Partial View code - “GridViewPartial” (Razor):
@Html.DevExpress().GridView(
    settings =>
    {
        settings.Name = "myGridView";
        settings.CallbackRouteValues = new { Controller = "Home", Action = "GridViewPart" };
        settings.Width = 450;

        settings.Columns.Add("ContactName");
        settings.Columns.Add("CompanyName");
        settings.Columns.Add("City").SortOrder = DevExpress.Data.ColumnSortOrder.Ascending;
        settings.Columns.Add("Region");
        settings.Columns.Add("Country");
    }).Bind(Model).GetHtml()
Controller
In the controller code, define the action method that will handle GridView’s callbacks. The GridViewPart action method below handles the grid’s callbacks. This method should return the PartialView with the GridView extension, and pass a model to the View.
Controller (“Home”):
    public class HomeController : Controller{

        public ActionResult Index(){
            return View(GetCustomers());
        }

        public ActionResult GridViewPart(){
            return PartialView("GridViewPartial", GetCustomers());
        }

        public IEnumerable GetCustomers(){
            NWindDataContext DB = new NWindDataContext();
            return from customer in DB.Customers select customer;
        }

    }
In this example, the GetCustomers method returns a collection of items that will be displayed within a GridView. The controller passes this collection to the View as a Model. In the View code, the GridView is bound to the Model object using the GridViewExtension.Bind method.
The code result is demonstrated in the image below.

Adding GridView to a Project Using the Insert Extension Wizard
The Insert DevExpress MVC Extension Wizard allows you to insert DevExpress ASP.NET MVC extensions to your project with minimum or no coding.
Follow the steps below to insert the GridView extension to your project.
- Create a new data model (using the Entity Framework or LinqToSql ORM) with the code first or the database first approach.
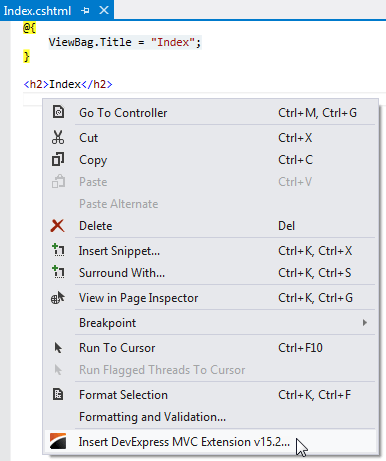
Open the required View file (Index.cshtml in this topic), focus on the position in the code where you would like to insert the GridView, right-click -> select “Insert DevExpress MVC Extension v19.2…”
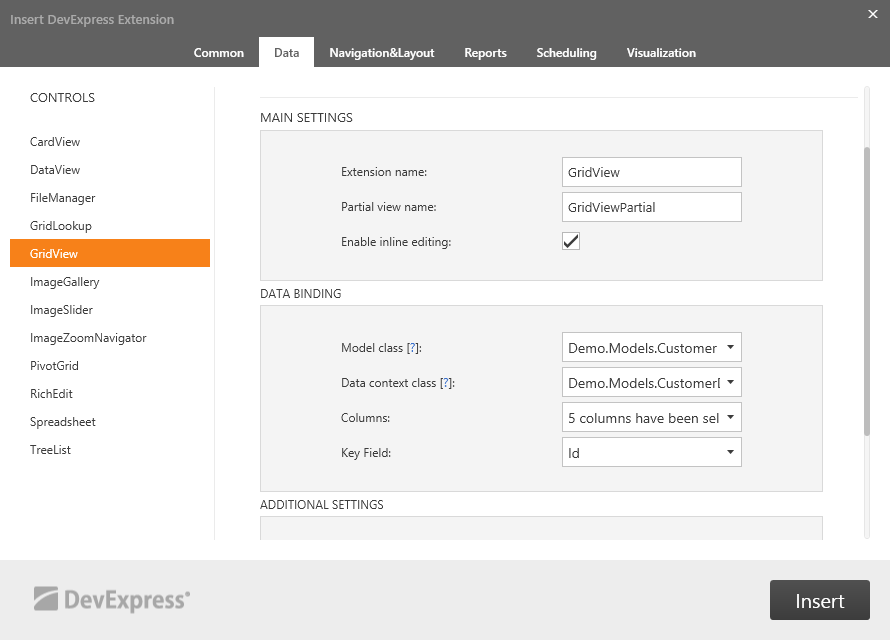
The Insert Extension Wizard opens. Navigate to the tab with the Data extensions and select GridView. Define the extension name and the partial view name. In the Model Type item, select the data model class; in the Model Context item, select the data context class. Select the columns you want to display within the GridView and select the key field.
- Click the “Insert” button and the GridView will be added into your project.
After these manipulations, Insert Extension Wizard generates a partial view with the GridView‘s settings and inserts the required code into the corresponding controller class. As a result, you have a fully functional MVC GridView bound to a data source.
Client-Side API
In addition to the comprehensive server-side object model, the MVC GridView extension offers an advanced client-side API.
The GridView‘s client counterpart is represented by the MVCxClientGridView object. An extension client object can be accessed on the client using the extension name defined using the GridViewSettings.Name property. The GridView’s client events can be accessed via the GridViewSettings.ClientSideEvents property.
Individual GridView columns are exposed on the client side as JS objects of the ASPxClientGridViewColumn class.
Example
The code sample below demonstrates how to start row editing when an end-user double clicks this row. In this example, the GridView’s client RowDblClick event is handled. The event sender is the MVCxClientGridView object. When the event is fired, the sender’s ASPxClientGridView.StartEditRow method is called. This method turns the GridView to edit mode and opens an edit form for the specified row.
@Html.DevExpress().GridView( settings =>
{
    settings.Name = "myGridView";
    // ...

    // When an end-user double-clicks a grid row, the edit form appears, allowing an end-user to edit the row.
    settings.ClientSideEvents.RowDblClick = "function(sender, e) { sender.StartEditRow(e.visibleIndex); }";
}).Bind(Model).GetHtml()