How to: Customize Appointment Appearance via Templates
- 4 minutes to read
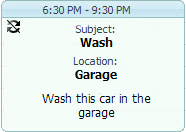
ASPxScheduler control, as well as most of the DevExpress web controls, supports the customization mechanism based on templates. The web control templates enable you to provide visual extensibility for the scheduler interface elements. In particular, an appointment may change its default appearance and look like this:
Now you can modify the appointment appearance with ease. It is possible because appointments are implemented using editable web templates.
We’ll elaborate on how the mechanism works and construct a template, to display a custom field.
1. Introduction.
An appointment template is actually a user control with all parts of an appointment being elements of an asp page which forms a control. There are three templates representing different kinds of appointments - VerticalAppointmentTemplate, HorizontalAppointmentTemplate and HorizontalSameDayAppointmentTemplate. Each template has its own template container. A template container is actually another composite control used to contain templates that you define. The container is visible from the code-behind file as well as from the ascx file. It is the AppointmentTemplateContainer descendant.
For each appointment element the container stores a template item with all necessary information to display that element. The Items property provides access to a particular template item via the dot (.) operator. Look at the VerticalAppointmentTemplate.ascx file. It contains the ASPxLabel element with ID=”lblTitle”. This element is responsible for displaying the appointment header. Template container for the element stores an object of AppointmentTextItem type, accessible via the Items.Title property. This object holds the header’s text and the style to apply to the text when rendering for display.
To bind an ASPxLabel element to the related element of the container, a binding expression is used. The binding expression for the Textproperty is shown below:
Text='<%#((VerticalAppointmentTemplateContainer)Container).Items.Title.Text%>'
The style required to display a text of ASPxLabel is applied while the template is loading, within the Page_Load event handling code, as follows:
Each appointment element has its own templated item. The default items for the vertical appointment are : horizontalSeparator, lblStartTime, lblEndTime, lblTitle, lblDescription. Images are represented by elements of the Items.Images collection. The main style of an appointment, defining the style of the DIV element which encompasses an appointment, is accessible via the Items.AppointmentStyle property.
Summarizing the above, you can modify the page’s mark-up and control the page elements via code in the code-behind file to create appointments designed as you require.
2. Problem.
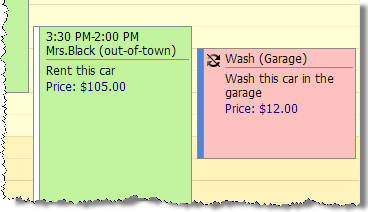
We’ve got appointments with a custom field - e.g. price. The field’s value, if not empty, should be displayed in an appointment below the description, formatted as “Price: $xx”.
3. Solution
Step 1.
Create a custom template based on existing VerticalAppointmentTemplate. The instruction is enclosed within the template file located at ~\DevExpress\ASPxSchedulerForms\VerticalAppointmentTemplate.ascx in your project. If this folder is missing, you can create it and copy default templates to your project site using the ASPxScheduler control’s Smart Tag, as shown in the Dialog Forms article.
Save a copy of this file with a different name in another location.
Add a Register tag in the .aspx page header for each template you use, as follows:
<%@ Register Src="PathToTemplateFile" TagName="NameOfTemplate"} TagPrefix="ShortNameOfTemplate" %>
In the .aspx page find the tags for different scheduler views within the ASPxScheduler control tag. Insert template tags into the tags for the views which should be customized. The template tag should satisfy the following pattern:
    <Templates>
        <VerticalAppointmentTemplate>
             <ShortNameOfTemplate: NameOfTemplate runat="server"/>
        </VerticalAppointmentTemplate>
    </Templates>
where the ShortNameOfTemplate and the NameOfTemplate are the names of the registered templates, defined before in the Register directive.
Step 2.
Look for ASPxLabel with ID=”lblDescription”. Add the following piece of HTML in a table below the label:
<tr><td>
<br/>
<dx:ASPxLabel runat="server" ID="lblPriceHeader" ForeColor="DarkBlue"
    Text="Price:  " Visible="true"></dxe:ASPxLabel>
<dx:ASPxLabel runat="server" ID="lblPrice" ForeColor="DarkBlue"
    Visible="true"></dxe:ASPxLabel>
</td></tr>
Step 3.
Add code for the template page’s PageLoad event:
object cfPrice = Container.AppointmentViewInfo.Appointment.CustomFields["Price"];
    if (cfPrice != DBNull.Value)
    {
        Decimal price = Convert.ToDecimal(cfPrice);
        lblPrice.Text = price.ToString("c2");
        //set the style identical to the description
        lblPrice.ControlStyle.MergeWith(Items.Description.Style);
        lblPriceHeader.ControlStyle.MergeWith(Items.Description.Style);
    }
    else
   {
    //hide the field if no data is available
    lblPrice.Visible = false;
    lblPriceHeader.Visible = false;
    }
Step 4. Observe the result.
Note
Note that there are other customization methods. You can use ASPxScheduler.InitAppointmentDisplayText event to customize the display of text and handle ASPxScheduler.InitAppointmentImages to substitute default images. Other appointments properties, such as whether clock images are used to indicate time, background color, font color and typeface are available for modification within the ASPxScheduler.AppointmentViewInfoCustomizing event handler.