Edit Form
- 4 minutes to read
The built-in Edit Form is one of the ASPxGridView editing modes that allows end-users to edit column values within grid cells. The Edit Form is displayed when the Edit command button is clicked. You can specify edit cell visibility, position and appearance within the Edit Form. This topic describes how to manipulate edit forms, and customize their layout and appearance using style settings and templates.
Overview
To allow end-users to edit data using the built-in Edit Form, enable the data edit functionality and set the ASPxGridViewEditingSettings.Mode (using GridViewSettings.SettingsEditing.Mode) property to GridViewEditingMode.EditForm, GridViewEditingMode.EditFormAndDisplayRow or GridViewEditingMode.PopupEditForm.
The Edit Form is displayed in the image below.
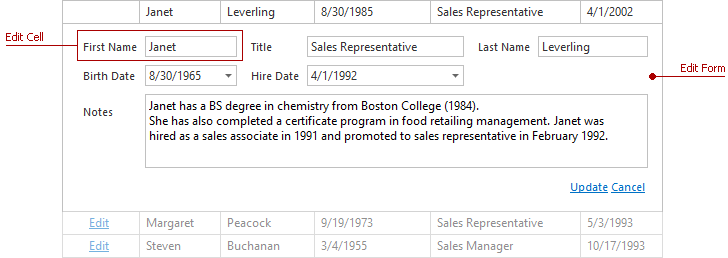
The Edit Form displays edit cells that correspond to data columns, and the Cancel/Update commands that allow end-users to discard changes or save them to a database.
Each edit cell displays a column caption and a corresponding editor. Individual columns provide settings for individual edit cells, which allow you to provide various Edit Form layouts. If you wish to use a custom layout rather one the one produced by default, compose a template using the GridViewSettings.SetEditFormTemplateContent method.
These settings are listed in the table below.
| Property | Description |
|---|---|
| GridColumnEditFormSettings.CaptionLocation | Specifies column caption location. |
| GridColumnEditFormSettings.Visible | Specifies edit cell visibility. If this property is set to ‘Default’, then edit cell visibility depends on the visibility of the data column to which it corresponds. |
| GridColumnEditFormSettings.VisibleIndex | Specifies the edit cell position among other edit cells within the Edit Form. |
| GridColumnEditFormSettings.ColumnSpan | Specifies the number of edit form columns that the cell spans. |
| GridColumnEditFormSettings.RowSpan | Specifies the number of edit form rows that the edit cell spans. |
To access these settings, use the column’s GridViewDataColumn.EditFormSettings property.
Customizing an Edit Form using Style Settings
You can customize command cells using the common style settings for the entire command column with the GridViewStyles.CommandColumn property (using GridViewSettings.Styles.CommandColumn), as shown in the code sample below.
@{
    var grid = Html.DevExpress().GridView(settings =>
    {
        settings.Name = "myGridView";
        settings.CallbackRouteValues = new { Controller = "Home", Action = "GridViewPartial" };

        settings.SettingsEditing.AddNewRowRouteValues = new { Controller = "Home", Action = "GridViewPartialAddNew" };
        settings.SettingsEditing.UpdateRowRouteValues = new { Controller = "Home", Action = "GridViewPartialUpdate" };
        settings.SettingsEditing.DeleteRowRouteValues = new { Controller = "Home", Action = "GridViewPartialDelete" };
        settings.SettingsEditing.Mode = GridViewEditingMode.EditFormAndDisplayRow;

        // ...

        // Change the style settings for the edit form and the edited row that is displayed.
        settings.Styles.EditForm.BackColor = System.Drawing.Color.FromArgb(242, 242, 242);
        settings.Styles.EditFormDisplayRow.BackColor = System.Drawing.Color.FromArgb(245, 245, 245);
    });
    if (ViewBag.EditError != null)
    {
        grid.SetEditErrorText(ViewBag.EditError);
    }
}
@grid.Bind(Model).GetHtml()
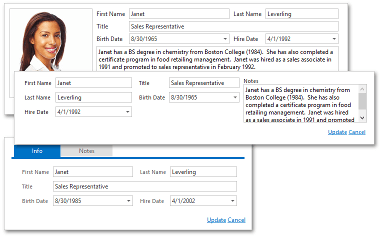
The image below illustrates the result.
Customizing an Edit Form using Templates
The GridView provides the GridViewSettings.SetEditFormTemplateContent method used to set a template to render its edit form. This allows you to change the look and feel of the edit form.
The code sample below demonstrates how to define a template for the edit form. In this example, all data editors are organized in a single column using the FormLayout extension. FormLayout automatically adds the required marks to the captions of the required fields.
Partial View code (“GridViewPartial”):
@{
    var grid = Html.DevExpress().GridView(settings =>
    {
        settings.Name = "myGridView";
        settings.CallbackRouteValues = new { Controller = "Home", Action = "GridViewPartial" };

        // ...
        settings.KeyFieldName = "CustomerID";
        settings.Columns.Add("CompanyName");
        settings.Columns.Add("ContactName");
        settings.Columns.Add("ContactTitle");
        settings.Columns.Add("Phone");
        // Define the template for rendering the edit form.
        settings.SetEditFormTemplateContent(c =>
        {
            Html.RenderAction("EditFormPartial", new { currentCustomerID = c.KeyValue.ToString()} );
        });
    if (ViewBag.EditError != null)
    {
        grid.SetEditErrorText(ViewBag.EditError);
    }
}
@grid.Bind(Model).GetHtml()
Controller code (“HomeController”):
using System;
using System.Linq;
using System.Web.Mvc;
using DevExpress.Web.Mvc;
using MyProject.Models;

namespace MyProject.Controllers
{
    public class HomeController : Controller
    {
        // ...
        MyProject.Models.northwndEntities db = new MyProject.Models.northwndEntities();

        // Returns the partial view that contains an edit form bound to the edited item.
        public ActionResult EditFormPartial(String currentCustomerID)
        {
            var model = db.Customers;
            var item = model.FirstOrDefault(it => it.CustomerID == currentCustomerID);
            return PartialView("_EditFormPartial", item);
        }
    }
}
Edit form partial View (“_EditFormPartial”):
@model BatchEditBug.Models.Customer

@Html.DevExpress().FormLayout(settings => {
    settings.Name = "FormLayout";

    settings.SettingsItems.ShowCaption = DefaultBoolean.True;
    settings.SettingsItemCaptions.Location = LayoutItemCaptionLocation.Left;

    settings.Items.Add(m => m.CompanyName, s => {
        s.HelpText = "Enter the company name";
        s.Caption = "Company";
    });
    settings.Items.Add(m => m.ContactName, s => {
        s.HelpText = "Enter the contact name";
        s.Caption = "Contact";
    });
    settings.Items.Add(m => m.ContactTitle, s => {
        s.HelpText = "Enter the contact position";
        s.Caption = "Contact Title";
    });
    settings.Items.Add(m => m.Phone).HelpText = "Enter the phone number";

    settings.Items.AddGroupItem(group =>
    {
        group.GroupBoxDecoration = GroupBoxDecoration.None;
        group.ColCount = 2;
        group.Items.Add(i =>
        {
            i.ShowCaption = DefaultBoolean.False;
            i.NestedExtensionType = FormLayoutNestedExtensionItemType.Button;
            var button = (ButtonSettings)i.NestedExtensionSettings;
            button.Name = "cancel";
            button.Text = "Cancel";
            button.ClientSideEvents.Click = "function (s,e) {myGridView.CancelEdit();}";
        });
        group.Items.Add(i =>
        {
            i.ShowCaption = DefaultBoolean.False;
            i.NestedExtensionType = FormLayoutNestedExtensionItemType.Button;
            var button = (ButtonSettings)i.NestedExtensionSettings;
            button.Name = "update";
            button.Text = "Update";
            button.ClientSideEvents.Click = "function (s,e) {myGridView.UpdateEdit();}";
        });
    });
}).GetHtml()
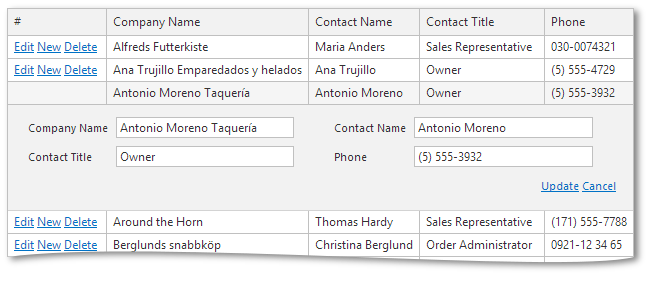
The image below illustrates the result.
