Item Manipulation
- 5 minutes to read
With the FormLayout, you can easily create form layouts of any complexity by combining the order and hierarchy of the provided layout elements. The main layout elements of the FormLayout consist of labeled items, labeled regular groups and tabbed groups.
This topic describes how to manipulate layout items and groups within the FormLayout.
Item elements serve as placeholders for ASP.NET MVC helpers and extensions or custom content. Group elements are containers for other layout elements. It is possible to nest one group inside another group.
Items can be created in two ways:
- Automatically, when the FormLayout is bound to a model. In this case, FormLayout automatically generates layout items for all fields of a model class. See the Binding to Data topic to learn more.
- Manually. The FormLayout extension allows you to manually add layout items and groups by populating the FormLayoutSettings<ModelType>.Items collection, either in bound or unbound mode. In this case, you have the flexibility to customize each item or customize the group settings.
Item Manipulation Capabilities
The following actions are available.
Adding a layout item.
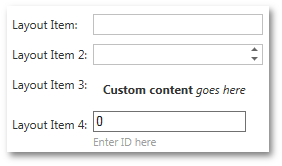
You can add a layout item with default settings, the nested extension or custom content. The code sample below illustrates how to add layout items with different settings to the FormLayout.
@Html.DevExpress().FormLayout(settings =>
{
    settings.Name = "FormLayout1";

    //Adding a layout item with default settings.
    settings.Items.Add();

    //Adding a layout item with the nested SpinEdit.
    settings.Items.Add(i =>
    {
        i.Caption = "Layout Item 2";
        i.NestedExtensionType = FormLayoutNestedExtensionItemType.SpinEdit;
        i.NestedExtensionSettings.Name = "spinEdit1";
    });

    //Adding a layout item with the custom HTML as content.
    settings.Items.Add(i =>
    {
        i.Caption = "Layout Item 3";
        i.SetNestedContent("<div style=\"padding:10px\"><b>Custom content</b> <i>goes here</i></div>");
    });

    //Adding a layout item with a third-party editor, custom help text, and custom HTML.
    settings.Items.Add(i =>
    {
        i.Caption = "Layout Item 4";
        i.SetNestedContent(() =>
        {
            ViewContext.Writer.Write("<div class=\"divWithStandardTextBox\">");
            ViewContext.Writer.Write(Html.TextBoxFor(m => m.Id));
            ViewContext.Writer.Write("</div>");
        });
        //Adding the help text.
        i.HelpText = "Enter ID here";
    });
}).GetHtml()
The result is illustrated in the image below.
Adding a regular or tabbed layout group.
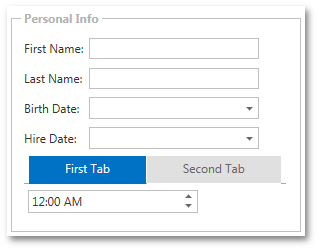
The code sample below illustrates how to gather layout items and tabbed group into a regular group.
@Html.DevExpress().FormLayout(settings =>
{
    settings.Name = "FormLayout2";

    //Adding a layout group.
    settings.Items.AddGroupItem(group =>
    {
        //Adding layout items to this group.
        group.Items.Add(i => i.FirstName);
        group.Items.Add(i => i.LastName);
        group.Items.Add(i => i.BirthDate);
        group.Items.Add(i => i.HireDate);
        //Adding a tabbed layout group with two layout items represented as tabs.
        group.Items.AddTabbedGroupItem(g =>
        {
            g.Items.Add(i =>
            {
                i.Caption = "First Tab";
                i.SetNestedContent(() =>
                {
                    ViewContext.Writer.Write("<div style=\"padding:4px\">");
                    Html.DevExpress().TimeEdit(s => s.Name = "timeEdit1").Render();
                    ViewContext.Writer.Write("</div>");
                });
            });
            g.Items.Add(i =>
            {
                i.Caption = "Second Tab";
                i.SetNestedContent("<div style=\"padding:10px\">Tab2 Content</div>");
            });
        });

        //Specifying the caption of the layout group.
        group.Caption = "Personal Info";

        //Specifying the decoration of the layout group.
        group.GroupBoxDecoration = GroupBoxDecoration.Box;
    });
}).GetHtml()
The result is demonstrated in the image below.
Creating a multicolumn layout and using an empty layout item.
The code sample below illustrates how to organize layout items in a two-column layout. This example also shows how an empty layout item can be used in organizing multicolumn layouts.
@Html.DevExpress().FormLayout(settings =>
{
    settings.Name = "FormLayout1";
    settings.ColCount = 2;

    //Adding a layout group.
    settings.Items.AddGroupItem(group =>
    {
        //Specifying the caption of the layout group.
        group.Caption = "Personal Info";

        //Specifying the decoration of the layout group.
        group.GroupBoxDecoration = GroupBoxDecoration.HeadingLine;

        //Specifying the number of columns that the layout group spans.
        group.ColSpan = 2;

        //Specifying the number of columns in the layout group.
        group.ColCount = 2;

        //Adding layout items to this group.
        group.Items.Add(i => i.LastName);
        group.Items.Add(i => i.Photo, itemSettings =>
        {
            itemSettings.NestedExtensionType = FormLayoutNestedExtensionItemType.BinaryImage;
            itemSettings.RowSpan = 3;
        });
        group.Items.Add(i => i.FirstName);
        group.Items.Add(i => i.BirthDate);
    });

    //Adding a layout group.
    settings.Items.AddGroupItem(group =>
    {

        //Specifying the caption of the layout group.
        group.Caption = "Additional Info";

        //Specifying the decoration of the layout group.
        group.GroupBoxDecoration = GroupBoxDecoration.HeadingLine;

        //Specifying the number of columns that the layout group spans.
        group.ColSpan = 2;

        //Specifying the number of columns in the layout group.
        group.ColCount = 2;

        //Adding layout items to this group.
        group.Items.Add(i => i.HireDate);

        //In order to place the City and the Country fields in one line,
        //an empty layout item is added here.
        group.Items.AddEmptyItem();

        group.Items.Add(i => i.City);
        group.Items.Add(i => i.Country);
    });

}).GetHtml()
The result is illustrated in the image below.

Note
If an item type (specified using the MVCxFormLayoutItem.NestedExtensionType property) is not set explicitly, the FormLayout creates a default item, applies your settings to it and uses a corresponding model property to determine a required type. Once the type is determined, the default Layout item is removed, and another item or a required type is created. Note that in this scenario, the FormaLayout gets access to the Model only during data binding, at which time your settings have been already applied to the default item. So, they do not apply to the new item again.
To solve this issue, you can do the following.
- Declare item type in item settings explicitly:
groupSettings.Items.Add(itemSettings => {
    itemSettings.FieldName = "Description";
     itemSettings.NestedExtensionType = FormLayoutNestedExtensionItemType.TextBox; //required type here
    itemSettings.NestedExtensionSettings.Width = Unit.Percentage(100);
});
- Alternatively, use the overloaded Add method that directly accepts a Model property:
groupSettings.Items.Add(m => m.Description, itemSettings =>
{
    itemSettings.FieldName = "Description";
    itemSettings.NestedExtensionSettings.Width = Unit.Percentage(100);
});