Applying Themes - The ASP.NET Approach
- 4 minutes to read
If you are familiar with standard ASP.NET Themes and use them widely across web projects, you can use DevExpress Themes in a similar way, if required. In this case, to apply a prepackaged or custom theme, copy the required theme source files (such as skins, cascading style sheets and images) to your project’s App_Themes folder. The ASPxThemeDeployer tool will also help if you need to deploy theme resource files from a theme assembly (ASPxThemes or a custom theme assembly).
Deploying Skin Files to a Website
- Launch the ASPxThemeDeployer tool.
If you already have the custom theme assembly, do the following.
- In the Theme Deployer window, click the File menu, and then click Import Custom Themes…
- In the invoked Open dialog box, select the required assembly and click Open.
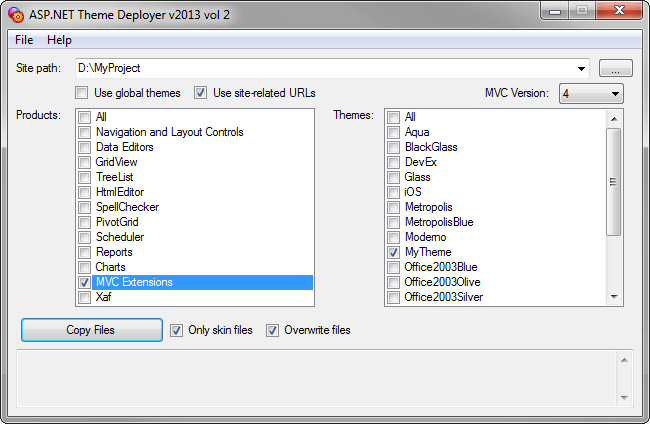
- Specify the path to your site in the Site path box.
- Select the required MVC version from the MVC version combo box. Note that projects created using the DevExpress Template Gallery target ASP.NET MVC 5 by default.
- In the Products check box list, select the required product (MVC Extensions).
- In the Themes check box list, select the required pre-packaged or custom theme.
- Since the assembly contains all required images and CSS files, you only need to add skin files to your project, so leave the Only skin files option checked.
- Click Copy Files and close the Theme Deployer after copying is finished.
- Click the Refresh button (
 ) in Solution Explorer. You can see that the required pre-packaged or custom theme is added to the App_Themes folder of your application.
You can now apply the theme to an extension or an entire website.
Applying a Theme to a Website
To apply a theme to a web application, perform the following steps:
Add the required stylesheets to the View using the ExtensionsFactory.GetStyleSheets method.
The following code demonstrates how to add style sheets for all DevExpress MVC Extensions.
View code (“_Layout.cshtml“):
...
@Html.DevExpress().GetStyleSheets(
    new StyleSheet { ExtensionSuite = ExtensionSuite.NavigationAndLayout, Theme="Aqua" },
    new StyleSheet { ExtensionSuite = ExtensionSuite.Editors, Theme="Aqua" },
    new StyleSheet { ExtensionSuite = ExtensionSuite.HtmlEditor, Theme="Aqua" },
    new StyleSheet { ExtensionSuite = ExtensionSuite.GridView, Theme="Aqua" },
    new StyleSheet { ExtensionSuite = ExtensionSuite.PivotGrid, Theme="Aqua" },
    new StyleSheet { ExtensionSuite = ExtensionSuite.Chart, Theme="Aqua" },
    new StyleSheet { ExtensionSuite = ExtensionSuite.Report, Theme="Aqua" },
    new StyleSheet { ExtensionSuite = ExtensionSuite.Scheduler, Theme="Aqua" },
    new StyleSheet { ExtensionSuite = ExtensionSuite.TreeList, Theme="Aqua" }
)
...
Specify the extension theme in the Global.asax file or in Web.config.
The code sample below demonstrates how to specify a theme for DevExpress Extensions in Global.asax:
Global.asax code:
protected void Application_PreRequestHandlerExecute(object sender, EventArgs e) {
    DevExpressHelper.Theme = "Aqua";
}
The code sample below demonstrates how to specify a theme for DevExpress Extensions in Web.config.
web.config code:
<system.web>
    <pages theme="Aqua" />
    ...
</system.web>
Note that if you only call the ExtensionsFactory.GetStyleSheets method in this implicit manner (i.e., without specifying the theme name via a stylesheet object’s StyleSheet.Theme property) and do not specify a global theme in Web.config (or via the DevExpress helper’s static property), style sheets of the Default DevExpress theme will be attached. As a result, this Default DevExpress theme will automatically be applied to all DevExpress extensions.
Applying a Theme to an Extension
If you need to apply a theme to a standalone extension, perform the following steps.
In the View code, add the stylesheets for the required extension suite explicitly (by specifying the theme name via a stylesheet object’s StyleSheet.Theme property), as shown in the code sample below.
View code:
@Html.DevExpress().GetStyleSheets(
    new StyleSheet { ExtensionSuite = ExtensionSuite.HtmlEditor, Theme="MetropolisBlue" },
    new StyleSheet { ExtensionSuite = ExtensionSuite.Editors, Theme="MetropolisBlue" },
    new StyleSheet { ExtensionSuite = ExtensionSuite.NavigationAndLayout, Theme="MetropolisBlue" }
)
...
Note that themes that are specified explicitly via the ExtensionsFactory.GetStyleSheets method are always rendered regardless of which theme is specified globally (in Web.config or via the DevExpress helper’s static Theme property).
Define the extension’s Theme property value.
Partial View code:
@Html.DevExpress().HtmlEditor(settings =>
 {
     settings.Name = "HtmlEditor";
     ...
     settings.Theme = "MetropolisBlue";
     ...
 }).GetHtml()
Note
When adding style sheets for the HtmlEditor, GridView and TreeList MVC Extensions, you should also add style sheets for the Data Editors and Navigation and Layout extensions.
Theme Application Precedence
The order of precedence for applying a DevExpress theme (from lowest to highest priority) is as follows.
- The standard pages.theme Web.config option;
- The static DevExpressHelper.Theme property;
- The SettingsBase.Theme property of individual extensions.