Binding to Data via Entity Framework (Code First)
- 4 minutes to read
The DevExpress MVC GridView supports binding to a data source using the Entity Framework ORM.
If you do not yet have a database, you can code your own classes and properties that correspond to tables and columns and use them with the Entity Framework. The Entity Framework can automatically create the database for you, or drop and recreate it if the model changes. This development approach is called “Code First”.
This topic describes how to bind the MVC GridView to a data source using the Entity Framework and the “Code First” development approach.
Important
Project requirements.
Before you start, make sure you have the Entity Framework installed. Learn more about how to get the Entity Framework from the following MSDN tutorial: Get Entity Framework.
Your project should be prepared for using DevExpress MVC Extensions. See this topic to learn how to prepare your project: Integration into an ASP.NET MVC Project.
To use the Server Mode with Entity Framework 6+, it is necessary to use special options on the application startup. To learn more, see the Knowledge Base Article: Is it possible to use the Entity Framework 6 and Server Mode together.
To implement this kind of data binding, you need to perform the following steps.
- Step 1. Create a data model and a data context
- Step 2. Add a connection string
- Step 3. Add the GridView to the required View
Step 1. Create a data model and a data context
The data model class (the “Customer” class in this topic) is used to represent data records in a database. Each instance of a data model class will correspond to a row within a database table, and each property of the data model class will map to a column within a database table.
The image below demonstrates how the model class properties are represented within the GridView.

The data context class (“CustomerDbContext” in this topic) represents the Entity Framework database context, which handles fetching, storing, and updating data model class instances in a database. The data context class derives from the System.Data.Entity.DbContext base class provided by the Entity Framework.
Add the data model class with the required properties and a data context class to the data model code, as shown in the code sample below.
Model code:
using System.Data.Entity;

namespace Demo1.Models
{
    public class Customer
    {
        public int Id { get; set; }
        public string FirstName { get; set; }
        public string LastName { get; set; }
        public int Age { get; set; }
        public string Email { get; set; }
    }

    public class CustomerDbContext : DbContext
    {
        public DbSet<Customer> Customers { get; set; }
    }
}
Step 2. Add a connection string
Create a connection string that points to your data context class and place it in the <connectionStrings> element in the Web.config file. You can learn more about connection strings from the following MSDN topic: Connection Strings.
The following is an example of a connection string for the data model created in the previous step:
Web.config code:
<add name="CustomerDBContext"
    connectionString="Data Source=(LocalDB)\v11.0;AttachDbFilename=|DataDirectory|\Customers.mdf;Integrated Security=True"
    providerName="System.Data.SqlClient"
/>
Note
Build the application before going on to the next step.
Step 3. Add the GridView to the required View
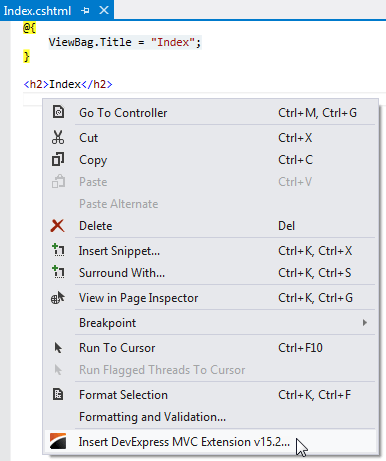
Open the required View file (Index.cshtml in this topic), focus on the position in the code where you would like to insert the GridView, right-click -> select “Insert DevExpress MVC Extension v19.2…”
The Insert Extension Wizard opens. Navigate to the tab with the Data extensions and select GridView. Define the extension name and the partial view name. In the ‘Model class’ item select the data model class, in the ‘Data context class’ item select the data context class, select the columns you want to display within the GridView and select the key field.
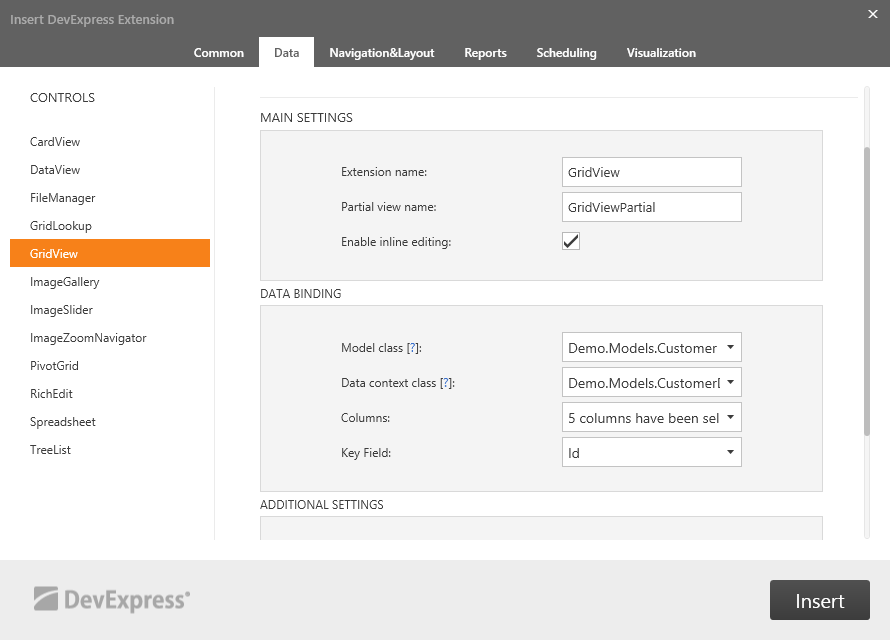
Click the ‘Insert’ button and the GridView will be added into your project. See this topic to learn more about the MVC Wizard: Insert DevExpress MVC Extension Wizard.
After these manipulations, Insert Extension Wizard generates a partial view with the GridView‘s settings and inserts necessary code into the corresponding controller class. As a result you have a fully functional MVC GridView bound to a data source using the Entity Framework.