Overview
- 3 minutes to read
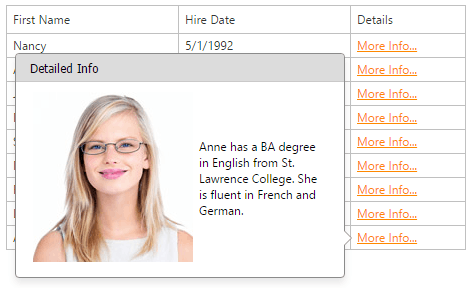
The DevExpress ASP.NET Hint Control (ASPxHint) allows generating a hint message for a UI element on a web page. A hint is displayed within a box with an arrow targeting the specified UI element in response to user interaction.
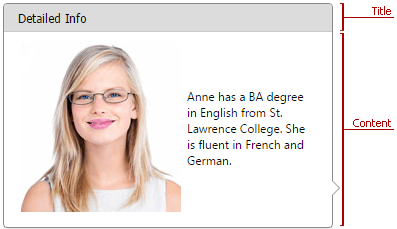
Visual Elements
The following image illustrates the ASPxHint‘s visual elements:
Server-Side Features
Customizable Content
It is possible to specify a hint’s content using the properties in the following table:
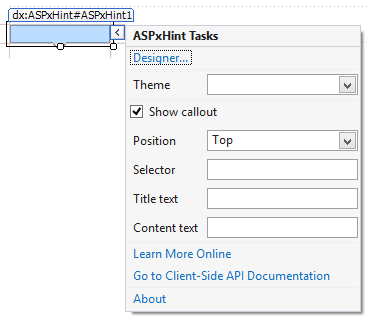
Property Description ASPxHint.Title, ASPxHint.TitleAttribute Specifies a hint’s title text. ASPxHint.Content, ASPxHint.ContentAttribute Specifies a hint’s content text. Customizable Trigger Action
The ASPxHint.TriggerAction property allows you to specify which user action triggers a hint (click or mouse over).
Animation
Property Description ASPxHint.Animation Specifies whether it should use animation effects when a hint appears. ASPxHint.AllowShift Specifies whether to shift a hint if its content and title are outside the browser’s client area. ASPxHint.AllowFlip Specifies whether to flip the hint to the opposite position relative to the target element. Positioning
You can specify a hint’s position using properties in the table below.
Property Description ASPxHint.Position Specifies a hint’s position relative to the target element. ASPxHint.X, ASPxHint.Y Specifies the hint’s X and Y position on the form. Customizable Size
The ASPxWebControl.Width and ASPxWebControl.Height properties allow you to specify a hint’s size.
Client-Side Features
Client-side events allow you to respond to a hint’s visibility state changes.
Relative API:
Reference Description ASPxClientHint.Showing Occurs on the client side when a hint is about to be shown. ASPxClientHint.Hiding Occurs on the client side when a hint is about to be hidden. The client-side API allows you to register a hint’s functionality, show and hide a hint, specify its position relative to other HTML elements and change its content.
Relative API:
Reference Description ASPxClientHint.Register Registers a hint’s functionality with the specified settings. ASPxClientHint.Show Invokes a hint. ASPxClientHint.Hide, ASPxClientHint.HideAll Hides a hint or all hints. ASPxClientHint.Update Updates the ASPxHint’s target UI elements according to the specified CSS selector (ASPxHint.TargetSelector) if the DOM tree is changed. ASPxClientHint.UpdatePosition, ASPxClientHintWindow.UpdatePosition Repositions the ASPxHint if the page element(s) it is attached to is moved.
Getting Started
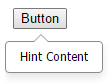
Step 1. Create a new website or open an existing one in Visual Studio. Locate the ASPxHint item in the Visual Studio toolbox and drop it onto the form.
<dx:ASPxHint ID="ASPxHint1" runat="server"></dx:ASPxHint>Step 2. Add a button to a form with the specified style settings. Hovering the mouse pointer over this button displays a hint.
<style>
    .myClass[title] {/* style settings*/}
</style>
...
<asp:Button ID="Button1" CssClass="myClass" runat="server" Text="Button" />
Step 3. Set the hint’s ASPxHint.TargetSelector and ASPxHint.Content properties to specify web page element(s) for which the hint displays and the hint’s content, respectively.
<dx:ASPxHint ID="ASPxHint1" TargetSelector=".myClass" Content="Hint Content" runat="server"></dx:ASPxHint>Step 4. Run the website to see the result.
Note
Use the ASPxClientHint.Update method to update the ASPxHint’s target UI elements as the hint doesn’t automatically inspect the changes in the DOM tree if any element has been removed or added on the page.
Demos
You can see the ASPxHint in action in the following online demos:
-
The demo illustrates how to get started with ASPxHint.
-
This demo shows the ASPxHint’s main features.
ASPxHint - Load Content on Demand
This demo illustrates how to create and populate a hint programmatically on the client side using our client-side functionality.
ASPxHint - Hint for Text Ellipsis
This demo illustrates how to use the ASPxHint instead of standard tooltips.
-
This demo illustrates how to use the ASPxHint to implement a model of a cinema hall and show ticket prices for different seats.