Lesson 1 - Use Scheduler to Display Appointments in Read-Only Mode
- 8 minutes to read
This step-by-step guide demonstrates how to create a simple application that uses the Scheduler MVC Extension to display appointments, and how to provide data for it.
In this tutorial, a standalone MS SQL database file (*.mdf) is used. The database is created using the script listed below. Sample appointments and resources are added by connecting the database to a WinForms XtraScheduler sample application.
CREATE TABLE [dbo].[DBAppointments](
    [UniqueID] [int] IDENTITY(1,1) NOT NULL,
    [Type] [int] NULL,
    [StartDate] [smalldatetime] NULL,
    [EndDate] [smalldatetime] NULL,
    [AllDay] [bit] NULL,
    [Subject] [nvarchar](100) NULL,
    [Location] [nvarchar](50) NULL,
    [Description] [ntext] NULL,
    [Status] [int] NULL,
    [Label] [int] NULL,
    [ResourceID] [int] NULL,
    [ReminderInfo] [ntext] NULL,
    [RecurrenceInfo] [ntext] NULL,
    [CustomField1] [ntext] NULL,
 CONSTRAINT [PK_Appointments] PRIMARY KEY CLUSTERED
(
    [UniqueID] ASC
)WITH (PAD_INDEX = OFF, STATISTICS_NORECOMPUTE = OFF, IGNORE_DUP_KEY = OFF, ALLOW_ROW_LOCKS = ON, ALLOW_PAGE_LOCKS = ON) ON [PRIMARY]
) ON [PRIMARY] TEXTIMAGE_ON [PRIMARY]

GO

SET ANSI_NULLS ON
GO
SET QUOTED_IDENTIFIER ON
GO
CREATE TABLE [dbo].[DBResources](
    [UniqueID] [int] IDENTITY(1,1) NOT NULL,
    [ResourceID] [int] NOT NULL,
    [ResourceName] [nvarchar](50) NULL,
    [Color] [int] NULL,
    [Image] [image] NULL,
    [CustomField1] [ntext] NULL,
 CONSTRAINT [PK_Resources] PRIMARY KEY CLUSTERED
(
    [UniqueID] ASC
)WITH (PAD_INDEX = OFF, STATISTICS_NORECOMPUTE = OFF, IGNORE_DUP_KEY = OFF, ALLOW_ROW_LOCKS = ON, ALLOW_PAGE_LOCKS = ON) ON [PRIMARY]
) ON [PRIMARY] TEXTIMAGE_ON [PRIMARY]

GO
To create a simple scheduling application, do the following.
- Step 1. Create a New Project
- Step 2. Create Data Objects
- Step 3. Provide Data for the Scheduler
- Step 4. Create a Controller
- Step 5. Create Views
- Step 6. Observe the Result
Step 1. Create a New Project
Create a new C# MVC Application using New - Project - DevExpress ASP.NET MVC Empty Web Application.
All required references are already included in the project template. If you upgrade an existing project, check for the following lines.
Check for references in web.config file:
<add assembly=”DevExpress.XtraScheduler.v23.2.Core, Version=23.2.5.0, Culture=neutral, PublicKeyToken=b88d1754d700e49a” />
<add assembly=”DevExpress.Web.ASPxScheduler.v23.2, Version=23.2.5.0, Culture=neutral, PublicKeyToken=b88d1754d700e49a” />
Check for namespaces in web.config file:
<add namespace="DevExpress.XtraScheduler" />
<add namespace="DevExpress.XtraScheduler.Native" />
<add namespace="DevExpress.Web.ASPxScheduler" />
Check Views\Shared_Layout.cshtml for correct stylesheets and scripts:
@Html.DevExpress().GetStyleSheets(
new StyleSheet { ExtensionSuite = ExtensionSuite.Scheduler }
)

@Html.DevExpress().GetScripts(
new Script { ExtensionSuite = ExtensionSuite.Scheduler }
)
Step 2. Create Data Objects
- Add a new item using Linq to SQL Classes template. You can find it under the Data branch of the Installed Templates tree. Name it SchedulingDataClasses. The file SchedulingDataClasses.dbml is created. Place it in the Models folder.
- Use Server Explorer to establish a new data connection to the SchedulerCars database (file SchedulerCars.mdf). This file is contained in the E3971 sample project, however you can use a database created as described in the beginning of this document.
- Drag tables DBAppointments and DBResources to the SchedulingDataClasses.dbml designer window. Click Yes when asked whether to copy the data file to your project and modify the connection.
Step 3. Bind to Data
Add a new code file to the project. Within the file, implement a base type that will contain appointments and resources.
public class SchedulerDataObject { public System.Collections.IEnumerable Appointments { get; set; } public System.Collections.IEnumerable Resources { get; set; } }Create a public class SchedulerDataHelper. It contains methods to get appointments and resources from the data model. Create a method that will return data to the scheduler. These methods are static and reside within the SchedulerDataHelper class.
public class SchedulerDataHelper { public static System.Collections.IEnumerable GetResources() { SchedulingDataClassesDataContext db = new SchedulingDataClassesDataContext(); return from res in db.DBResources select res; } public static System.Collections.IEnumerable GetAppointments() { SchedulingDataClassesDataContext db = new SchedulingDataClassesDataContext(); return from apt in db.DBAppointments select apt; } public static SchedulerDataObject DataObject { get { return new SchedulerDataObject() { Appointments = GetAppointments(), Resources = GetResources() }; } } }Note
The SchedulingDataClassesDataContext is the name of the class created automatically by Linq to SQL classes template.
Create the SchedulerStorageProvider class that provides default appointment storage, default resource storage and creates required mappings.
public class SchedulerStorageProvider {
    static MVCxAppointmentStorage defaultAppointmentStorage;
    public static MVCxAppointmentStorage DefaultAppointmentStorage {
        get {
            if (defaultAppointmentStorage == null)
                defaultAppointmentStorage = CreateDefaultAppointmentStorage();
            return defaultAppointmentStorage;
        }
    }
    static MVCxAppointmentStorage CreateDefaultAppointmentStorage() {
        MVCxAppointmentStorage appointmentStorage = new MVCxAppointmentStorage();
        appointmentStorage.Mappings.AppointmentId = "UniqueID";
        appointmentStorage.Mappings.Start = "StartDate";
        appointmentStorage.Mappings.End = "EndDate";
        appointmentStorage.Mappings.Subject = "Subject";
        appointmentStorage.Mappings.Description = "Description";
        appointmentStorage.Mappings.Location = "Location";
        appointmentStorage.Mappings.AllDay = "AllDay";
        appointmentStorage.Mappings.Type = "Type";
        appointmentStorage.Mappings.RecurrenceInfo = "RecurrenceInfo";
        appointmentStorage.Mappings.ReminderInfo = "ReminderInfo";
        appointmentStorage.Mappings.Label = "Label";
        appointmentStorage.Mappings.Status = "Status";
        appointmentStorage.Mappings.ResourceId = "ResourceID";
        return appointmentStorage;
    }
    static MVCxResourceStorage defaultResourceStorage;
    public static MVCxResourceStorage DefaultResourceStorage {
        get {
            if (defaultResourceStorage == null)
                defaultResourceStorage = CreateDefaultResourceStorage();
            return defaultResourceStorage;
        }
    }
    static MVCxResourceStorage CreateDefaultResourceStorage() {
        MVCxResourceStorage resourceStorage = new MVCxResourceStorage();
        resourceStorage.Mappings.ResourceId = "ResourceID";
        resourceStorage.Mappings.Caption = "ResourceName";
        return resourceStorage;
    }
}
Step 4. Create a Controller.
- Add a controller to the project. To accomplish this, select Add New Item and navigate to the Web->MVC 4 branch in a tree of installed templates. Select MVC 4 Controller Class and name it HomeController.cs.
Add new actions:
public ActionResult Index() {
    return View(SchedulerDataHelper.DataObject);
}
public ActionResult SchedulerPartial() {
    return PartialView("SchedulerPartial", SchedulerDataHelper.DataObject);
}
Step 5. Create Views
- Create a default view. To accomplish this, right-click the Views folder, add a subfolder named Home, select Add->View and specify the name (“Index”) and a view engine (Razor).
Add a line
@Html.Partial("SchedulerPartial", Model)to the newly created default view represented by a file Views\Home\Index.cshtml.
Use the @model directive to specify a strongly-typed model:
@model SchedulerDataObject- Add a new view SchedulerPartial to the project. Right-click in the Project Explorer and select Views - Add View. Name it SchedulerPartial and click the checkbox indicating that this is a partial view (Create as a partial view). A SchedulerPartial.cshtml file is created.
Implement a view using SchedulerSettings. To accomplish this, copy the following code to the SchedulerPartial.cshtml file. The code prevents appointment creation, deletion and editing. It also hides appointments which meet certain conditions.
@Html.DevExpress().Scheduler(
    settings => {
        settings.Name = "scheduler";
        settings.CallbackRouteValues = new { Controller = "Home", Action = "SchedulerPartial" };
        settings.Storage.Appointments.Assign(MVCSchedulerReadOnly.Models.SchedulerStorageProvider.DefaultAppointmentStorage);
        settings.Storage.Resources.Assign(MVCSchedulerReadOnly.Models.SchedulerStorageProvider.DefaultResourceStorage);
        settings.Storage.EnableReminders = false;
        settings.OptionsCustomization.AllowAppointmentCreate = DevExpress.XtraScheduler.UsedAppointmentType.None;
        settings.OptionsCustomization.AllowAppointmentEdit = DevExpress.XtraScheduler.UsedAppointmentType.None;
        settings.OptionsCustomization.AllowAppointmentDelete = DevExpress.XtraScheduler.UsedAppointmentType.None;
        settings.Width = 800;
        settings.Views.DayView.Styles.ScrollAreaHeight = 600;
        settings.Views.DayView.DayCount = 2;
        settings.Start = new DateTime(2015, 4, 15);
        settings.GroupType = SchedulerGroupType.Resource;
    }).Bind(
    //Hide appointments containing "Test" in their subject lines.
    (e) => {
    if (((Appointment)e.Object).Subject.Contains("Test")) e.Cancel = true;
    },
    //Hide appointments assigned to resources containing "OPEL" in their captions.
    (e) => {
        if (((Resource)e.Object).Caption.Contains("OPEL")) e.Cancel = true;
    }
    ).Bind(Model.Appointments, Model.Resources).GetHtml()
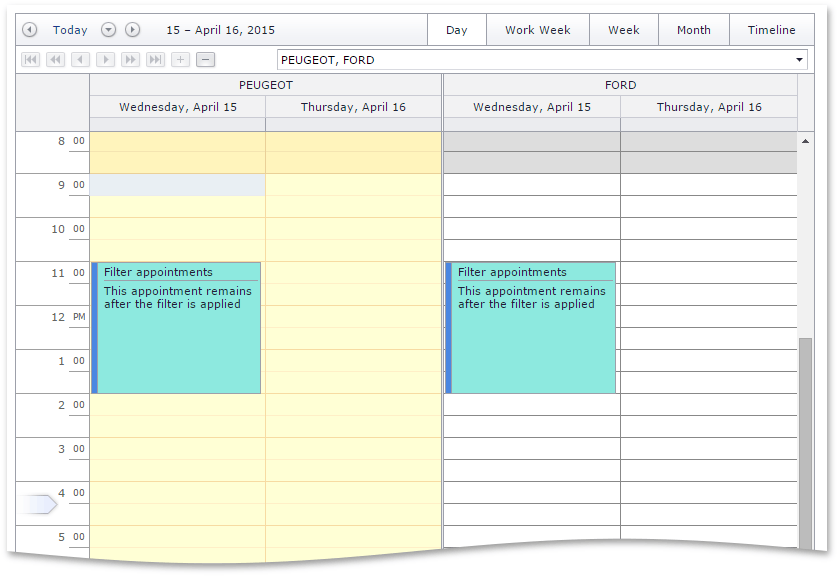
Step 6. Observe the Result
Run the project. You will see the scheduler with appointments on a page as illustrated in the following page. Appointment modifications are not allowed so there are no corresponding commands. You can navigate dates and switch between views.