Validation
- 5 minutes to read
The DevExpress ASP.NET MVC CardView extension and DevExpress ASP.NET MVC data editors support a model-based data validation approach, which is implemented in the ASP.NET MVC framework. This approach is based on decorating model class properties with the DataAnnotations attributes and jQuery Validation. You can learn more about unobtrusive client validation from the following blog post: Unobtrusive Client Validation in ASP.NET MVC 3.
Note
The list of supported data annotation attributes is available in the Supported Attributes for Model Validation topic.
This topic describes how to add a validity check to the DevExpress ASP.NET MVC CardView extension.
- Adding Validation Rules to the Model Class
- Enabling Server-Side Validation
- Enabling Unobtrusive Client Validation
- Displaying Validation Error Messages
Adding validation rules to the model class
To define validation rules for user input, add the required DataAnnotation attributes to the corresponding model class properties. You can learn more about DataAnnotation attribute usage in ASP.NET MVC validation in the following blog post: How data annotations for ASP.NET MVC validation work.
The code sample below demonstrates how to add the DataAnnotation attributes to the model class properties.
using System.ComponentModel.DataAnnotations;

namespace Validation.Models {
    public class Clients {

        [Required(ErrorMessage = "First name is required")]
        [StringLength(15, ErrorMessage = "Must be under 15 characters")]
        public string FirstName { get; set; }

        [Required(ErrorMessage = "Email is required")]
        [EmailAddress(ErrorMessage = "Email is invalid")]
        public string Email { get; set; }

        [Required(ErrorMessage = "Age is required")]
        public int Age { get; set; }
    }
}
Once the data model is decorated with the data annotation attributes, you can enable the server-side validation and the unobtrusive client validation.
Enabling Server-Side Validation
Within the action methods that handle CardView callbacks for adding new records and updating existing records, check whether or not the model is valid using the ModelStateDictionary.IsValid property.
Controller code:
// Handles CardView callbacks for adding a new record.
[HttpPost, ValidateInput(false)]
public ActionResult CardViewPartialAddNew(MyProject.Models.Customer item)
{
    // Perform server-side model validation based on data annotation attributes.
    if (ModelState.IsValid)
    {
        // Add a new item to the data source.
    }
    else
        ViewBag.EditError = "Please, correct all errors.";
   // Returns the CardView's Partial View with a data model object.
   return PartialView("_CardViewPartial", GetData());
}

// Handles CardView callbacks for updating an edited record.
[HttpPost, ValidateInput(false)]
public ActionResult CardViewPartialUpdate(MyProject.Models.Customer item)
{
    // Perform server-side model validation based on data annotation attributes.
    if (ModelState.IsValid)
    {
        // Update the edited item within the data source.
    }
    else
        ViewBag.EditError = "Please, correct all errors.";
    // Returns the CardView's Partial View with a data model object.
    return PartialView("_CardViewPartial", GetData());
}
When an end-user submits data, the CardView sends a callback to the server, and the server validates user input. If user input is valid, data will be added to the data source. Otherwise, an error message will be displayed next to the CardView editor containing invalid data.
Enabling Unobtrusive Client Validation
With the steps described above, your application only performs server-side validation. In addition to server-side validation, you can enable client-side validation functionality. The client-side validation allows you to immediately validate user input without sending a callback to the server.
Client-side validation requires that you include the jquery-3...min.js, jquery.validate.min.js and jquery.validate.unobtrusive.min.js JavaScript references in your layout page (or in certain views that contain validation forms).
The code sample below demonstrates how to include the required JavaScript references.
<script src="~/Scripts/jquery-3.3.1.min.js" type="text/javascript"></script>
<script src="~/Scripts/jquery.validate.min.js" type="text/javascript"></script>
<script src="~/Scripts/jquery.validate.unobtrusive.min.js" type="text/javascript"></script>
Note
The JavaScript references should be added in the order they are specified in the code samples above.
To enable client-side validation for all pages in your project, add a key to Web.config.
...
<configuration>
    <appSettings>
        <add key="ClientValidationEnabled" value="true"/>
        <add key="UnobtrusiveJavaScriptEnabled" value="true"/>
    </appSettings>
</configuration>
...
To enable the client-side validation functionality for a specific view only, you can add the following code to the required view.
View code (Razor):
@{
    Html.EnableClientValidation();
    Html.EnableUnobtrusiveJavaScript();
}
Place the Partial View with the CardView’s code inside the <form> tag by using the Html.BeginForm() helper.
@using (Html.BeginForm()){
    @Html.Action("CardViewPartial")
}
Displaying Validation Error Messages
For Server-Side Validation
The DevExpress MVC CardView provides a card error row which is used to display validation errors. The MVCxCardViewEditingSettings.ShowModelErrorsForEditors option allows you to control whether or not it is required to display validation error messages for data editors within the edit form. Set the MVCxCardViewEditingSettings.ShowModelErrorsForEditors property value to false to disable the display of model validation errors.
For Client-Side Validation
The DevExpress ASP.NET MVC Data Editors have the ShowModelErrors property, which allows (when enabled) error messages to automatically be displayed within invalid editors when validation fails. The DevExpress ASP.NET MVC Data Editors provide their own placeholder for rendering validation error messages. Using a built-in error message placeholder allows you to flexibly control how errors should be displayed within editors by using settings exposed using the editor ValidationSettings property, such as ValidationSettings.ErrorDisplayMode.
The table below demonstrates how different ErrorDisplayMode property values affect validation error message appearance.
| ErrorDisplayMode property value | Description | Image |
|---|---|---|
| ImageWithText | An error message is represented by an error image and error text. |  |
| ImageWithTooltip | An error message is represented by an error image. The image’s tooltip displays the error text. | 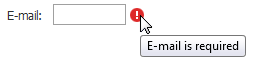 |
| Text | An error message is represented by an error text only. |  |
| None | A specific error frame is displayed near the editor. |  |